

Fixing up damaged plasterboard is one of those classic jobs every property owner faces sooner or later. It usually involves slapping some filler in a hole or crack, sanding it back, and hitting it with a fresh coat of paint. For tiny dings and old screw holes, a bit of spackle is often all you need. But when you're dealing with bigger gashes, you'll need a more robust solution to make sure the repair holds up.
Your Guide to Plasterboard Repairs on the Farm and Homestead
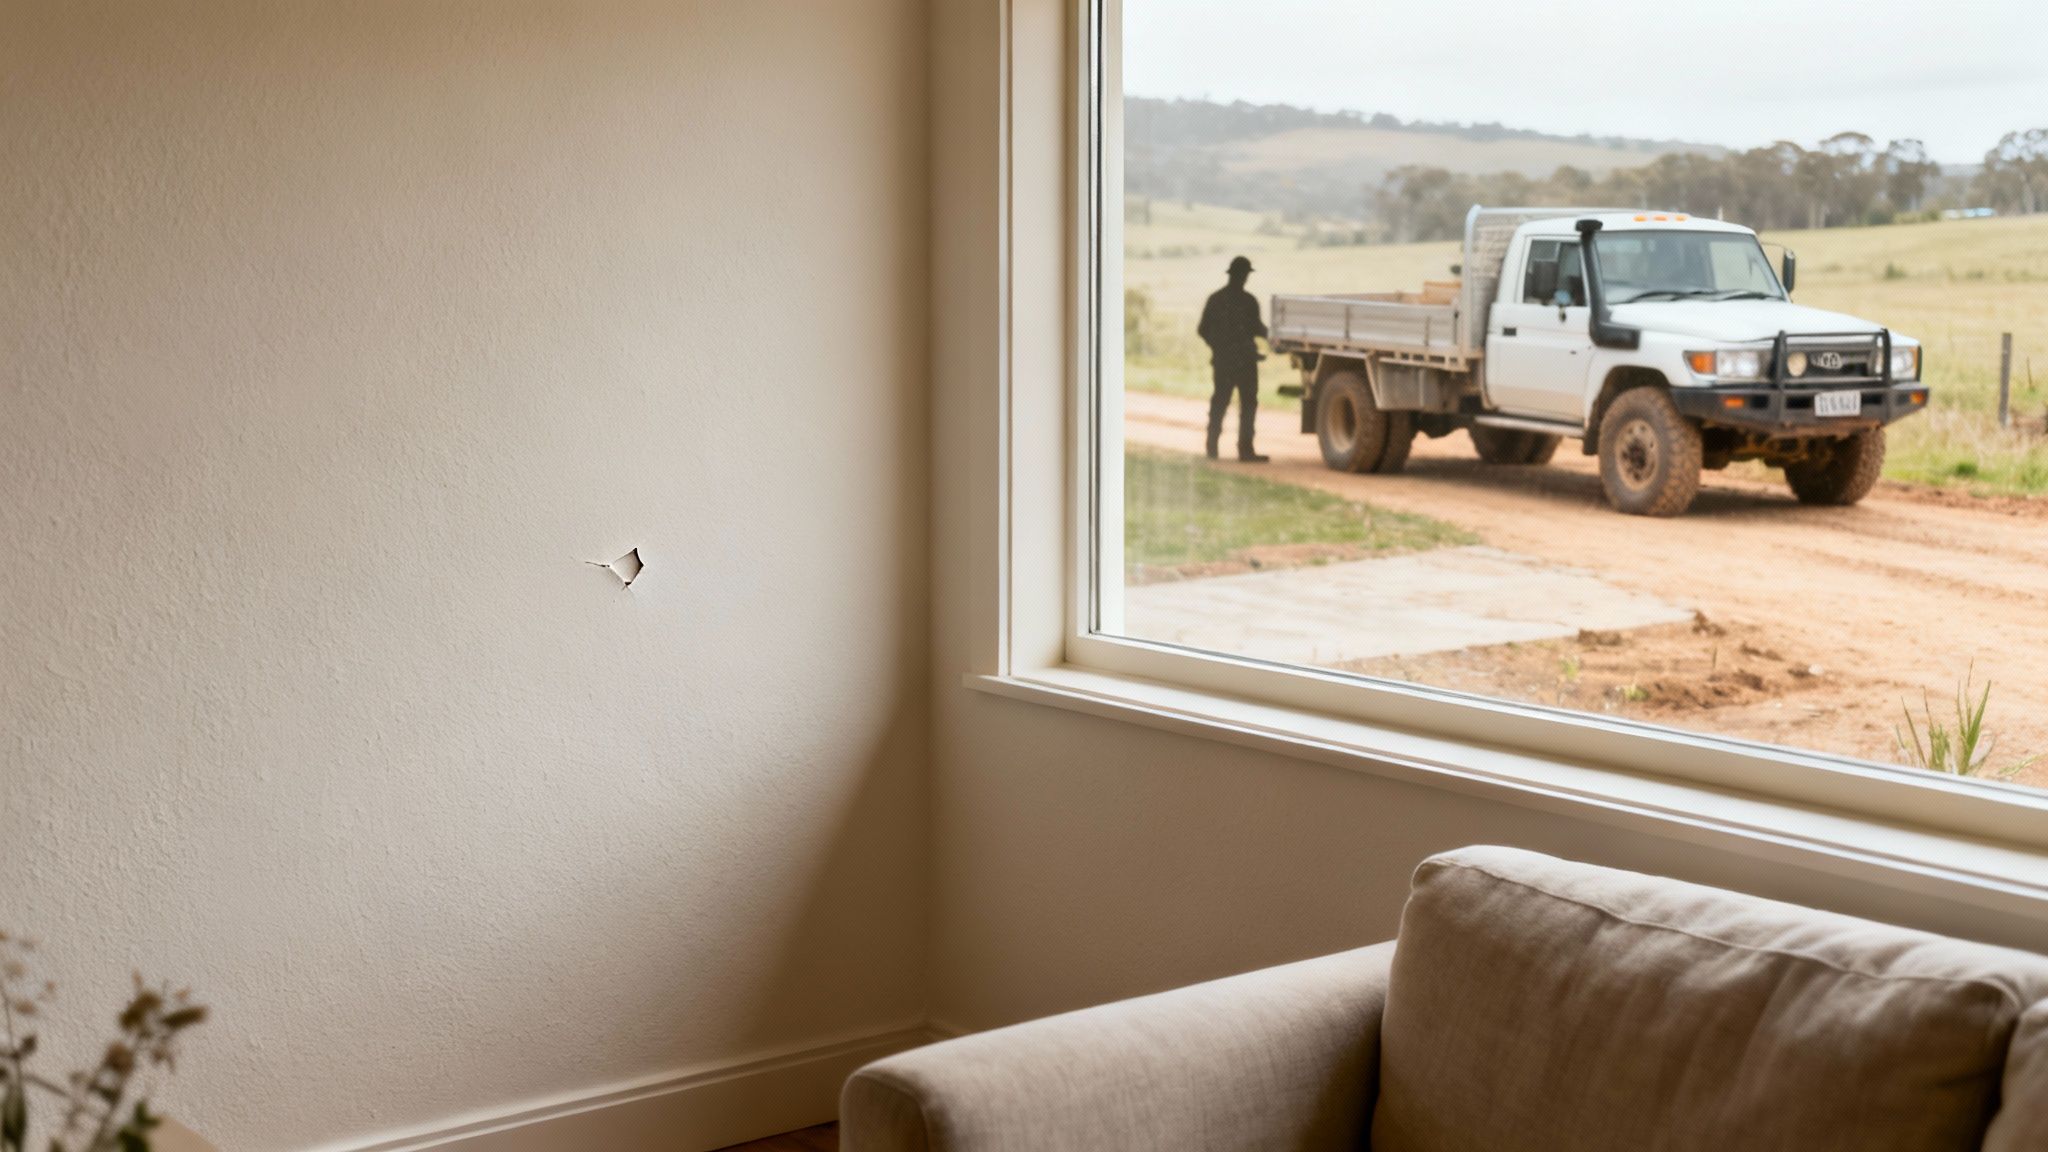
Living and working on a rural property in New South Wales throws some unique challenges at your home and sheds. Whether it's an accidental knock from a bit of gear or just the general wear and tear from our tough climate, plasterboard damage is pretty much a given.
A small hole might look like a simple cosmetic issue, but leaving it can invite bigger headaches down the track, compromising your home's insulation and even its structural integrity.
This guide is built for the hands-on needs of farm and homestead owners. We'll walk you through how to properly diagnose and fix common plasterboard problems like holes, stress cracks, and minor water damage. The aim is to give you the confidence to tackle straightforward plasterboard wall repairs yourself, but just as importantly, to know when it's time to call in a pro.
Tackling Repairs in Remote New South Wales
Here at Awesim Building Contractors, we get it. One of the biggest hurdles in rural property maintenance is simply getting someone out to you. For over 35 years, we’ve made it our business to serve the remote properties others can't or won't travel to. What makes us different is our purpose-built fleet, designed to handle the rugged terrain of regional NSW. We have a 10 tonne 4×4 truck to bring in materials and supplies for the most remote properties around New South Wales, allowing us to bring in labour, materials and equipment where and when it's needed the most.
Why Good Maintenance is More Important Than Ever
The need for skilled and reliable repair services is definitely on the rise. The Australian plastering industry, which covers all plasterboard wall repairs, has been booming, with revenues hitting an estimated $7.5 billion.
For those of us on rural properties, this trend points to a simple truth: as our homes and buildings get older, proper maintenance and expert repairs are crucial for preserving their value and keeping them functional.
This guide gives you a solid starting point for your plasterboard projects. If you're keen to get your hands dirty with other home improvement jobs, there are plenty of other practical skills you can learn about. Whether you're patching a small hole or trying to decide if the job is too big, getting the fundamentals right is the first step to looking after your property for the long haul.
Getting to the Bottom of Your Plasterboard Problems
Before you even think about mixing up some plaster, the first—and most important—step is to figure out exactly what you’re dealing with. It’s easy to spot a ding in the wall, but sometimes that little crack or stain is a sign of a much bigger headache, especially on rural properties that have to contend with everything the NSW climate throws at them. Getting the diagnosis right from the start saves you from doing the same job twice.
A classic mistake is to treat every crack and hole the same way. A hole from a piece of machinery getting knocked about is one thing, but a hairline crack snaking out from a window frame? That could be a hint that your building is shifting. Knowing the difference is what makes for a repair that actually lasts.
A good first step is simple: run your hand over the area. Does the wall feel solid, or is there a bit of a spongy, soft feel to it? If it’s soft, you've almost certainly got moisture involved, and that’s a problem you need to solve before any cosmetic patching begins.
Reading the Signs Your Walls Are Giving You
To really understand what's going on, you need to play detective for a moment. Different types of damage tell different stories, and knowing what to look for will help you decide if this is a quick DIY fix or a job that needs a more serious, professional approach.
We've put together a quick guide to help you assess the damage like a pro.
Plasterboard Damage Assessment Guide
This table breaks down the common issues we see on rural properties, what typically causes them, and your best first move.
| Type of Damage | Visual Cues | Common Rural Causes | Recommended Action |
|---|---|---|---|
| Small Holes & Dents | Small, contained indentations or punctures. | Accidental impacts from tools, equipment, or furniture. | Straightforward DIY patch job. |
| Stress Cracks | Fine, straight cracks near windows, doors, or corners. | Minor building settlement (common). | Monitor. If cracks widen or grow, it may signal a structural issue. |
| Discolouration/Stains | Yellow or brown patches, often with a "tide line". | Leaking roof, failing pipe, or condensation from poor ventilation. | Find and fix the water source first. The plasterboard may need replacing. |
| Bowing or Sagging | The plasterboard appears to be bulging or drooping. | Significant water damage, failed ceiling fixings, or a structural failure. | Do not ignore this. This is a serious issue requiring professional assessment. |
Knowing these signs is a genuinely useful skill for any homeowner. Given that plasterboard is the wall lining of choice in about 80% of Australian buildings, it pays to understand its weak points. Unchecked water leaks can sap up to 30% of a plasterboard panel's strength within a couple of years, turning what could have been a simple patch into a full-blown replacement. The Gyprock website has some great insights on general upkeep if you want to learn more.
Getting the Job Done, No Matter How Far Out You Are
For those of us on properties deep in rural New South Wales, the challenge isn't just figuring out the problem; it's the logistics of getting the right people and materials out to your site. This is where planning becomes just as critical as the repair work itself. At Awesim Building Contractors, we’ve structured our entire operation around this exact problem. Our 10 tonne 4×4 truck allows us to bring in all the necessary labour, materials, and equipment to get the job done right, exactly when and where you need it most. This capability takes the logistical nightmare off your plate, ensuring that no property is too far out for a professional, top-quality repair.
Your DIY Toolkit for Common Plasterboard Repairs
When you’re staring down a scuff, crack, or small hole in your plasterboard, having the right gear on hand is half the battle. A professional-looking repair isn't about owning the most expensive tools; it's about having the correct ones for the job. It empowers you to get a durable, seamless finish without having to call in a pro for every little thing.
Think of it this way: you wouldn't use a sledgehammer to hang a picture. Different types of plasterboard damage call for different tools and materials. A fine hairline crack needs a different touch than the hole left behind by an old wall anchor. Let's walk through what you actually need for these common DIY fixes.
Before you start patching, you need to know what you're dealing with. This simple diagnosis process is key to getting it right the first time.
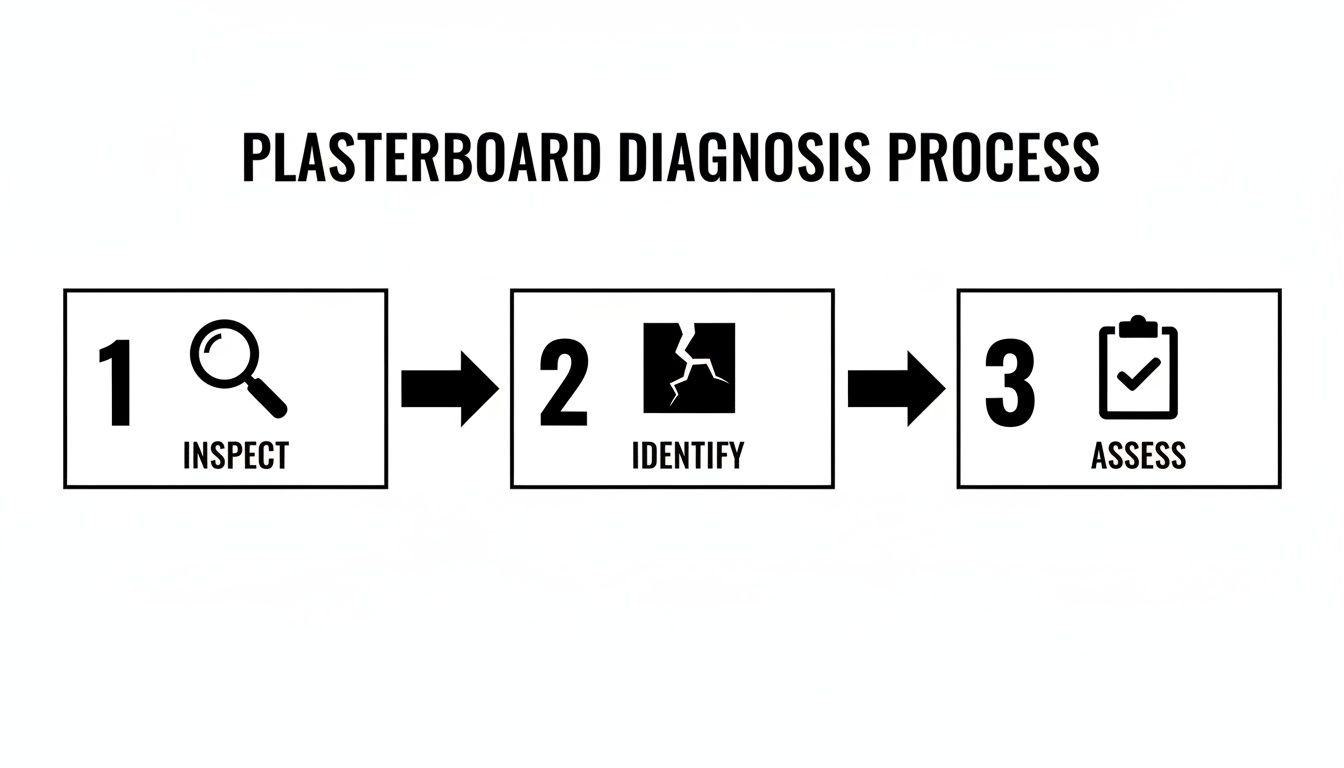
This "inspect, identify, and assess" approach is the foundation of any good plasterboard repair. It ensures you don't waste time and materials on the wrong method.
Assembling Your Essential Materials
The first step is gathering your materials. There’s nothing worse than having to down tools and make a run to the hardware store midway through a job. Here's a straightforward list of what you’ll want for most small-scale plasterboard wall repairs.
- Joint Compound (Plaster): This is the heart of the repair, often called "mud." For small jobs, a pre-mixed tub is incredibly convenient. If you’ve got a larger project on the go, powdered versions are more economical.
- Self-Adhesive Mesh Tape: This stuff is your best friend for reinforcing cracks and joins. It provides some structural integrity and stops the filler from cracking as it cures.
- Sandpaper: A few different grits are ideal. You’ll want a medium grit (around 120) to knock back the bulk of the dried compound, then a fine grit (180 or 220) to get that perfectly smooth finish ready for paint.
- Primer: Don’t skip this step. Primer seals the porous joint compound, which is crucial for ensuring your final coat of paint has a uniform sheen and doesn't "flash" (look different from the rest of the wall).
The Right Tools for a Clean Job
With your materials sorted, let's talk tools. You don't need a huge collection, just a few key items to apply everything effectively.
- Putty Knives/Scrapers: A flexible 10cm or 15cm knife is perfect for applying and feathering out the compound. It’s always handy to have a smaller one as well for getting into tight spots.
- Sanding Block or Pole Sander: For small patches, a simple sanding block gives you excellent control. If you’re tackling a larger repaired area or working on a ceiling, a pole sander will be a lifesaver for your arms and back.
- Utility Knife: This is essential for cutting your mesh tape cleanly and for trimming away any frayed paper around the damaged area before you start filling.
- Drop Sheets and Rags: Plastering can get messy. Protect your floors and furniture with a good drop sheet, and keep a few damp rags on hand for quick clean-ups.
Fixing Small Holes and Hairline Cracks
Alright, let's put these tools and materials to work. Small holes—like those from screws or picture hooks—are probably the most common repair you'll face. The secret is creating a solid base for the filler.
Start by cleaning the area of any loose debris. If there are raised paper edges around the hole, use the handle of your putty knife to gently press them inwards. This creates a slight concave, allowing the filler to sit flush with the wall surface once you’re done.
Apply a small amount of joint compound, pressing it firmly into the hole. The real trick here is to use thin layers. Don't try to fill the hole in one go, as a thick application will almost certainly shrink and crack as it dries.
A tip from the pros: learn to "feather" the edges. As you spread the compound, apply more pressure to the outer edge of your putty knife. This creates a thin, tapered edge that blends seamlessly into the existing wall and dramatically reduces how much sanding you'll have to do later.
For hairline cracks, the process is very similar but with one extra step. After cleaning the crack, apply a strip of self-adhesive mesh tape directly over it. The tape acts like a skeleton, reinforcing the weak spot and preventing the crack from coming back. Apply your joint compound directly over the mesh, again using thin, feathered layers.
Patience is key—allow each layer to dry completely. Rushing this is a classic mistake that leads to a poor finish. Once the final layer is dry, give it a light sand, wipe away the dust, and you're ready for primer. For a more detailed walkthrough, you can check out our guide on Gyprock repairs.
If you're dealing with a larger hole, the approach needs to be more structural. Best practice is to cut the damaged section into a neat square, going right back to the timber studs. This lets you screw in a new, perfectly sized piece of plasterboard, giving you a secure and level base that won’t crack or fail down the line.
Getting Supplies to Remote Properties
Of course, knowing what tools you need is one thing. Actually getting them to a remote property in rural New South Wales can be a whole other challenge, and it's a problem we understand well. At Awesim Building Contractors, we’ve built our service around solving this exact obstacle. We operate a 10 tonne 4×4 truck specifically to bring labour, materials, and equipment wherever they're needed. This unique capability means we can service the most remote properties, ensuring you get a high-quality repair no matter how far off the beaten track you are.
Achieving a Flawless and Invisible Finish
Once you’ve filled a hole or taped a crack, you're only halfway there. The true measure of a successful plasterboard wall repair is making it completely disappear, leaving no hint that damage ever existed. This finishing stage is what separates a quick patch-up from a truly professional result.
It all comes down to careful sanding, proper priming, and getting a perfect match with your existing wall. Rushing this part is a classic mistake, and it almost always results in a patch that sticks out like a sore thumb. A little extra patience here will pay off tenfold when the final coat of paint goes on.
The Art of Sanding for a Seamless Surface
Sanding is what blends your repair into the surrounding wall, but it’s a bit of a balancing act. You need to flatten the joint compound until it’s perfectly flush without chewing up the paper face of the plasterboard around it.
Kick things off with a medium-grit sandpaper—something around 120-grit—on a sanding block. The block ensures you apply even, consistent pressure. Use gentle, sweeping motions to knock down the high spots and feather the edges of the compound.
When it feels nice and level, switch to a fine-grit paper like 180-grit or even 220-grit. This second pass erases any minor scratches left by the coarser paper, giving you a glass-smooth surface that’s ready for the next step.
Pro Tip: Grab a torch or a work light and hold it flat against the wall, shining across your repair. This low-angle light will cast shadows and instantly reveal any tiny bumps or dips you might have missed with your eyes alone.
Priming to Prevent Flashing
Ever painted a wall and noticed the patched spot has a different sheen? That annoying effect is called 'flashing'. It happens because fresh joint compound is like a sponge—it soaks up paint differently than the rest of your painted wall, creating a dull or shiny spot.
The fix is simple: prime the repair before you paint.
- It seals the porous surface: Primer creates a uniform base, so the new patch and the old wall absorb paint at the same rate.
- It guarantees an even finish: Your final paint coat will have a consistent, even sheen from corner to corner.
- It helps the paint stick: A good primer gives the topcoat something to grip onto, making for a much more durable finish.
Don't be tempted to skip this. A quick coat of a quality sealer-primer is the single most important thing you can do to make your plasterboard wall repair truly vanish.
Matching Paint and Texture
Getting the paint colour right can be a challenge, especially if the original has faded over the years. If you don’t have the leftover paint, your best bet is to slice a small chip—about the size of a 10-cent coin—from behind a piece of furniture or another hidden spot. Take it to your local paint shop, and they can scan it to get a perfect match.
Many older homesteads out here in rural NSW also have textured walls, which presents another hurdle. You have to replicate the pattern, or the repair will never look right.
- Stipple Texture: For that common dabbed look, you can often get close by dipping a stiff-bristled brush or even a scrunched-up rag into slightly thinned-out compound and dabbing it onto the patch.
- Roller Texture: Some subtle patterns were created with a thick-napped roller. You can try to mimic this by rolling on a thin layer of compound.
- Spray Texture: You can buy aerosol texture sprays for smaller patches. They work well, but it’s crucial to practise on a scrap piece of cardboard first to get your spray distance and technique down pat.
The Challenge of Remote Finishing
Of course, achieving a flawless finish on a remote property brings its own set of headaches. Finding the right texture compound or getting a specific paint colour matched can involve a long drive into town. This is exactly where our unique setup at Awesim Building Contractors shines. Our 10 tonne 4×4 truck is more than just a delivery vehicle; it's a fully-equipped mobile workshop. We load it up with everything needed for a perfect finish and bring our labour, materials, and equipment straight to your front gate. This lets us get the job done right, where and when it's needed most, no matter how far out you are in New South Wales.
If you’re thinking about your paint job, our guide on finding great painters in Dubbo has some useful local tips. To ensure your repair blends seamlessly, you might consider engaging professional painters and decorators who specialise in achieving that flawless look.
Knowing When to Call In the Pros
While getting your hands dirty with a bit of DIY can be satisfying, a big part of looking after your property is knowing when a job is bigger than it seems. Some plasterboard problems are more than just cosmetic blemishes; they’re little red flags signalling deeper issues that a quick patch-up will only hide, not fix.
Taking on a serious repair without the right know-how can, unfortunately, turn a small problem into a much larger, more expensive headache. A DIY approach is perfect for minor dings or a stable hairline crack. But when you’re staring at extensive damage, it’s often wiser to put the tools down and make a call.
When the Damage Runs Deeper
Some types of plasterboard damage are clear signs that you need an expert eye. These situations aren’t just about getting a perfectly smooth finish—they're about making sure the bones of your home are safe and sound.
If you spot any of these tell-tale signs, it's a strong signal that the job is more complex than it appears on the surface.
- Significant Water Damage: If the plasterboard feels soft, is sagging, or has any signs of mould, the whole panel needs to go. A professional won't just replace the board; they'll track down the source of the moisture to stop it from happening all over again.
- Cracks That Keep Coming Back (or Are Just Plain Big): A crack that reappears after you've fixed it usually points to building movement or stress on the foundations. An expert can determine if it's just normal settling or a symptom of a more serious structural issue.
- Anything to Do With Ceilings: Let's be honest, ceiling repairs are tricky and carry more risk. The sheer weight of plasterboard, especially if it’s been weakened by water, is a genuine safety hazard. A pro has the gear and experience to ensure the new board is properly and safely secured to the joists above.
DIY Repair vs Professional Help
It can be tough to decide whether to roll up your sleeves or bring in an expert. To make it a bit clearer, here’s a quick rundown of common scenarios we see and our honest recommendation for each.
| Situation | Recommended DIY Approach | When to Call Awesim Building Contractors |
|---|---|---|
| Small Dents & Screw Holes | Fill with compound, give it a light sand, prime, and paint. A straightforward weekend job. | When you have hundreds of them across multiple rooms after a renovation or tenancy change. We can get it done far more efficiently. |
| A Single, Stable Hairline Crack | Use proper mesh tape and joint compound. It's a great skill to learn for a lasting fix. | When cracks are wide, actively growing, or showing up near structural beams, windows, or foundations. |
| Minor Water Stain (Completely Dry) | First, make sure the leak is 100% fixed. Then, hit it with a good stain-blocking primer before you paint. | For any plasterboard that feels soft, is bowed, or shows any sign of mould. This always requires full panel replacement. |
| Large Holes in Walls or Ceilings | We don't recommend this for DIY. It involves structural and safety risks that are best left to experienced hands. | Always. Large-scale repairs need proper framing, bracing, and a professional finish to look right and be secure. |
The Awesim Advantage for Rural and Remote NSW
For those of us living in the more remote corners of New South Wales, the challenge is often a double-whammy: first, figuring out if you have a serious problem, and second, finding a qualified team who can actually get to you with all the right gear. That logistical nightmare is exactly why Awesim Building Contractors is set up the way it is. Our expertise in complex plasterboard wall repairs is matched by our unique ability to operate just about anywhere. Our specialised 10 tonne 4×4 truck allows us to bring our labour, materials, and equipment to tackle any job where and when it’s needed the most. It takes the logistical burden completely off your shoulders, ensuring no property is too far out for a professional, flawless repair. If you're looking for Gyprock repairs near you and feeling stuck, it's worth seeing what a professional service can do.
Your Plasterboard Repair Questions Answered
Even the most straightforward guides can leave you with a few lingering questions. When it comes to something as hands-on as repairing plasterboard, it's completely normal to have a few "what ifs."
We get calls all the time from property owners across rural NSW with these exact queries. So, let’s run through some of the most common ones we hear—getting these answers straight from the beginning can save you a world of trouble down the track.
What’s the Real Cost to Repair Plasterboard Out Here?
This one’s a classic “how long is a piece of string?” question, but I can give you a pretty good idea. The cost really hinges on the type and size of the damage. If you’ve got a professional in to patch a simple doorknob hole or a small ding, you might only be looking at a few hundred dollars.
But for bigger jobs, like sorting out a water-damaged ceiling or replacing a full section of wall, you’re more likely in the range of $45 to over $90 per square metre. When we quote a job at Awesim, we lay everything out on the table. We factor in the unique logistics of getting to your rural property so there are absolutely no nasty surprises later on.
Can I Fix Water Damaged Plasterboard Myself?
Look, sometimes you can. If you've had a minor leak that’s long gone, and all you’re left with is a small, bone-dry water stain on a solid bit of wall, then yes. A high-quality stain-blocking primer followed by a couple of coats of paint will often do the trick.
However, the moment that plasterboard feels soft, spongy, or is sagging even slightly, it’s a non-negotiable—it has to be cut out and replaced. And you must fix the source of the water first! If you're dealing with anything more than a small patch of damp, it's best to call in a professional. We can make sure there isn't a deeper structural problem or a hidden mould issue that could compromise your family's health.
How Long Does a Plasterboard Repair Actually Take?
A good plasterboard repair is not a rush job. While you can often get the initial patching for a small crack or hole done in a day, the real time is in the drying. That joint compound needs to cure completely between each coat, and you can’t cheat it.
All up, including the sanding and painting stages, a proper repair from start to finish will usually take 2 to 3 days. Of course, if we’re replacing entire sheets of plasterboard, it’s going to take a bit longer. We always aim to work as efficiently as possible to keep the disruption to your household to a minimum.
The biggest mistake we see is people rushing the drying process. Slapping on a second coat of plaster or painting over a patch that isn't fully cured will almost always lead to cracking or a botched finish. A little patience goes a long way.
How Do You Service Really Remote Properties?
This is a big one for folks living way out of town. It’s not just about the repair; it’s about the sheer challenge of getting people and materials to the site. Honestly, this is a problem we’ve built our business around solving. With our 10 tonne 4×4 truck, we can bring in all the necessary supplies for the most remote properties around New South Wales. This purpose-built rig allows us to haul labour, equipment, and bulk materials—full-size plasterboard sheets, bags of compound, you name it—directly to your front door. It means we can tackle any plasterboard wall repair properly, delivering a top-quality job wherever you are.
For professional, reliable building and repair services that reach every corner of rural NSW, contact Awesim Building Contractors. Let us handle the tough jobs so you can focus on what matters most. Find out more at https://awesim.au.


