

Let me be completely honest: figuring out whether a secondary dwelling makes sense on your country property can feel like trying to read the sky for rain when you’ve got a herd to watch.
Do you ever stand on the edge of the paddock, picture a modest guest house perched beside the shed, and wonder if you’re stepping into a legal maze or just adding another comfortable space for family and workers?
That’s exactly where a secondary dwelling builder rural nsw comes in – not a faceless corporate office, but a seasoned team that understands the quirks of outback building, from soil that shifts after a storm to council regulations that change from Dubbo to Armidale.
We’ve spent decades turning old barns into cosy lofts, converting spare blocks into fully‑licensed granny flats, and fitting solar‑ready roofs that survive the harsh NSW sun. The goal isn’t just to tick a box; it’s to give you a functional, low‑maintenance space that blends with the landscape and adds real value to your farm.
Imagine waking up to the scent of eucalyptus, stepping onto a porch that’s already wired for a small kitchen, and knowing the build was designed to cope with everything from dust storms to bushfire‑season prep. That peace of mind is what we aim to deliver.
So, what should you ask yourself before you sign the contract? First, think about the purpose – is it a weekend retreat, a rental income stream, or a safe spot for seasonal workers? Next, consider the site – does it have good drainage, easy access for trucks, and proximity to existing utilities?
Once those basics are clear, the right builder will walk you through the approval process, suggest cost‑effective materials that stand up to the elements, and schedule work around your farming calendar so you’re never left without a working shed.
Ready to turn that vision into a reality? Let’s dive in and explore the steps you need to take, the pitfalls to avoid, and how a local secondary dwelling builder rural nsw can make the whole journey feel as smooth as a freshly ploughed furrow.
Buildings in Rural NSW
A seasoned secondary dwelling builder rural nsw can turn your farm’s spare block into a low‑maintenance, weather‑ready guest house that adds value and peace of mind. We’ll guide you through site checks, approvals and material choices, so you avoid costly surprises and get a comfortable, compliant dwelling ready for workers, family or rentals.
Step 1: Planning Your Secondary Dwelling
First thing’s first – why are you even thinking about a secondary dwelling? Maybe you need a safe spot for seasonal workers, a weekend hide‑away for the kids, or a little rental cash flow to shave a few hundred dollars off the mortgage. Whatever the reason, pinning down the purpose helps you size the project and keeps the whole process from feeling like a wild goose chase.
Grab a notebook and sketch the block you have in mind. Is the land level or does it roll like a gentle hill? Does it drain quickly after a rainstorm or does water linger? Those little details dictate foundation type, slab size and even the kind of waterproofing you’ll need. In the outback, a soggy patch can turn a simple slab into a costly nightmare.
Check the zoning and SEPP limits
The NSW Housing SEPP says you can build a secondary dwelling of up to 60 m² on any lot that’s at least 450 m², provided you meet the setback and height rules. That’s the magic number you’ll see in most councils’ guidelines according to the NSW Planning portal. If your block is smaller, you’ll still be able to apply, but you’ll have to go through a full Development Application instead of the faster Complying Development route.
Don’t forget the optional clause 5.5 for rural zones – some councils have extra distance requirements between the principal house and the new dwelling as outlined in the Town Planning guide. It’s worth a quick phone call to your local council to confirm.
Map out services and access
Next, walk the site with a meter stick (or just your phone’s measuring app). Measure the distance from the existing house to the nearest power pole, water mains and the driveway. If you need to extend a service line, factor in trenching costs – they can easily add $5,000–$10,000 to the budget.
Access for trucks is another hidden snag. A 3‑tonne truck needs a turning radius of about 5‑6 metres. If the path is too narrow, you might have to create a temporary gravel road or even reposition the driveway. That’s the kind of thing you discover early when you bring in a Farm New Builds – Awesim team – they’ll scope the site before any concrete is poured.
Budgeting and financing
Start with a rough spreadsheet: design fees ($3‑$8k), council/certifier fees ($3‑$5k), utility extensions, and the build itself. For a custom granny flat in regional NSW, the construction cost usually sits between $140,000 and $2000,000. A kit can shave a few thousand off the headline, but remember the hidden costs we mentioned earlier. Add a 10 % contingency – you’ll thank yourself if a surprise bushfire‑risk assessment pops up.
If you’re planning to rent the unit, run the numbers: a two‑bedroom flat in a town like Dubbo can fetch $250‑$350 a week. That’s roughly $13,000‑$18,000 a year, which often covers the loan repayments and leaves a tidy profit.
Choosing between kit and custom build
Here’s a quick decision tree you can scribble on the back of a napkin:
- If you love DIY, have a solid toolbox and can juggle trades, a kit might save $10‑$20k.
- If you need a fast turnaround, want a warranty, or have a tricky site (steep slope, heritage tree), a custom build with a reputable rural builder is the safer bet.
Real‑world example: John from Gunnedah ordered a 2‑bed kit for $75k, spent another $30k on foundations, services and labor, and ended up at $110k – only slightly cheaper than a quoted custom build, but he spent three extra months managing the project himself.
Meanwhile, Sarah in Armidale hired a local secondary dwelling builder, paid $145k for a turnkey two‑bed flat, and moved in within eight weeks. She’s now collecting $300 a week in rent, which means the flat pays for itself in under seven years.
Action checklist
- Define the purpose (rental, family, workers).
- Verify lot size ≥ 450 m² and zoning compliance.
- Measure setbacks: at least 0.9 m side, ~3 m rear for single‑storey.
- Map utilities and access routes.
- Get a preliminary cost estimate (design + soft costs).
- Decide kit vs custom – weigh time, warranty, site complexity.
- Engage a local secondary dwelling builder rural nsw for a site‑specific plan.
- Apply for a Complying Development Certificate or DA.
Once you tick those boxes, you’ll have a clear path from idea to a solid foundation. And if you ever get stuck, a quick chat with a local builder can clear up the mystery of “do I need a separate water meter?” – they’ve seen it a hundred times.
Need a tech‑savvy side note? For those who love to automate their budgeting spreadsheets, there’s a handy online tool that uses AI to spot calculation errors in real‑time – how to use a JavaScript error analyzer online AI for faster debugging. It’s a neat trick to keep your numbers honest.

Step 2: Securing Council Approvals
Alright, you’ve done the legwork – checked the lot size, mapped the services and even had a quick chat with a local builder. Now comes the part that makes most farm owners break into a sweat: getting the council on board.
Know which route you’re taking
In NSW you’ve got two main pathways – a Complying Development Certificate (CDC) for the straightforward cases, or a full Development Application (DA) when the council needs a deeper dive. The difference? A CDC can be approved in a few weeks, while a DA might take a few months and involve neighbours, heritage checks and possibly a bushfire assessment.
So, how do you decide? If your secondary dwelling sits on a lot that meets the SEPP size and setback rules, and you’re not in a bushfire‑prone zone, you’re probably safe to go the CDC route. Anything outside those neat boxes – like a steep slope or a heritage‑listed homestead nearby – will push you into the DA lane.
Gather the paperwork early
Here’s a quick checklist that saves you a trip back to the council office:
- Site plan showing the existing house, proposed dwelling, setbacks and access routes.
- Survey plan signed by a registered land surveyor.
- Floor‑plan and elevations – even a rough sketch works for a CDC, but a DA wants more detail.
- Engineering reports if you’re building on a slope or need a new footings design.
- Bushfire Attack Level (BAL) assessment if you’re in a bushfire‑prone area.
- Stormwater management plan – councils love to see how you’ll handle runoff.
Having these in hand before you knock on the council door cuts the back‑and‑forth by at least half.
Talk to a certifier – your new best friend
Most secondary dwelling builder rural nsw teams work with a private certifier who knows the local council’s quirks. A certifier will review your drawings, flag any missing items and often submit the application on your behalf. Think of them as the translator between your farm‑side jargon and the council’s legalese.
And here’s a tip: ask the certifier if they can do a pre‑submission check. It’s a small fee, but it catches things like an incorrect driveway width before the council ever sees the file.
Navigate the council process
Once the application is lodged, you’ll usually get a notification of “assessment in progress”. That’s when the council’s planning officer will look at compliance with zoning, SEPP limits and any local environmental overlays. If they spot an issue, they’ll issue a “request for further information” (RFI). Don’t panic – it’s just their way of saying “give us a bit more detail”.
Typical RFIs include: “show us the proposed water meter location”, “provide a neighbour notification record”, or “clarify the roof pitch for the BAL assessment”. Respond promptly and you’ll keep the timeline moving.
Sometimes the council will call a site visit. That’s a good sign – it means they’re taking your proposal seriously. Bring along your builder, the surveyor and a copy of the site plan. A quick walk‑through can clear up any lingering doubts faster than a dozen emails.
Final approval and next steps
When everything checks out, you’ll receive either a CDC or a Development Consent (DA approval). Both come with conditions – things like “install a rainwater tank by X date” or “maintain the existing driveway width”. Make a habit of writing those conditions into your project schedule; missing a condition can halt construction and cost you extra.
Now that you have the green light, you can hand the paperwork back to your secondary dwelling builder rural nsw and get the first shovel in the ground.
Need a visual guide? The video below walks through a typical council submission for a rural secondary dwelling.
Remember, the council process is less about bureaucracy and more about making sure your new guest house sits safely on the land and won’t cause headaches for neighbours. Keep the lines of communication open, stick to the checklist, and you’ll find the approval part of the build surprisingly painless.
Step 3: Designing for Rural NSW Conditions
Now that you’ve got the council’s nod, the next big question is: how do we make sure the secondary dwelling actually survives the quirks of rural NSW? That’s where good design meets real‑world experience.
Know the climate and soil before you draw a line
First off, swing by the site after a rain and look at how the ground reacts. Does the earth turn to mud or does it stay firm? On the western slopes of the New England region, a heavy clay can swell and crack, while the western plains often sit on sandy loam that drains fast but can shift under a heavy slab.
Ask yourself: will a shallow slab suffice, or do you need a deeper footing with concrete pads? A seasoned secondary dwelling builder rural nsw will usually recommend a footing depth of at least 500 mm in clay soils, and a wider base if the land is prone to movement.
Bushfire‑prone land isn’t optional
If your property sits in a BAL (Bushfire Attack Level) zone, you can’t just copy‑paste a city granny flat design. The NSW Planning portal notes that “you cannot do a complying development” on land at risk of ember attack or direct flame exposure, meaning you’ll need a full Development Application and stricter building standards as outlined by NSW Planning.
Practical steps? Use non‑combustible cladding on the exterior, raise the roof pitch to at least 30°, and install ember‑proof vents. It may feel like extra work, but it’s the difference between a guest house that lasts ten years and one that’s gone after a single fire season.
Water, energy and off‑grid options
Rural properties often have limited mains water, so think about rainwater tanks right from the design stage. A 2 000‑litre tank can comfortably supply a two‑bedroom flat for a dry summer, especially if you pair it with low‑flow fixtures.
Solar isn’t a nice‑to‑have; it’s a must. Position the roof to capture the strongest sun angle (north‑facing in the southern hemisphere) and size the array for at least 4‑5 kWh daily use – that covers a fridge, lights and a modest kitchen.
Don’t forget battery storage if you want power for evenings or for when a storm knocks out the grid. A 5 kWh lithium system will keep the lights on and the fridge humming through a night‑time outage.
Materials that love the outback
When you’re picking timber, go for treated hardwood or steel framing. Untreated pine will warp in the humidity of the Riverina, while steel resists termite attack on the far western stations.
Flooring? Polished concrete is low‑maintenance and tolerates dust storms, but if you prefer a warmer feel, opt for sealed timber decking with a slip‑resistant finish – perfect for a porch where you might slip off muddy boots.
Roofing should be Colourbond steel or metal tiles with a reflective coating. It sheds rain, reflects heat and, crucially, meets the fire‑rating requirements for most rural councils.
Quick design checklist for your builder
- Confirm soil type and decide on slab vs. pier foundations.
- Identify BAL rating; if > 12, plan for full DA and fire‑resistant materials.
- Size rainwater tank and solar array based on expected occupancy.
- Select termite‑treated timber or steel framing.
- Choose non‑combustible cladding and a roof with a minimum 30° pitch.
- Plan access for a 3‑tonne truck – at least 5‑6 metres turning radius.
- Include space for a separate water meter if the council requires it.
Bottom line: designing for rural NSW isn’t about ticking boxes; it’s about respecting the land, the climate and the safety of anyone who steps inside. When you partner with a local secondary dwelling builder rural nsw, you get a design that’s rugged enough for a dust storm, compliant enough for the council, and cosy enough for a weekend getaway or a worker’s rest stop.
Ready to sketch the next steps? Grab a notepad, walk the site at sunrise, and jot down the three things that feel most “out‑of‑place”. Those are the clues that will shape a design that truly belongs on your farm.
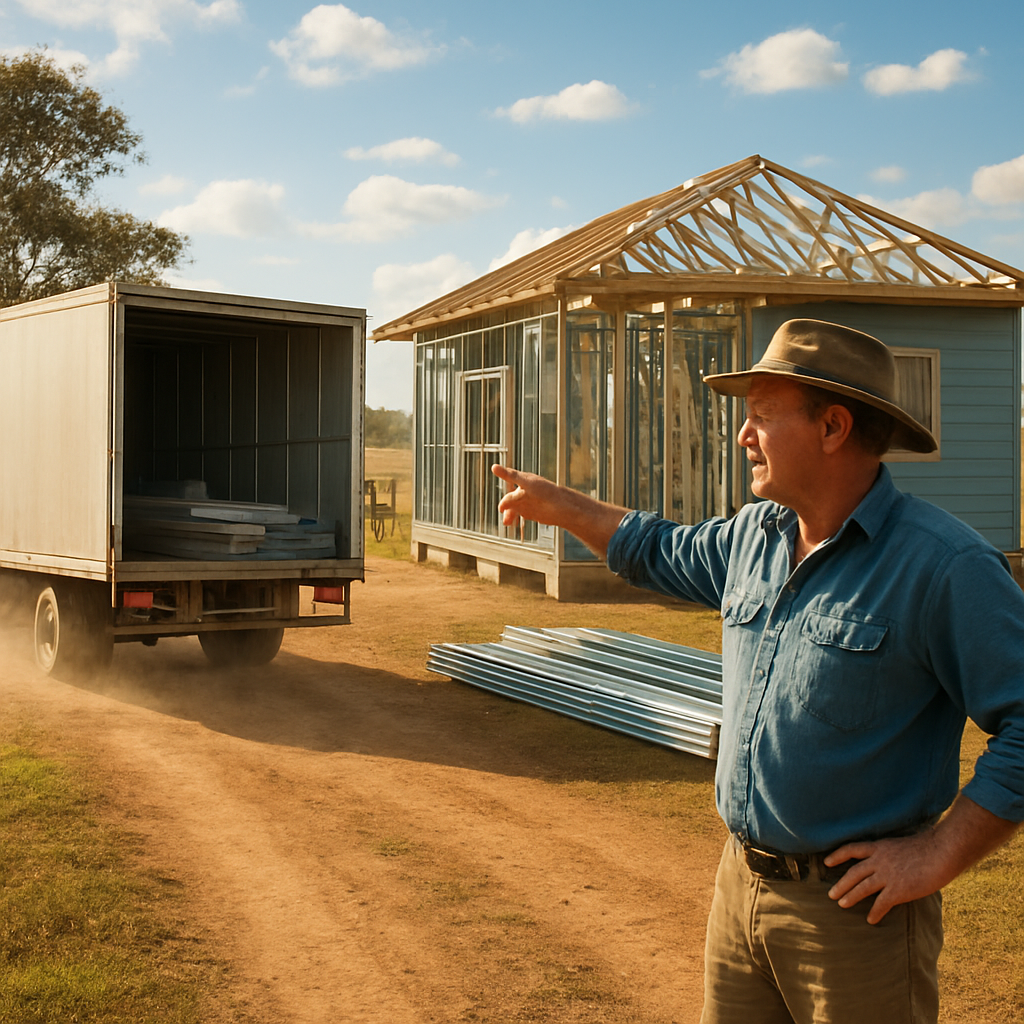
Step 4: Managing Build Logistics on the Farm
Now that the design is stamped and the council green‑light is in your pocket, the real work begins – getting all the bits and pieces onto the farm in the right order. It sounds simple, but without a clear logistics plan you’ll end up with trucks queuing in the mud, material shortages, and a schedule that spirals out of control.
So, how do we keep the chaos at bay? Think of the build like a well‑timed milking routine: everything has its slot, and you only move on when the previous step is done.
Map out the build timeline before the first shovel hits the ground
Start with a master Gantt‑style chart – even a hand‑drawn one works on a farm kitchen table. Break the project into five buckets: site prep, foundation, shell, services, and finish. Assign realistic durations (e.g., 2 weeks for earthworks, 1 week for footings) and flag any tasks that depend on weather.
Ask yourself: “If a thunderstorm hits next week, which activities can I push back without costing extra?” That question will reveal the critical path and give you leeway for the inevitable rain‑out.
Coordinating materials and services
A secondary dwelling builder rural nsw like Awesim will already have a preferred supplier list, but you still need to lock in delivery windows. Order long‑lead items – steel joists, Colourbond roofing, and any custom windows – at least four weeks ahead. For quicker items such as timber studs or conduit, a two‑week buffer is usually enough.
Real‑world example: Tom from Bourke ordered his steel frames three weeks early, but the delivery truck got stuck on a wet track. He saved the day by having a local timber yard on standby with pre‑cut studs, so the crew could keep the walls up while waiting for the steel.
Tip: schedule deliveries for early morning when the farm road is dry and traffic is light. It also gives you the chance to inspect the load before the crew starts working.
Managing on‑site traffic and safety
Farm lanes are often narrow and unsealed. Mark a clear turnaround zone for the 3‑tonne truck – at least 5‑6 metres of flat ground, preferably with crushed rock to prevent wheels sinking. Use traffic cones and a simple “one‑way” sign to keep everyone moving in the same direction.
Safety isn’t just about trips over cables. If you have livestock nearby, set up a temporary fence or a “keep out” rope line. That avoids a curious sheep wandering into a concrete pour and breaking a pipe.
Contingency planning for weather and delays
Rural NSW can swing from a scorching 38 °C day to a sudden downpour in minutes. Build a 10 % time contingency into each major phase and keep a small reserve of quick‑dry sand‑cement mix on site. When a rainstorm hits, you can still finish a footings pour without waiting for a new batch.
Data from the rural housing reforms notes that demand for on‑farm accommodation is high, meaning contractors are booked solid. That pressure makes it even more important to have a backup crew or an extra day of labour budgeted.
Quick logistics checklist
- Confirm delivery dates for long‑lead items (steel, windows, roof panels).
- Prep a 5‑6 m turning radius on the access lane with compacted stone.
- Set up a “site safety board” with daily tasks, weather forecast, and contact numbers.
- Arrange a standby supplier for fast‑track items (timber, conduit).
- Allocate a 10 % time buffer per phase and a $2 000 material contingency.
- Brief the crew on livestock safety and traffic flow each morning.
When you run through these steps with your secondary dwelling builder rural nsw, the build feels less like a gamble and more like a well‑orchestrated farm operation. You’ll finish on schedule, stay within budget, and end up with a solid, fire‑rated guest house that’s ready for the next season’s workers or family visits.
Step 5: Comparing Builder Options
Alright, you’ve got the site, the budget, and the dream – now it’s time to pick the right hands to bring it to life.
Do you go with a full‑service custom builder, a kit supplier, or a hybrid that mixes both? Each route has its own rhythm, cost curve, and risk profile.
Custom secondary dwelling builder rural NSW
A full‑service builder like Awesim will manage everything from design approvals to the final roof‑top inspection.
Because they live in the region, they know the quirks of rural soil, the local council’s favourite inspectors, and the nearest supplier of fire‑rated cladding.
What’s the downside? You’ll pay a premium for that peace of mind – typically 10‑15 % more than a kit, but you also lock in a single point of contact who can troubleshoot a surprise bushfire‑risk assessment on the fly.
Kit homes – the fast‑track option
Kit packages arrive pre‑cut, pre‑engineered and often include a detailed assembly manual.
They’re a favourite for owners who love a hands‑on approach or have a trusted crew on‑site.
Because the majority of the work is done off‑site, you shave weeks off the schedule and often save $5‑$10 k on labour.
But remember: you’ll still need a local supervisor to handle foundations, utility connections, and any site‑specific tweaks for bushfire compliance.
Hybrid builders – the best of both worlds?
Some firms will assemble a kit on‑site while providing design services and project management.
Think of it as ordering a pre‑fitted wardrobe and hiring an interior designer to make sure it fits your bedroom perfectly.
Hybrid models can reduce the guess‑work of DIY while keeping the kit’s price advantage.
Ask yourself: do you have the time to coordinate multiple trades, or would you rather hand the baton to a single manager?
Key decision checklist
Grab a coffee and run through this quick list before you sign any quote.
- Scope of work – does the builder handle everything from footings to final finishes?
- Local expertise – can they navigate NSW’s bushfire‑prone zone rules?
- Cost transparency – is there a clear breakdown of materials, labour, and contingency?
- Timeline – does the schedule align with your farming calendar?
- Warranty – what’s covered and for how long?
Do you feel a gut instinct about one option? Trust it, but back it up with facts.
Side‑by‑side comparison
Notice how the cost ranges overlap? That’s because site conditions – like a steep slope or a remote power hookup – can swing the numbers up or down.
| Option | Typical Cost (incl. contingency) | Timeframe | Pros | Cons |
|---|---|---|---|---|
| Full‑service custom builder | $120‑$150 k | 12‑20 weeks | One‑stop shop, local knowledge, full warranty | Higher price, less control over daily schedule |
| Kit home (self‑assemble) | $90‑$110 k | 6‑10 weeks | Lower cost, faster delivery, predictable design | Requires on‑site supervision, limited customisation |
| Hybrid (kit + project management) | $100‑$130 k | 8‑14 weeks | Cost‑effective, professional oversight, some flexibility | Potential coordination headaches if manager isn’t local |
Speaking of numbers, the NSW Productivity Commission’s recent cost‑feasibility study notes that secondary dwellings in regional areas typically sit between $130 k and $190 k, depending on design complexity and site access according to the state report.
So, what’s your next move?
If you’re leaning toward a custom builder, schedule a site walk‑through and ask for a detailed scope sheet.
If the kit route feels right, request a sample module and check the connection details for water and electricity.
And if you’re torn, ask a few local farms who have already built secondary dwellings – their stories often reveal the hidden costs of “cheaper” options.
Bottom line: the right choice aligns with your timeline, budget tolerance, and how much you enjoy being in the driver’s seat.
Ready to compare quotes? Pull them into a simple spreadsheet, colour‑code the “must‑have” columns, and let the numbers do the talking.
FAQ
What does a secondary dwelling builder rural nsw actually do?
A secondary dwelling builder rural nsw is a local contractor who specialises in adding a small, self‑contained house to an existing farm property. They handle everything from site assessment and council paperwork to foundations, framing, services and the final handover. Because they know the quirks of outback soil, bushfire zones and farm access, they can tailor the design so it blends with your land while staying on budget.
How much will a secondary dwelling cost on a farm in regional NSW?
Cost can vary a lot, but most secondary dwellings in regional NSW fall between $90 k and $150 k once you include foundations, services and a 10 % contingency. A kit‑home might shave $10‑$20 k off the headline, while a full‑service custom builder adds the peace of mind of a single point of contact and a warranty. Your final number will hinge on site access, soil type and any extra fire‑rating measures.
Do I need council approval for a secondary dwelling on my property?
Yes – almost every secondary dwelling needs some form of council consent, even if it qualifies for a Complying Development Certificate. The SEPP lets you build up to 60 m² on a lot of at least 450 m², but you still have to prove setbacks, fire‑risk compliance and proper service connections. A local secondary dwelling builder rural nsw can prepare the drawings, lodge the application and chase any requests for further information, keeping the process moving.
Can I use a kit home instead of a custom build, and what are the pros?
A kit home is essentially a pre‑cut package that you or a local foreman assembles on‑site. The big upside is speed – you can have the shell up in six to ten weeks and often save $10‑$15 k on labour. The downside is you need someone to manage foundations, utility hookups and any bushfire‑specific upgrades, which can add hidden costs if you’re not prepared. It works best when you have a clear site plan and a reliable crew.
How long does it usually take to get a secondary dwelling finished?
From the first site survey to the handover, most farms see a timeline of 12 to 20 weeks for a full‑service build. Kit homes can shave a few weeks off, but you still need time for earthworks, concrete curing and final inspections, so expect at least eight weeks even on a smooth site. Weather is the biggest wildcard – a heavy rainstorm can push foundations back a week or two, so build a modest time buffer.
What fire‑rating requirements should I expect for a rural secondary dwelling?
If your property sits in a Bushfire Attack Level (BAL) zone, the council will demand fire‑rated cladding, a roof pitch of at least 30°, and ember‑proof vents. You’ll also need a separate water meter and a non‑combustible eaves design. A secondary dwelling builder rural nsw familiar with AS 3959 can pull the BAL assessment, source the right materials and ensure the final inspection passes without costly re‑work.
How can I choose the right secondary dwelling builder rural nsw for my farm?
Start by checking their track record on farms similar to yours – ask for references in Dubbo, Gunnedah or Armidale and look for projects that dealt with the same soil or fire‑risk issues. Verify they hold a valid NSW builder’s licence and have a local certifier on call. Finally, compare the scope of work, warranty length and price breakdown; the builder who gives you a clear, itemised quote and a realistic timeline is usually the safest bet.
Conclusion
We’ve walked through everything you need to know to turn a patch of NSW country into a functional secondary dwelling – from zoning checks to fire‑rating, budgeting, design choices and the logistics of getting a build off the ground.
If you’re still wondering whether a local secondary dwelling builder rural nsw can make the process painless, think of it like having a trusted neighbour who knows the soil, the council quirks and the best way to keep a 3‑tonne truck from getting stuck in mud.
Remember the three quick checkpoints: confirm lot size and setbacks, lock in a realistic timeline with a weather buffer, and choose a builder who offers a clear, itemised quote and stands behind a solid warranty.
When you hand the paperwork to a seasoned team like Awesim, you’ll get the first shovel in the ground without endless back‑and‑forth, and you’ll finish with a fire‑rated, off‑grid‑ready guest house that adds both comfort and income.
So, what’s the next step? Grab your notebook, give our Tamworth office a call, and let us map out a site‑specific plan that fits your farm’s rhythm. We’ll handle the certifier, the council forms and the on‑site logistics, so you can focus on the coffee you’ll enjoy on the new verandah.
In the end, a well‑planned secondary dwelling isn’t just a building – it’s an extra set of hands, a tidy rental stream, and peace of mind that the structure will stand up to bushfire, rain and time.


1 Comment