

A good farm shed is so much more than just a building. It's a hard-working asset that streamlines your day-to-day, boosts efficiency, and safeguards your most valuable gear. Getting the farm shed design right from the start means thinking about your workflow, planning for the future, and respecting the harsh Australian climate. Do it right, and you'll have a structure that protects your machinery, fodder, and supplies for decades.
Why a Smart Farm Shed Design Is Your Best Investment
Putting up a new shed is a major investment in your farm's productivity and long-term value. It's your chance to build something that doesn't just solve today's storage problems but is also ready for what's next. A bit of thoughtful planning upfront can save you a world of headaches and costly fixes down the track, ensuring the final build is practical, tough, and a perfect fit for your property.
Think about it—your shed is the nerve centre of your operation. It's where you park hundreds of thousands of dollars worth of machinery, keep valuable feed safe from the elements, and do the critical maintenance that keeps everything running. A poorly thought-out shed can quickly become a source of daily frustration, from awkward layouts that chew up time to flimsy protection that lets your assets deteriorate.
The Backbone of a Productive Farm
A strategic design goes way beyond just putting up four walls and a roof. It’s about digging into how you work, what you need to store, and how the shed will fit into the bigger picture of your property. The aim is to create a structure that genuinely makes your job easier and boosts your overall efficiency.
A well-designed shed delivers on several fronts:
- Asset Protection: Properly storing high-value equipment like tractors, headers, and other implements keeps them out of the rain and scorching sun. This prevents rust and damage, extending their working life and protecting their resale value.
- Operational Efficiency: A logical layout with the right bay spacing, door heights, and clear access routes makes shifting equipment and supplies quicker, easier, and a whole lot safer.
- Future-Proofing Your Farm: It's always more cost-effective to build a little bigger than you think you need right now. Adding an extension later is a far more expensive and disruptive process.
A great farm shed isn't just about storage; it's about creating a purpose-built workspace that makes every job easier. From site selection to material choice, every decision contributes to a structure that works as hard as you do.
Tackling Access Challenges in Rural NSW
Anyone on the land in New South Wales knows that getting things delivered can be a mission. Winding dirt roads, tricky water crossings, and remote locations can stop a standard delivery truck dead in its tracks. This is something that absolutely has to be factored into any shed construction plan, because if you can't get materials and crew on-site, the project is a non-starter.
To get around this, we run a specialised 10-tonne 4×4 truck. This beast is the key to our service, letting us haul crew, materials, and equipment directly to even the most isolated properties around New South Wales. Whether you're in Tamworth, out past Bourke, or anywhere in between, our unique setup allows us to bring in labour, materials and equipment where & when it's needed the most, ensuring your project can move ahead without delays, no matter what the terrain throws at us.
Choosing the Right Farm Shed for Your Needs

No two farms in New South Wales are the same, and your shed shouldn't be either. A thoughtful farm shed design isn't just about putting up four walls and a roof; it’s about creating a purpose-built structure that works as hard as you do. The right shed becomes an indispensable asset, while the wrong one can be a daily frustration.
The whole process starts with one simple question: what is this shed for? Is it going to be a secure home for your expensive machinery, a dry and well-aired barn for fodder, or a dedicated workshop for repairs? Each job has its own unique demands that will shape everything from the layout and materials to the ventilation and security.
Matching Shed Type to Farm Purpose
First things first, you need to pin down the shed's main role on your property. While it’s true that many sheds end up wearing multiple hats, they are almost always designed with a primary function in mind. This decision is the bedrock for all the others that follow, like sizing, bay configuration, and those all-important finishing touches.
Let's walk through the most common types of farm sheds and see what makes them tick.
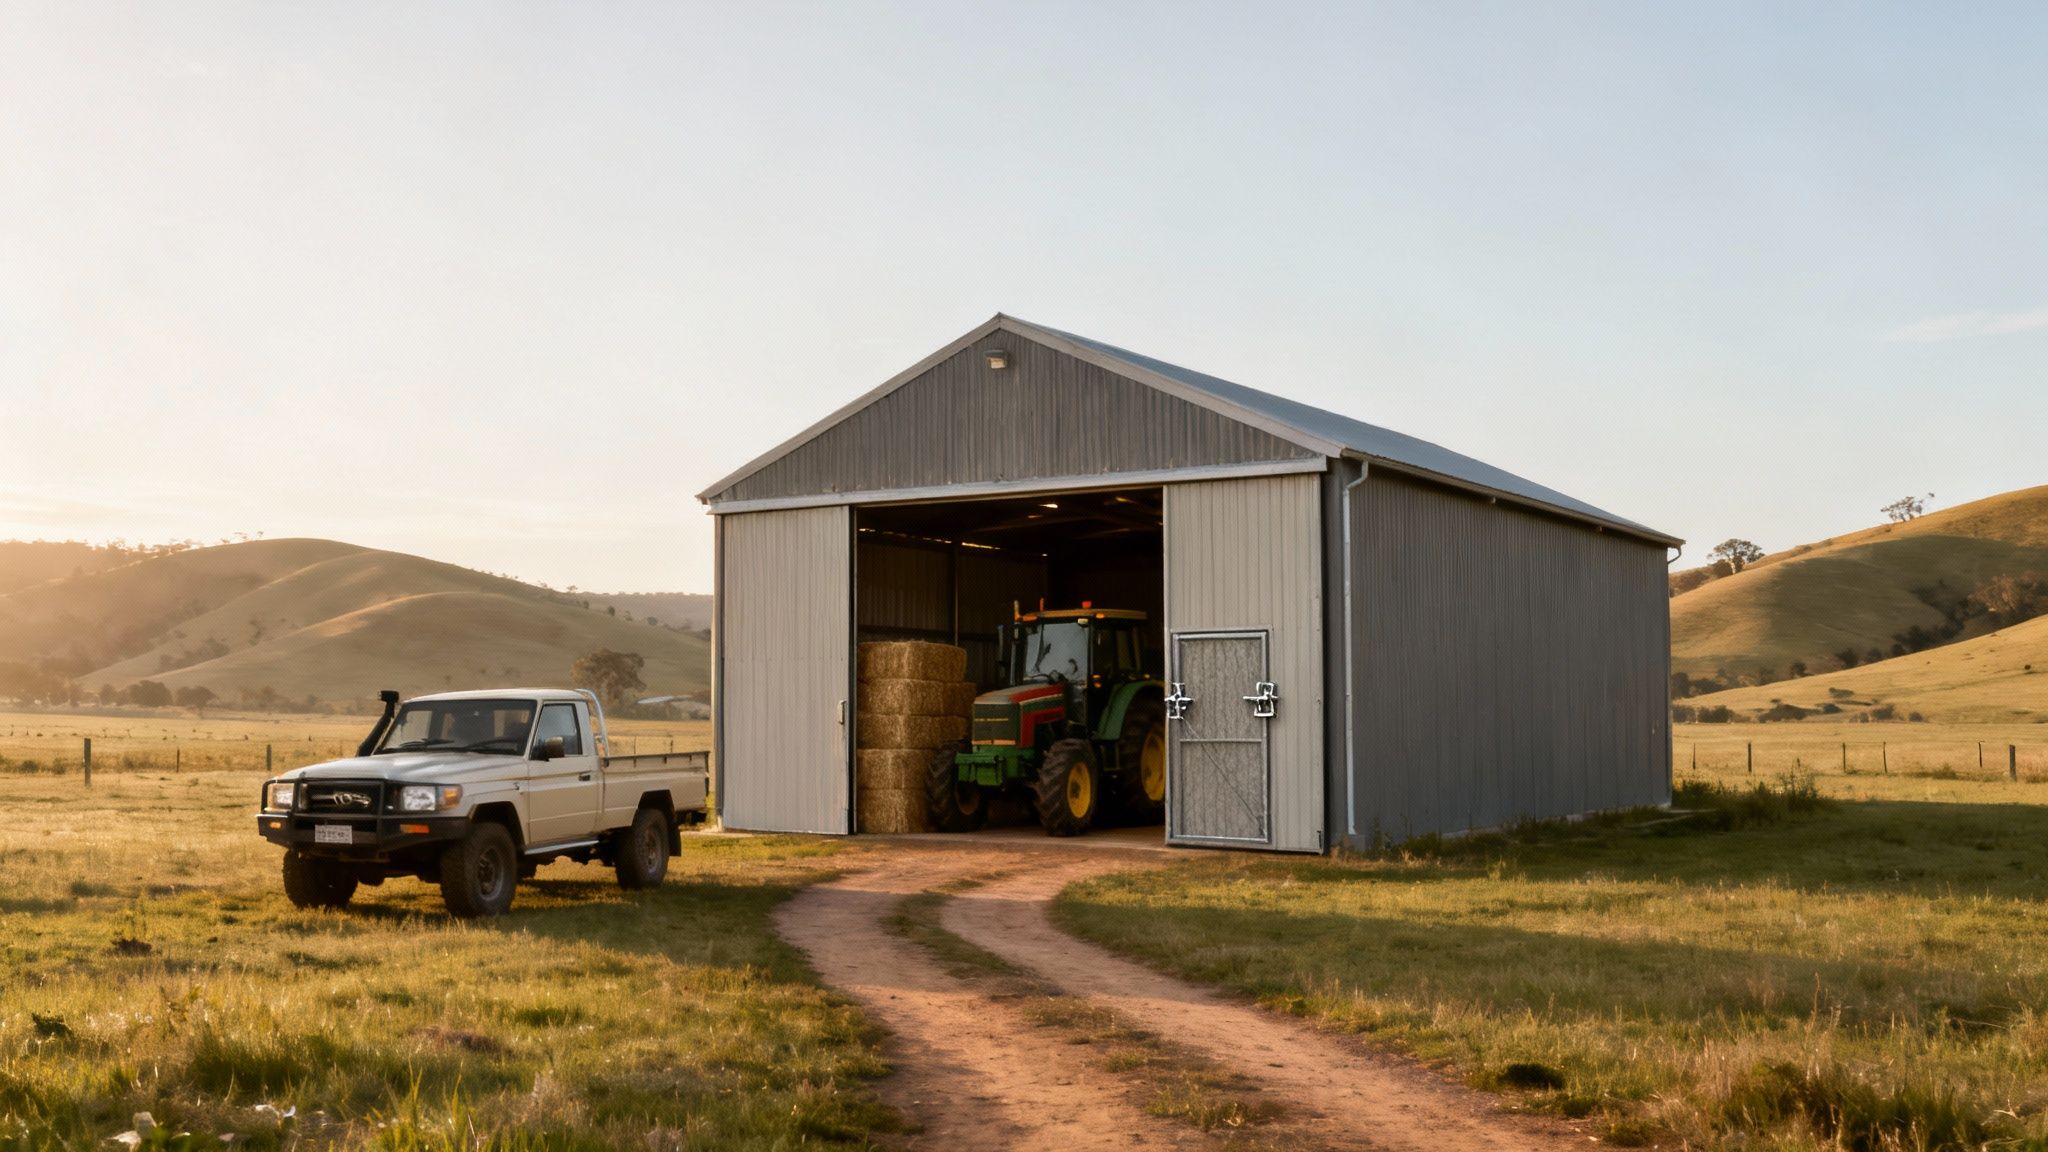
- Machinery Sheds: These are your farm's high-security garages, built to protect your biggest investments—tractors, harvesters, and other gear. Access and security are paramount.
- Hay Sheds: Designed from the ground up for fodder storage. The name of the game here is ventilation and keeping moisture out to prevent spoilage.
- Workshops: A dedicated space for maintenance and fabrication. These designs are all about good lighting, ample power, and creating a safe, comfortable place to work.
- Shearing Sheds: Highly specialised buildings designed around efficient workflow, animal welfare, and the durability needed to withstand the rigours of shearing season.
Machinery Sheds: Protecting Your High-Value Assets
A modern combine harvester or a GPS-guided tractor can easily cost hundreds of thousands of dollars. Leaving that kind of investment out in the harsh NSW elements simply isn't an option. A machinery shed is your fortress, designed to offer uncompromising protection.
You'll typically see these sheds with fully enclosed, lockable bays, extra-high roller doors to clear the largest equipment, and reinforced concrete floors built to handle serious weight. The layout is carefully planned for easy access, so you can get machinery in and out without a complicated logistical puzzle.
Hay Sheds: Maximising Airflow and Access
When you're storing fodder, moisture is your mortal enemy. A proper hay shed is engineered to maximise airflow, keeping your bales dry and preventing mould or, in the worst-case scenario, spontaneous combustion. This is precisely why so many hay sheds have an open-front design or are open on several sides.
The goal of a great hay shed is simple: keep the rain off and let the air through. The structure itself is usually focused on wide, clear spans that make stacking and retrieval with a front-end loader a breeze, ensuring you can always get to the oldest bales first.
Right across Australia, hay sheds are consistently one of the most sought-after farm buildings. This is especially true in New South Wales, where farmers from Tamworth to Bourke rely on them to manage the ups and downs of the seasons. Many operators opt for flexible designs that can store hay one year and machinery the next, turning the shed into a truly versatile asset. If you'd like to dig deeper, you can learn more about the most popular farm shed types in Australia.
Laying the Groundwork for a Lasting Structure
A shed is only as strong as the ground it stands on. It's a simple truth, but one that’s easy to overlook. Long before the first steel frame is bolted together, the most critical decisions in your farm shed design are made right on the dirt. Getting the site selection and preparation right is the single best way to guarantee your structure’s longevity and prevent a lifetime of headaches like water damage, foundation cracks, and access problems.
Think of your shed’s foundation as an anchor. Just as a ship needs a heavy, well-placed anchor to stay put in a storm, your shed needs a solid, stable base to withstand decades of heavy use and wild NSW weather. A poorly prepared site is like dropping a lightweight anchor in shifting sand—it’s only a matter of time before things start to move.
Strategic Site Selection
Choosing the perfect spot involves much more than just finding a flat piece of land. It’s a strategic decision that impacts your daily workflow, long-term maintenance, and the structural integrity of the shed itself. Rushing this step is a recipe for regret.
Before you drive in a single peg, walk the property and think hard about these factors:
- Vehicle Access: How will you get heavy machinery in and out? Not just on a dry, sunny day, but during a wet winter when the ground is soft. You need to plan for wide, all-weather access tracks that can handle everything from a combine harvester to our specialised 10-tonne 4×4 truck delivering your shed kit. We can bring labour, materials, and equipment to even the most remote NSW properties, so your project stays on schedule.
- Water Drainage: Water is the enemy of any building foundation. Always look for a site with a slight natural elevation that encourages runoff away from the shed. Stay well clear of low-lying areas that turn into swamps after a downpour, as this leads to water pooling around and under your concrete slab.
- Prevailing Winds: In many parts of regional NSW, powerful winds are a serious force to be reckoned with. Orienting your shed so its largest openings face away from the prevailing wind direction can dramatically reduce stress on your roller doors and the entire structure over its lifetime.
- Proximity to Services: Do you need power, water, or data connections in your shed? Choosing a site closer to existing services can save you thousands of dollars in trenching and connection fees down the track.
Preparing the Pad for Peak Performance
Once you’ve pinpointed the ideal location, the real earth-moving begins. This is where precision and proper technique are absolutely non-negotiable. For any farm shed to last, establishing a perfectly level and stable foundation is critical; some of the core principles are shared in guides to robust methods like shipping container levelling techniques.
The process starts by creating a perfectly level building pad that extends slightly beyond the shed’s final footprint. This isn’t a simple job of scraping the surface flat. It often involves excavating, bringing in select fill material, and compacting the ground layer by layer to achieve the right soil density. This hard work prevents the ground from sinking or shifting under the immense weight of the structure and the machinery it will hold.
A well-compacted pad is the unsung hero of a durable farm shed. It provides the unwavering stability needed to prevent the concrete slab from cracking and ensures your shed remains perfectly level for generations.
Finally, the foundation itself is formed and poured. For most farm sheds, this will be a reinforced concrete slab, engineered to handle serious loads. The exact specifications—including the thickness and the type of steel reinforcement—depend entirely on what you'll use the shed for. A slab for a machinery workshop will need to be significantly thicker and stronger than one for a simple hay shed.
To make sure you get this crucial step right, you can explore our detailed advice on determining the right concrete slab thickness for sheds on NSW farms. This is the foundational step where your investment is truly secured.
Designing for Durability: Layout and Materials
With the groundwork done and a solid foundation ready to go, we can get into the part of your shed design where functionality and resilience really come together. This is where we move from the dirt up, focusing on the layout and materials that will define your shed’s day-to-day use and its ability to handle the tough NSW climate for decades to come.
Every single choice, from the width of your bays to the type of cladding you pick, plays a crucial role. We're not just putting up four walls and a roof; we're building a practical, long-lasting workspace. Think of it like setting up a new workshop – you wouldn't just throw your tools in a pile. You’d plan your workflow, figure out where each machine goes for easy access, and choose materials that can take a beating. It’s the same logic for your farm shed.
The flowchart below recaps the essential groundwork we've covered, which sets the stage for the design and material choices we're about to dive into.

As you can see, a durable shed starts well before the first steel beam goes up. It begins with proper access, ground prep, and a solid foundation.
Calculating the Right Dimensions
If there's one piece of feedback we hear over and over from farmers, it's this: "I wish I'd built it bigger." It is always cheaper and easier to add an extra bay or another metre of height during the initial build than it is to tack on an extension down the track. Getting the dimensions right from the start is one of the smartest investments you can make.
- Height: Take your tallest piece of equipment—think headers with GPS units or augers fully extended—and add at least one metre of clearance. This gives you a safe buffer and accounts for any larger machinery you might buy in the future.
- Width and Bay Spacing: Your bay width needs to be generous enough to park machinery easily and still have room to walk around it. A standard 9-metre bay works for most large equipment, but going wider can give you invaluable extra space for maintenance.
- Length: Don't just think about what you need to store today. Think about your farm's five or ten-year plan. Adding an extra bay or two now is a relatively small cost for the massive flexibility it provides later on.
Choosing a Layout for Maximum Functionality
The layout of your shed should be a direct reflection of its job. A machinery shed is designed very differently from a hay shed, which is different again from a shearing shed or a multi-purpose workshop. The aim is to create a design that makes your daily operations smoother, not harder.
An open-front design is perfect for storing hay, as it allows for fantastic airflow to keep your fodder dry and makes access with a loader a breeze. On the other hand, a fully enclosed shed with lockable roller doors gives you the security you need for expensive tractors, utes, and tools.
A popular and practical solution these days is a hybrid design. This might mean having a few open bays for easy access to frequently used gear, combined with a secure, enclosed section for a workshop or storing high-value assets.
A well-planned layout isn't just about storage; it's about workflow, movement, and safety. The right design makes every task—from parking a header after a long day to servicing an engine—simpler and more efficient.
Selecting Materials That Endure the Australian Climate
Your choice of materials is the final piece of the durability puzzle. Here in New South Wales, your shed will face everything from scorching sun and howling winds to torrential rain and the ever-present threat of bushfires. The materials you choose have to be up to the task.
The structural frame is the skeleton of your shed. Heavy-duty galvanised or universal beam (UB) steel provides the backbone needed for those large, clear spans, ensuring your shed stands firm for generations.
When it comes to the skin of the shed—the cladding—your choice is just as critical. While some traditionalists might look at various timber cladding options, the undisputed industry standard for modern Aussie farm sheds is Colorbond steel.
Here's a quick comparison of the most common materials to help you decide.
Material Comparison for NSW Farm Sheds
| Material | Key Advantages | Best Suited For | Considerations |
|---|---|---|---|
| Colorbond Steel | Highly durable, low maintenance, non-combustible, wide colour range, weather-resistant. Made for Australian conditions. | Machinery sheds, workshops, hay sheds—virtually any farm application. | Higher upfront cost compared to some alternatives, but offers long-term value. |
| Zincalume Steel | Cost-effective, strong, corrosion-resistant. A good no-frills option. | Budget-conscious projects, sheds where aesthetics are a lower priority. | Lacks the baked-on colour of Colorbond, so the finish is a standard metallic silver. |
| Treated Timber | Natural aesthetic, can be a sustainable choice if sourced responsibly. | Shearing sheds, rustic-style workshops, or feature walls. | Requires regular maintenance (staining/painting) to prevent rot and pests. Not ideal for high bushfire-risk areas. |
| Structural Steel | Incredibly strong, allows for massive clear spans, long-lasting. | The structural frame of almost all large-scale farm sheds. | Needs to be galvanised or properly coated to prevent rust, especially in coastal areas. |
Colorbond is a top choice for a reason. It's made right here in Australia, specifically for our harsh climate. It’s tough, easy to clean, and crucially, it's non-combustible—a vital safety feature in fire-prone areas. Its baked-on colour finish is designed to resist chipping and fading, so your shed will look sharp for years to come.
Ultimately, designing for durability comes down to making smart, forward-thinking choices. By taking the time to carefully plan your layout, dimensions, and materials, you're not just building a shed—you're creating a hard-working, long-term asset for your property.
Navigating Council Approvals and Building Codes
Getting your new shed designed and built is the exciting part, but making sure it’s fully legal is just as critical. Let's be honest, dealing with council approvals and building codes can feel like a chore, but getting it right from day one is non-negotiable. It’s what protects your investment, guarantees safety, and saves you from the nightmare of being ordered to tear down a non-compliant structure.
The rules for rural construction in New South Wales can seem like a jungle of technical jargon and endless paperwork. Every detail matters, from wind ratings calculated for your specific block of land to the local council's rules on setbacks. This is where having an experienced builder in your corner really pays off. A good team takes this entire administrative headache off your plate, turning a stressful process into a simple box-ticking exercise.
Understanding Key Compliance Requirements
Before you even think about turning the first sod, your shed design has to clear a few regulatory hurdles. These are mainly set by the National Construction Code (NCC) and your local council’s specific planning policies. These rules aren't there to slow you down; they exist to make sure every building is safe, built to last, and suited to its environment.
Here’s what you’ll typically need to cover:
- Engineering Certification: A qualified engineer must sign off on your shed plans. This is your proof that the design is structurally sound and can handle everything the local weather can throw at it, especially high winds.
- Wind Rating: Every single site in Australia has a specific wind rating. A shed tucked away in a sheltered Armidale valley will need very different engineering compared to one sitting on the exposed plains near Parkes.
- Setback Requirements: Your local council has firm rules on how far any new structure must sit from property lines, roads, and even other buildings on your land.
The Development Application (DA) Process
For almost any decent-sized farm shed, you’ll need to lodge a Development Application (DA) with your council. This is the formal process of submitting all your plans and documents for review before construction can start. While there are some exemptions for very small structures, it’s always safest to assume you’ll need a DA. We cover this in more detail in our guide on when council approval is needed for a shed.
The DA process can easily become the most time-consuming part of the project. A builder who manages all the council paperwork for you ensures the application is lodged correctly the first time, which is the best way to avoid unnecessary delays.
Australian farm sheds have come a long way from the simple timber huts of the past. Today's engineered steel buildings must meet strict NSW regulations, like maintaining a 5-metre setback from property boundaries and 20 metres from council roads. It’s no surprise that gable roofs are so common; they provide excellent water runoff, which is a major factor for both compliance and practical water management on the farm.
Understanding Project Costs and Realistic Timelines
Getting a new farm shed built successfully comes down to two things: a clear budget and a practical schedule. When you know the investment required upfront, you can properly align your farm shed design with your financial plan and operational calendar, which means no nasty surprises down the track.
Think of it like planning a harvest. You have to account for ground prep, the growing season (construction), and unexpected delays like a late break in the weather (or council approvals) to get a good result. A transparent, honest approach to costing and scheduling is the only way to manage expectations and keep the project running smoothly from the first sketch to the final handover.
Breaking Down the Costs
Most people start by thinking about a per-square-metre rate, but that’s really just a starting point. The final price tag is shaped by a handful of key variables that can make that figure move up or down pretty quickly.
A simple, open-sided hay shed on a perfectly flat block is always going to be more affordable than a fully enclosed workshop with multiple roller doors, insulation, and extensive electrical work on a sloping site. It just makes sense.
Here are the main cost drivers you need to consider:
- Size and Complexity: Bigger sheds and more intricate designs, like those with internal walls or mezzanine floors, naturally cost more.
- Material Choices: Every decision has a cost. Opting for premium materials like Colorbond steel or adding features like insulation will influence the final budget.
- Site Preparation: This is a big one. The amount of earthworks needed to create a level, stable pad can significantly impact the overall cost, especially on challenging terrain.
- Custom Features: All the extras add up. Whirlybirds, skylights, vermin-proofing, and automated doors all contribute to the final investment.
For a bit of context, a typical open-sided hay shed around 648 square metres might fall between $175 and $200 per m². That puts the total project cost somewhere between $113,400 and $129,600.
On the other hand, a larger, fully enclosed machinery shed of about 1,152 m² could range from $190 to $230 per m². This would bring the final price to between $218,880 and $264,960. These numbers show why smart, practical design choices are so critical from the outset.
Mapping Out a Realistic Project Timeline
One of the most common mistakes we see is underestimating how much time is needed before a single hole is dug. The pre-construction phase, which covers everything from design finalisation to waiting on council approval, often takes longer than the physical build itself. To plan properly, you need to understand every stage. For a deeper dive, our guide on the cost to build a storage shed provides some extra perspective.
A typical farm shed project in NSW can take several months from the initial handshake to completion. Patience during the planning and approvals stage is key to a stress-free build.
Here’s a general breakdown of how the timeline usually plays out:
- Design & Quoting (2–4 weeks): This is where we have our initial chats, visit the site, lock in your design, and get a detailed quote back to you.
- Council Approvals (6–12 weeks): This is often the longest and most unpredictable part of the whole process. How long it takes a council to process and approve a Development Application can vary massively between different shires.
- Fabrication & Delivery (4–6 weeks): Once we get the green light, your steel framework and components are manufactured and prepped for delivery to your property.
- On-Site Construction (3–6 weeks): The final stage, where our team erects the structure on your prepared site. For those remote properties around New South Wales, our specialised 10-tonne 4×4 truck is an absolute game-changer. It allows us to bring all labour, materials, and equipment exactly where and when they're needed most, cutting through access challenges to keep your project on schedule.
Got Questions About Your Farm Shed Design?
Thinking about a new shed for your property raises a lot of questions. It's completely normal. Nailing the details of your farm shed design right from the start means you’ll end up with a structure that genuinely works for you. Let's run through some of the common things we get asked by property owners across New South Wales.
How High Does My Machinery Shed Need to Be?
The best way to figure this out is to get the tape measure out. Find your biggest piece of machinery and measure it at its highest possible point – think GPS antennas on the header or an auger fully extended.
Once you have that measurement, add at least a metre of clearance. This gives you a safe buffer and, just as importantly, a bit of future-proofing for when you eventually upgrade to bigger gear. While standard eave heights often sit between 5 to 7 metres, a custom build lets you set the exact height you need, so you’re not paying for space you’ll never use.
What’s the Difference Between a Gable and a Skillion Roof?
A gable roof is that classic A-frame shape you see everywhere – two sloping sides meeting at a peak in the middle. It’s brilliant for creating a huge amount of internal volume and is fantastic at shedding water, which is why it’s the go-to for most large rural buildings.
A skillion roof, on the other hand, is just a single, steep slope. You’ll often see them on more modern-looking buildings or used for lean-to extensions. While they can be a bit more budget-friendly for smaller spans, the gable design’s strength and water-handling capabilities usually make it the better choice for big, clear-span machinery and hay sheds here in NSW.
Should I Bother with Insulation in My Shed?
This really comes down to what you’ll be doing in the shed. If it’s just for storing hay or parking machinery in an open bay, insulation is probably an expense you can skip. Good airflow is far more important in those situations.
But if any part of the shed is going to be a workshop where you'll be spending a fair bit of time, insulation is a game-changer. It keeps the temperature much more stable – cooler in summer, warmer in winter – and helps a lot with condensation.
Insulation is what turns a basic storage shell into a proper, comfortable workspace. For any area where people will be working, it's an investment that pays for itself in comfort alone.
How Long Does the Whole Shed Building Process Take?
The timeline can really vary depending on how complex the shed is and, honestly, how quickly the local council moves. As a rough guide, the initial chat and design stage usually takes about 2-4 weeks.
Getting council approval is often the part that takes the longest, typically anywhere from 6 to 12 weeks, though some shires can take longer. Once the paperwork is sorted and the materials are delivered, a standard farm shed build will usually take 3-6 weeks on-site.
Keeping this process on track is all about logistics. At Awesim Building Contractors, we run our own specialised 10-tonne 4×4 truck to get all our crew, materials, and equipment to site. This means we can get to even the most remote properties around New South Wales, bringing labour, materials and equipment where & when it's needed the most, tackling tricky access to make sure your project doesn't get held up.
Ready to talk about a farm shed design that’s a perfect fit for your operation? The team at Awesim Building Contractors has the real-world rural building experience to make it happen. Contact us today to start the conversation.


