

Ever walked into a farmhouse bathroom and felt that mix of charm and wear, like the old timber floor sighing under your boots?
You’re not alone – many rural homeowners dream of turning that space into something both sturdy and stylish, without losing the country soul.
I get it, because after 35 years of hauling tiles across dusty tracks, I’ve seen a lot of bathroom projects go from ‘just fix it’ to ‘wow, that’s gorgeous’.
The trick is to blend practical rural building know‑how with design choices that echo the farmhouse vibe – think reclaimed wood, simple fixtures, and easy‑care surfaces.
But where do you start? First, picture the daily flow: a quick shower after milking, a sturdy vanity that can survive a kid’s tumble, and a floor that won’t crack when the summer heat expands the slab.
From there, we map out the basics: waterproofing that can handle a sudden downpour, wall cladding that tolerates dust and wind, and lighting that feels warm even on a grey morning.
A common pitfall is chasing city‑style trends that crumble under farm conditions – those glossy tiles may look sleek, but they crack when a tractor’s vibration travels through the house.
Instead, I often recommend a slip‑resistant, matte‑finish tile or even a sealed concrete slab – they’re tough, easy to clean, and they age gracefully like a well‑worn barn door.
Don’t forget the little things that make a big difference: a deep basin sink for farmhands’ hands, recessed shelves for towels, and a vent that keeps moisture out of the loft.
When you pair those choices with Awesim’s 4×4 access and on‑site expertise, the renovation moves from a headache to a smooth, on‑time project, even if the site is a mile down a gravel track.
So, if you’ve been putting off that bathroom upgrade because you think it’s too messy or too expensive, let’s flip the script – a well‑planned farmhouse bathroom can boost your home’s comfort and its resale value.
Ready to see how a simple redesign can transform your daily routine? Grab a cuppa, picture the new space, and let’s dive into the steps that’ll get you there.
TL;DR
Farmhouse bathroom renovations blend right rugged durability with cosy charm, using slip‑resistant matte tiles, deep‑bowl sinks and strategic ventilation to survive dust, wind and farm life.
Partner with Awesim’s 4×4‑ready team for on‑site expertise, swift timelines and a stress‑free makeover that lifts your daily comfort and adds significant resale value.
Planning Your Farmhouse Bathroom Renovation
Picture this: you’re standing on the back porch, the morning sun catching dust off the boots, and you realise the bathroom you step into each day still looks like it belongs in a 1970s farmhouse catalogue. That feeling of “it needs a change, but I can’t afford to break the bank or the schedule” is the exact place we start.
First thing’s first – map out how the space works for you now. Do you dash in after a milking run? Do you need a deep‑bowl sink for soapy hands? Grab a tape measure, sketch a quick floor plan on a napkin, and note where the water lines, vent, and existing fixtures sit. This little habit saves you from costly surprises later.
Set a realistic budget (and stick to it)
Farm life throws curveballs – a sudden storm, a broken tractor, a surge in feed prices. Your bathroom budget should have a little wiggle room, say 10‑15% extra, for those “just‑in‑case” moments. Break the total down: demolition, waterproofing, tiles, fixtures, labour, and a contingency.
When you’re looking at tiles, think matte, slip‑resistant ceramic or sealed concrete. They handle mud, dust, and the occasional stray horse shoe without turning into a shiny hazard. And they age like a well‑worn fence – the more they’re walked on, the prettier they get.
Plan for durability and ventilation
Rural bathrooms need a ventilation system that can cope with humidity after a hot shower and the occasional gust of wind that carries barn dust right through the window. A robust, external wall vent with a back‑draft damper does the trick. Pair it with a moisture‑resistant paint on the ceiling – it’ll keep mould at bay for years.
Don’t forget the floor’s expansion and contraction. A thin, flexible underlay beneath your tiles lets the slab breathe when the summer heat expands the concrete. It’s a tiny detail that stops cracks before they start.
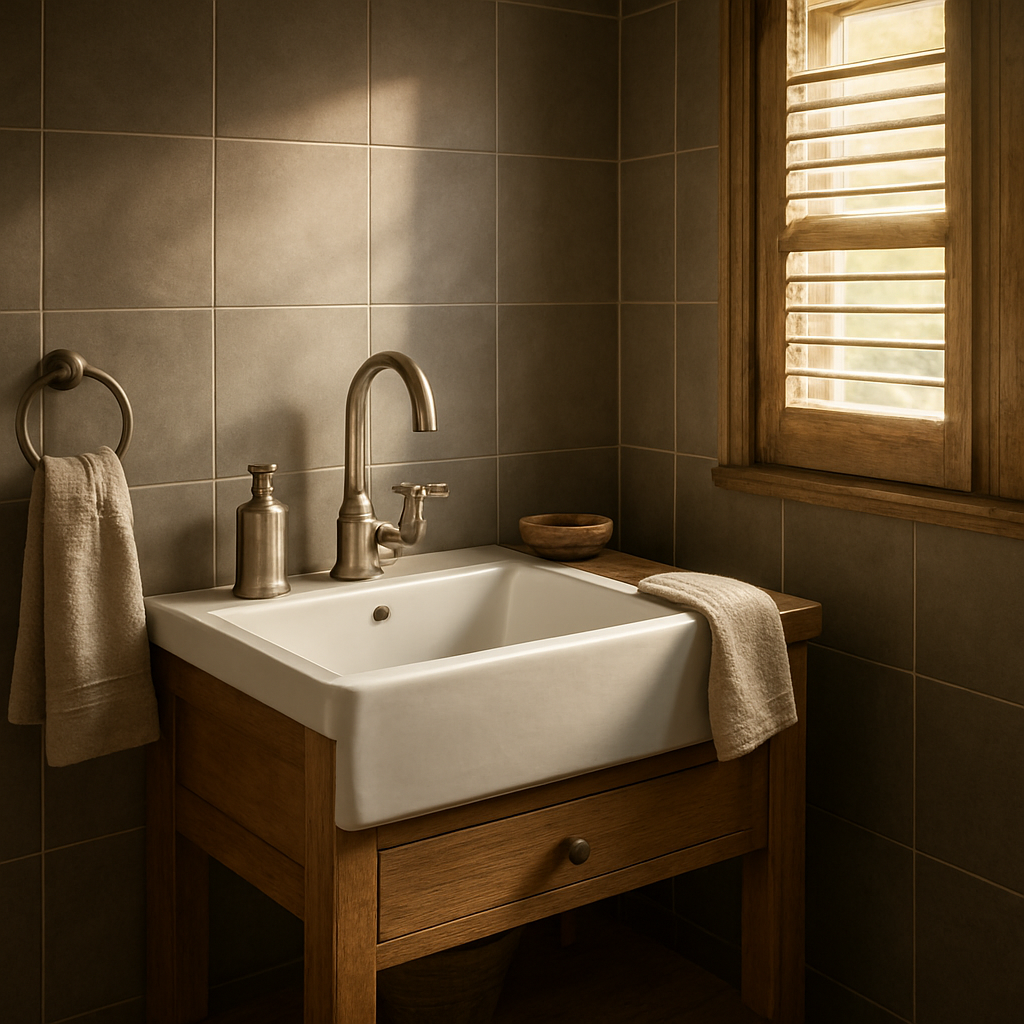
Choose fixtures that fit the farm aesthetic
A deep‑bowl sink with a wide apron is a lifesaver for farmhands washing off after a day in the paddocks. Look for brushed nickel or oil‑rubbed bronze finishes – they hide fingerprints and water spots better than polished chrome.
And while we’re at it, consider a simple, wall‑mounted vanity. It frees up floor space for a sturdy, washable rug that can handle a splash of mud without fraying.
Need inspiration for sturdy yet stylish shutters? Monroe Plantation Shutter Pros showcase custom options that blend rustic charm with weather‑proof performance.
Now, let’s talk about the exterior touches that tie the whole bathroom back to the homestead. A modest stone or brick accent wall behind the vanity can echo the farmhouse’s foundation, while a simple wooden frame around the mirror adds that cosy, lived‑in feel.
When you’re picking out paving or steps leading to the bathroom door, think about durability under heavy boots. Texas Pavers Outdoor Living offers a range of low‑maintenance, slip‑resistant pavers that stand up to both rain and the occasional mud splash.
Before you sign off on the plan, run through a quick checklist:
- Confirm the location of existing plumbing and electrical points.
- Ensure the waterproof membrane extends at least 150mm up the walls.
- Verify the vent size matches the bathroom’s floor area.
- Double‑check that all fixtures are rated for rural environments.
And one last tip: schedule your demolition and install days when the weather’s mild. A dry, breezy day means the waterproofing cures properly, and you won’t have to wait for a rainstorm to pause the work.
Choosing Materials that Suit Rural NSW Climate
Picture this: you step out of the shower after a long day in the paddock, and the floor beneath your boots feels cool, sturdy, and doesn’t crack under the heat of a scorching summer. That’s the kind of confidence a well‑chosen material can give you in a farmhouse bathroom.
First off, think about the climate swing we get out here in regional NSW – blistering summer, chilly winter, and the occasional heavy downpour that can turn a dusty track into a mud bath. Materials need to breathe, handle moisture, and stay resilient when the temperature shifts.
Flooring that Handles Heat and Mud
Slip‑resistant matte‑finish porcelain tiles are a favourite for a reason. They mimic the look of aged timber without the warping, and the matte surface hides mud splashes better than a high‑gloss tile. If you love the rustic feel of concrete, a sealed concrete slab is another solid option – it’s tough, low‑maintenance, and you can even colour‑stain it to match your farmhouse aesthetic.
When you choose a tile, check the PEI rating – a rating of 4 or 5 means it can take heavy foot traffic and the occasional dropped tool. Pair that with a high‑quality, water‑proof membrane underneath, and you’ve got a floor that will survive both summer heat and winter chill.
Wall cladding that Won’t Crack Under Dust
Most rural homes have a bit of dust that sneaks in when the wind blows across the fields. Traditional ceramic tiles can chip when a stray stone hits them, so many of us opt for fibre‑cement panels or waterproof plasterboard. Both are lighter to install, resist cracking, and you can finish them with a breathable, washable paint that won’t blister in the sun.
Don’t forget the little‑talked‑about detail – the splash‑back behind the basin. A tiled splash‑back with a subtle, non‑slippery finish catches the splatter from a heavy‑handed farmer’s wash and is easy to wipe down with a hose.
Vanities and Fixtures Built for Farm Life
A reclaimed‑wood vanity adds that farmhouse charm, but you’ll want to seal it with a marine‑grade varnish so that a stray bucket of water won’t soak the grain. If you’re after something even tougher, a powder‑coated steel vanity resists dents and rust, and you can still paint it to match your colour scheme.
Deep‑bowl sinks are a no‑brainer – they give enough room for muddy hands and large farm‑hand tools without water spilling over. Look for a low‑flow faucet with a dual‑flush option to keep water usage sensible, especially if you’re on a rain‑water tank.
Ventilation that Keeps the Loft Dry
Out here, a good exhaust fan isn’t just about preventing mould; it’s about protecting your roof structure from humidity that can seep into the timber framing. Choose a fan with a high CFM rating, preferably one that can handle the larger volume of steam from a 10‑minute shower after a hot day.
Mount it near the shower, but give it a few centimetres away from any external window – you don’t want a gust of wind sucking dust straight into the fan.
So, how do you bring all these choices together without getting overwhelmed?
Start with a simple checklist: floor material, wall cladding, vanity finish, sink depth, and fan capacity. Rank each item by how often it’ll see heavy use versus how much visual impact you want. That way you spend a little extra on the things that matter most, like a slip‑resistant tile, and save where you can, such as opting for powder‑coated steel over a custom‑carved wood piece.
Seeing those materials in action on a real farm can make the decision a lot easier – notice how the tiles hold up under a muddy boot, or how the vent clears steam in seconds.
Bottom line: choose materials that respect the NSW climate swing, stand up to farm traffic, and still look like the warm, welcoming space you imagined over a cup of tea. When you get those basics right, your farmhouse bathroom renovation will feel solid for years to come.
Step‑by‑Step Renovation Process
Alright, you’ve nailed the budget, chosen the slip‑resistant tiles, and pictured the reclaimed‑wood vanity – now let’s get our hands dirty and walk through the renovation day‑by‑day.
1. Do a quick site audit
First thing on arrival: pull out that notebook, measure the floor, check ceiling height, and locate every pipe and valve. Snap a photo of the existing layout – it’ll save you endless “where did that outlet go?” questions later. On a remote farm, you might also note the distance to the water tank or any low‑lying gutters that could flood the work area.
2. Set up a protected work zone
Dust and mud love to follow you around the site, so cordon off the bathroom with heavy‑duty sheeting. Lay down a breathable floor membrane before demolition; it protects the underlying slab from water damage while you tear out the old fixtures.
3. Demolition – safety first
Turn off the main water supply and electricity. Use a reciprocating saw for plasterboard, and a hammer‑drill for any concrete floor you’re pulling up. Keep a bucket handy for loose debris – you’ll thank yourself when the tiler can start on a clean surface.
4. Rough‑in plumbing and waterproofing
Now the tradespeople lay new waste lines and bring the supply lines up to the new vanity height. This is the perfect moment to install a high‑capacity exhaust fan, positioning it a few centimetres from the window to avoid dust draw‑in. After the pipes are set, roll out a liquid‑applied waterproof membrane across the floor and up the walls to the recommended height (usually 150 mm above the shower base).
5. Floor preparation and tiling
Give the membrane a full cure – typically 24 hours – then start laying your matte‑finish tiles. Use a 4‑mm spacer for a uniform grout line; it helps the floor expand and contract with summer heat. Remember to stagger the joints for a natural look, and press a full‑depth silicone seal around the shower tray to keep water from sneaking underneath.
6. Wall cladding and splash‑back
While the floor sets, install fibre‑cement panels or waterproof plasterboard on the walls. Finish with a tiled splash‑back behind the basin – a simple subway‑tile laid in a stacked bond works well and wipes clean with a hose. Apply a breathable, mould‑resistant paint over any exposed areas to cope with the farm’s dusty breezes.
7. Install fixtures and fittings
Hang the reclaimed‑wood vanity, secure the deep‑bowl sink, and fit the dual‑flush toilet. Connect the new tap, showerhead, and any accessories you’ve chosen – like a handheld sprayer for quick clean‑ups after a muddy ride.
8. Final finishes and snag check
Grout the tiles, seal the grout with a penetrating sealer, and polish the vanity surface. Run water through the system, test the fan for proper airflow, and check every door and drawer for smooth operation. Walk the site with the builder, noting any minor tweaks – that’s your snag list.
9. Clean‑up and handover
Give the whole bathroom a thorough sweep, mop the tiles, and wipe down every surface. Hand the homeowner a quick‑start guide: how to adjust the fan, care for the reclaimed wood, and what to do if a leak appears. A tidy handover makes the new space feel ready for that first post‑milking shower.
There you have it – a clear, step‑by‑step roadmap that turns a dusty, outdated bathroom into a sturdy, farmhouse‑chic retreat. Stick to the sequence, respect the weather buffers, and you’ll finish on time, on budget, and with a space that’ll stand up to the next generation of muddy boots. Enjoy the calm you’ve earned, and let the bathroom become the heart of your homestead.
Cost Comparison of Common Renovation Options
When you start thinking about farmhouse bathroom renovations, the first thing that pops up is the price tag. You’ve probably asked yourself, “Do I really need to rip everything out, or can I get a fresh look without blowing the budget?” The good news is there are a few clear paths, each with its own cost profile and trade‑offs.
Let’s break it down into three common routes: a full‑gut remodel, a surface‑upgrade refresh, and a DIY‑friendly makeover. I’ll walk you through what you’re actually paying for, so you can match the option to your wallet and your timeline.
Full‑Gut Remodel
This is the classic “start from scratch” approach. We tear out the old tiles, vanity, and plumbing, then rebuild everything to the spec you want – matte‑finish tiles, reclaimed‑wood vanity, dual‑flush toilet, and a high‑capacity exhaust fan. Because you’re working with a clean slate, you can install a waterproof membrane, upgrade the slab if needed, and even re‑route pipes for better efficiency.
Typical cost in regional NSW runs about A$4,500 to A$6,000 per square metre, including labour, materials, and disposal. The higher end reflects premium finishes and the extra labour of a 4×4‑access team travelling to remote sites.
Pros: maximum design freedom, best long‑term durability, and the chance to address hidden issues (like a cracked floor joist) before they become expensive repairs.
Cons: biggest upfront spend, longer timeline (often 6‑8 weeks), and you’ll need to coordinate multiple trades.
Surface‑Upgrade Refresh
If the layout works but the finishes feel dated, a surface‑upgrade can give you that farmhouse vibe for less cash. Think new tile over the existing slab, a prefabricated vanity with a reclaimed‑wood veneer, and swapping the standard fan for a more powerful, yet affordable, model.
Costs usually land between A$2,800 and A$3,500 per square metre. You save on demolition and structural work, but you still pay for quality tiling, waterproofing tape, and a fresh coat of sealant on the vanity.
Pros: lower spend, quicker turnaround (3‑4 weeks), and you keep most of the existing plumbing in place.
Cons: limited to the current room dimensions, and you may inherit hidden moisture issues if the old slab wasn’t properly sealed.
DIY‑Friendly Makeover
For hands‑on owners who don’t mind rolling up their sleeves, a DIY route can slash the price dramatically. You might purchase ready‑made slip‑resistant tiles, a kit‑vanity that you paint and seal yourself, and a basic exhaust fan that you install with a simple wall bracket.
Expect to spend around A$1,500 to A$2,200 per square metre, largely driven by material costs. Labour is your own time, so the “price” is really the hours you invest.
Pros: biggest savings, full control over colour and finish, and the satisfaction of building something yourself.
Cons: requires a decent skill set, risk of mistakes that could lead to water damage, and you’ll likely need a professional to do the final plumbing inspection.
Quick Comparison Table
| Option | Typical Cost (A$ / m²) | Key Benefits | Potential Drawbacks |
|---|---|---|---|
| Full‑Gut Remodel | 4,500‑6,000 | Complete design freedom, long‑term durability | Highest upfront cost, longer timeline |
| Surface‑Upgrade Refresh | 2,800‑3,500 | Lower spend, quicker finish | Limited to existing layout, possible hidden moisture |
| DIY‑Friendly Makeover | 1,500‑2,200 | Maximum savings, hands‑on control | Requires skill, risk of errors |
So, which path feels right for you? If you’ve got a solid budget and want a bathroom that can stand the next generation of muddy boots, the full‑gut remodel is the safe bet. If you’re keen to keep costs down but still crave that rustic charm, the surface upgrade hits the sweet spot. And if you love a good weekend project and want to stretch every dollar, the DIY makeover can work – just be honest about your skill level.
Whatever you choose, remember to factor in a 10‑15 % contingency for surprise items – a hidden pipe, a cracked slab, or that extra‑wide door you didn’t anticipate. That little buffer can be the difference between a smooth finish and a stressful overrun.
Bottom line: farmhouse bathroom renovations don’t have to be a gamble. By lining up the cost, the timeline, and the level of effort you’re comfortable with, you can pick the option that gives you the look you love without breaking the bank.
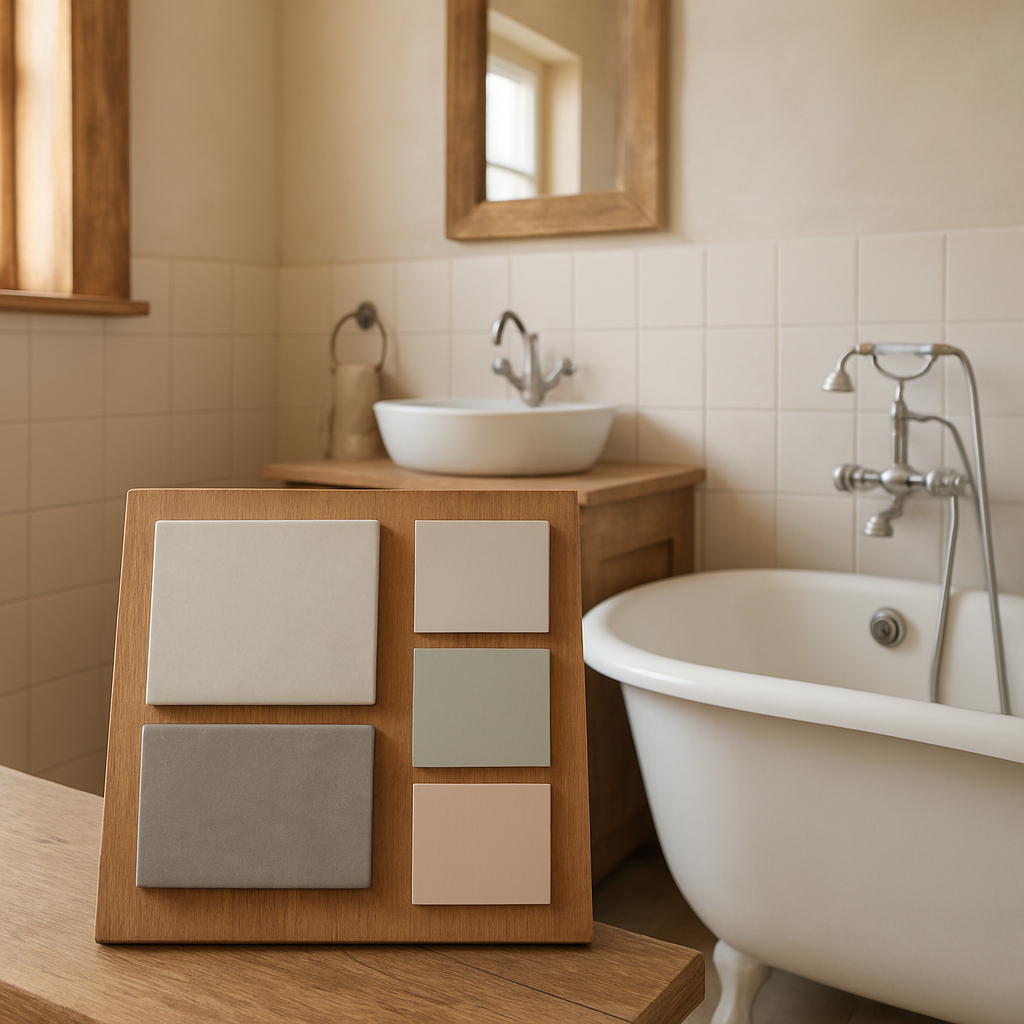
Material Samples and Colour Palettes
When you’re staring at a blank wall in a farmhouse bathroom, the first thing you probably think is – what’s going to look right with the old timber floor and that weather‑worn vanity?
Here’s the thing: the right samples and colour choices can turn that uncertainty into a moment of “aha!” – and they’ll save you a lot of back‑and‑forth with the builder later on.
Start with a tactile tile swatch
Grab a handful of matte‑finish porcelain tiles and lay them on the floor for a day. Notice how the PEI rating feels under your boots – a 4 or 5 will handle muddy boots and farm tools without scratching.
Slip‑resistant tiles are a farmhouse staple, but you can also look at sealed concrete slabs. The concrete can be colour‑stained to mimic aged timber, which blends perfectly with reclaimed‑wood vanities.
And if you’re wondering about trends, many designers are pushing eco‑friendly finishes this year – think reclaimed wood, bamboo, or recycled glass – which line up nicely with a country aesthetic according to 2025 bathroom trends.
Play with colour palettes before the paint hits the walls
Take a few paint swatches – soft pastels, earthy neutrals, or a muted sea‑foam – and tape them onto the wall next to a sample of your tile. Step back at different times of day; the morning light will highlight cooler tones, while the afternoon sun brings out warmer hues.
Farmhouse bathrooms often thrive on a palette of warm greys, muted blues, or creamy whites. These colours don’t clash with the inevitable dust that sneaks in on a windy afternoon, and they hide the occasional splash of mud better than stark, high‑gloss whites.
Pro tip: use a small piece of reclaimed timber as a colour reference. The natural grain can guide you toward a hue that feels cohesive with the vanity and flooring.
Wall panels: a smart sample solution
If you’re not ready to commit to full tiling, consider PVC or SPC wall panels. They’re lightweight, waterproof, and come in a range of finishes that mimic tile, stone or even faux wood. The best part? They’re cheaper to install than traditional tiles – about $120 per square metre versus $140 for the low‑end tile install according to wall panel pricing data.
Because they’re panel‑based, you can order a single 2.4 m² sheet as a sample, cut it to fit a small section of your shower wall, and see how it looks with your chosen lighting and hardware. If it doesn’t feel right, you can swap it out before committing to the whole room.
Create a material board that tells a story
Pull together a physical board with a tile fragment, a piece of your wall‑panel sample, a paint chip, and a small slab of reclaimed wood. Lay it on a table with a cup of tea and imagine the daily routine – the splash of water, the mud‑splattered boots, the morning light.
When the board feels right, snap a photo and send it to your builder. That single visual reference can cut weeks of back‑and‑forth and keeps everyone on the same page.
Does this all sound a bit much? Not really. It’s just a handful of simple steps that keep you from making costly colour mistakes later on.
Remember, the goal isn’t just to look good on paper – it’s to create a space that feels lived‑in, resilient, and genuinely yours.
So, grab those samples, play with a few colours, and let the farmhouse vibe settle in before the first tile is cut.
Ready to see those ideas in action? Start gathering a few swatches this weekend and watch the vision sharpen.
Hiring the Right Rural Builder in NSW
So you’ve sketched out the colour board, picked slip‑resistant tiles, and you can already picture that fresh‑scented farmhouse bathroom after a long day in the paddock. The next big question is: who’s actually going to turn that vision into reality?
First, trust your gut. A builder who’s been chewing the same dust on the same gravel tracks for 30‑plus years will already know the quirks of a Bourke summer or an Inverell downpour. You want someone who talks about “water‑pressure boosters on the farm” the same way they discuss “reclaimed timber finishes”. If they can’t name a single local council requirement for a new exhaust fan, walk away.
Check the credentials – and the paperwork
In NSW, a licence isn’t just a badge; it’s proof they’ve met strict safety and compliance standards. Ask for their licence number, then verify it on the NSW Fair Trading site. Also, request a copy of their public liability insurance – you don’t want a surprise claim when a tile cracks under a heavy boot.
Does the builder have a track record with farmhouse bathroom renovations? A quick look at their portfolio should show a few rural projects, not just glossy city kitchens. If they can point you to a recent job near Tamworth, you’ll see the same weather conditions you’ll face.
Ask the right questions
When you sit down with a potential builder, fire off questions that reveal how they handle the outback challenges. For example: “How do you protect the waterproof membrane when the site is a kilometre down a gravel road?” or “What’s your plan for a two‑week delivery delay on tiles during the rainy season?” Their answers will show whether they have a 4×4‑ready crew and a realistic timeline.
Don’t forget to discuss the contingency budget. A good rule of thumb is 10‑15 % for hidden surprises – think a cracked slab or an unexpected water‑pressure issue. A builder who builds that buffer into the quote is thinking ahead for you.
Real‑world example: Sam’s homestead near Bourke
Sam needed a bathroom that could survive his kids’ muddy boots and a harsh summer heat. He chose a builder who specialised in rural projects and who arrived in a 4×4 truck with all the tools pre‑loaded. The team mapped out a two‑week buffer for the concrete cure, sourced slip‑resistant matte tiles from a regional supplier, and installed a high‑capacity exhaust fan that could handle a 10‑minute shower after a day in the field. The job wrapped in eight weeks, stayed within the $32,000 budget, and Sam now swears by the builder’s “farm‑first” approach.
That story underlines a simple truth: the right rural builder blends technical know‑how with a genuine understanding of farm life.
Actionable checklist before you sign
- Verify licence and insurance details.
- Ask for at least three references from recent farmhouse bathroom projects in regional NSW.
- Confirm they have 4×4 access and can transport materials to remote sites.
- Get a written scope that includes a 10‑15 % contingency for unexpected issues.
- Discuss delivery timelines and buffer days for weather or road conditions.
Need a starting point? Bathroom Renovations for Rural Homes | Awesim Builders showcase exactly the kind of farm‑ready expertise you want.
Once the builder is on board, you might also think about the little luxuries that turn a functional space into a relaxing retreat. Adding a set of aromatic shower steamers can give your new farmhouse bathroom that spa‑like finish. Where to Find Shower Steamers Near Me: A Practical Guide walks you through the best places to pick them up.
Bottom line: hiring the right rural builder isn’t just about price; it’s about partnership, local knowledge, and a proven ability to handle the bumps that come with outback renovations. Follow the checklist, trust the builder who speaks your language, and you’ll watch that farmhouse bathroom come together without the usual headaches.
Conclusion
We’ve walked through everything from budgeting to picking slip‑resistant tiles, and now you can see why farmhouse bathroom renovations feel less like a nightmare and more like a rite of passage on the farm.
Remember that moment when you imagined stepping out of the shower and the floor staying cool under muddy boots? That’s the promise you get when you pair rugged materials with a builder who knows the back‑road challenges.
So, what’s the next move? Grab that checklist, give the licence numbers a quick look, and ask your builder how they’ll handle a two‑week delivery delay on tiles during the rainy season. A clear conversation now saves you a weekend of headaches later.
And if you’re still on the fence about whether to go full‑gut or a surface upgrade, think about the long‑term payoff: a bathroom that withstands the outback, adds resale value, and gives you a spot to unwind after a long day.
Bottom line: farmhouse bathroom renovations succeed when you blend solid planning, the right materials, and a rural‑focused builder who talks your language. When you’re ready to turn the plan into a finished space, reach out to a team that lives the farm life every day today.
FAQ
What’s the biggest mistake people make with farmhouse bathroom renovations?
Most folks dive straight into the design and forget the basics – a solid waterproof membrane and slip‑resistant flooring. On a farm that means mud, boots and a lot of water, so if the membrane isn’t sealed properly you’ll end up with mould under the tiles and costly repairs. Add a 10‑15 % contingency to your budget and you’ll avoid the nasty surprise when hidden pipework shows up.
How long should I expect a farmhouse bathroom renovation to take in regional NSW?
Rural NSW weather loves a surprise – sudden downpours can halt tiling for days. That’s why we always build a two‑week buffer into the schedule, especially for concrete curing and material deliveries that travel dusty back‑roads. Talk to your builder about a realistic Gantt chart, flag any road closures, and lock in a contingency day for each major trade. When the rain hits, you’ll already have a plan instead of a panic.
Which materials work best for the climate swings in NSW?
Choosing the right material starts with the climate swing in regional NSW – scorching summers, chilly winters and occasional floods. Matte‑finish porcelain tiles with a PEI rating of 4 or 5 handle muddy boots and heavy foot traffic, while sealed concrete slabs can be colour‑stained to mimic aged timber and stay cool under hot feet. Pair either with a breathable, waterproof wall membrane and you’ll get a surface that endures the outback without cracking or fading.
How do I verify I’m hiring the right rural builder?
The first thing I do with every client is check the builder’s licence number on the NSW Fair Trading register – it’s a quick way to confirm they’re qualified and insured. Ask for public liability cover and at least three references from recent farmhouse bathroom projects in the same region. A builder who can show you a completed job near Tamworth or Bourke already knows the local soil, water‑pressure issues and delivery challenges.
What’s the cost difference between a full‑gut remodel and a surface‑upgrade?
Full‑gut remodels give you total design freedom but run about $4,500‑$6,000 per square metre in regional NSW, while a surface‑upgrade refresh usually lands between $2,800‑$3,500 per metre. If you’re comfortable keeping the existing layout, the mid‑range option saves you weeks of labour and still lets you upgrade to slip‑resistant tiles and a new exhaust fan. Just remember to add a 10 % contingency no matter which route you choose.
How can I maintain my renovated farmhouse bathroom?
After the tiles are set and the vanity sealed, a quick monthly check can keep everything humming. Look for any water pooling around the splash‑back, tighten loose faucet nuts, and wipe the grout with a mild cleanser to stop salt from the water table building up. A simple 5‑minute routine each spring, before the heavy rains, will extend the life of your farmhouse bathroom and keep it looking fresh for years.
Is a DIY approach realistic for a farmhouse bathroom?
If you love getting your hands dirty, a DIY‑friendly makeover can shave $1,500‑$2,200 per square metre off the bill, but you’ll need confidence with waterproof membranes and tile cuts. Most rural owners find a hybrid approach works best – let a qualified builder handle the plumbing and waterproofing, then you install the tiles and finish the vanity. This way you still save on labour while avoiding the biggest headaches that come from a botched leak.


1 Comment