

Ever walked into your farmhouse kitchen and felt the space could use a fresh breath, but the thought of a full‑blown renovation makes you wince?
You’re not alone. Many of our neighbours across Tamworth, Armidale and the far‑west say the same – the heart of the homestead deserves a look that matches the rugged charm of rural life while handling the daily grind of farm chores.
In our experience, a farmhouse kitchen renovation doesn’t have to mean a costly, city‑style overhaul. It’s about blending sturdy, weather‑ready materials with the warm, lived‑in feel you already love.
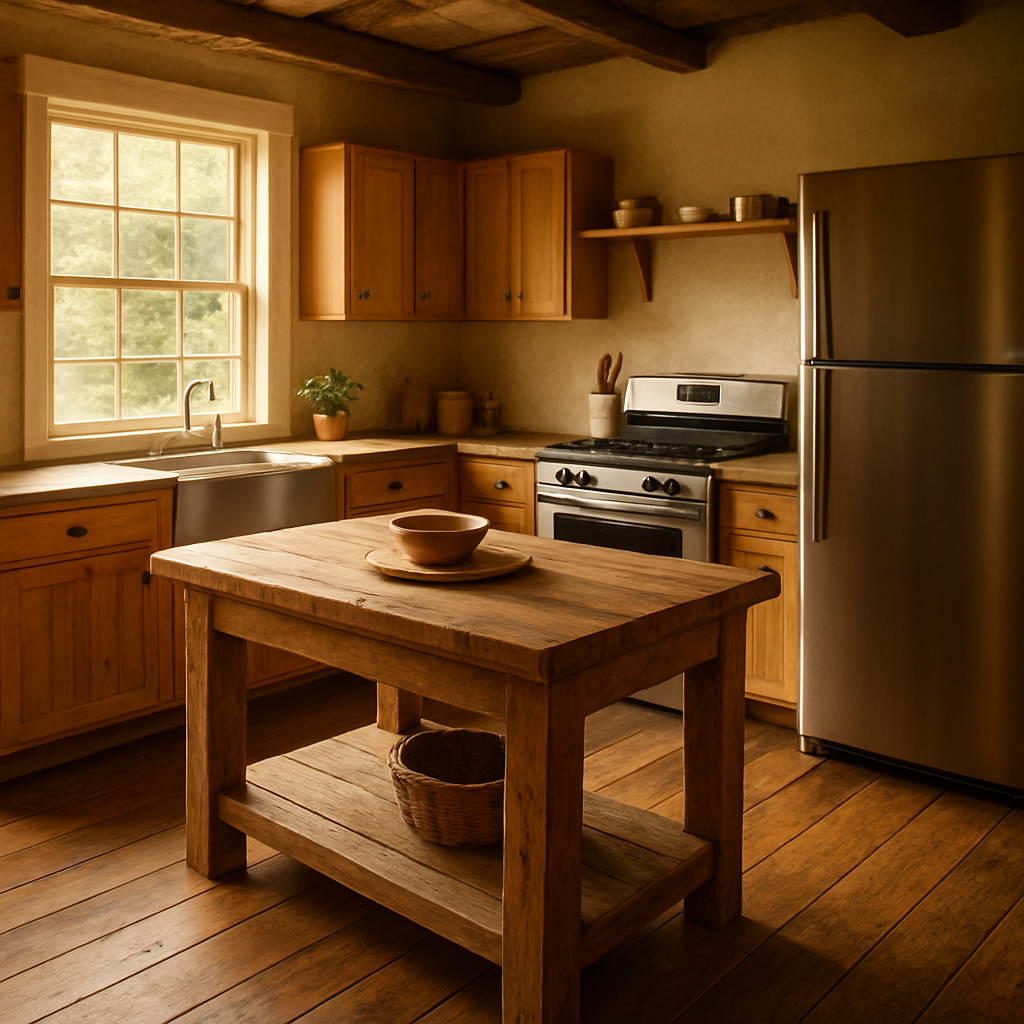
Think about the last time you cooked a Sunday roast while the kids chased the dog around the kitchen island. That moment of chaos and comfort is exactly the vibe we aim to preserve, even when we swap out old cabinets for new, low‑maintenance timber.
But where do you start? First, picture the workflow: prep sink, cooking zone, and storage. A simple layout tweak – moving the sink a metre closer to the stove can shave minutes off every meal prep, and that’s priceless when you’re juggling livestock checks and school runs.
Next, choose finishes that stand up to dust, mud and the occasional splash of rain that sneaks in during a storm. We often recommend sealed, reclaimed hardwood floors and fibre‑cement wall panels; they look rustic yet survive the harsh NSW outback.
And don’t forget lighting. Natural light from a north‑facing window paired with LED pendants over the island keeps the space bright without draining the power budget – a practical win for any remote property.
Now, you might wonder about budgeting. A phased approach works wonders: start with the most wear‑and‑tear items – countertops and flooring – then move on to cabinets and appliances as the season allows.
One tip we’ve seen pay off on a cattle station near Bourke: install a sturdy, stainless‑steel prep bench that can be wiped clean with a hose. It saves time and cuts down on cleaning chemicals, which is a bonus for the environment and your wallet.
Finally, remember that a farmhouse kitchen renovation is as much about the story you tell as the bricks you lay. When the finished space invites family, friends, and even the neighbour who stops by for a cuppa, you know the project was worth every nail.
Ready to turn that vision into reality? Let’s dive in and map out the first steps together.
TL;DR
A farmhouse kitchen renovation blends rugged NSW charm with practical upgrades, so your homestead stays cozy while handling daily farm chores.
We’ll guide you through phased budgeting, durable material picks, and smart layouts, ensuring every nail tells a story worth sharing for you and your neighbours alike on the property.
Step 1: Assess Your Existing Farmhouse Kitchen Layout
First thing’s first – stand in the middle of your kitchen and just look around. What do you notice? Maybe the prep sink feels a good way off the stove, or the island blocks the flow of traffic when the kids rush in for a snack. That gut reaction is the starting point for any farmhouse kitchen renovation.
Take a Walkthrough
Grab a notepad or use your phone’s notes app and walk the space three times. The first round, just observe. The second, sketch a quick floor plan – even a rough rectangle with circles for appliances does the trick. The third, mark any “pain points”: a narrow aisle, a door that swings into the cooking zone, or a window that lets in too much dust on windy days.
And don’t forget the little things that matter to rural life – where do you hose down the prep bench after a muddy morning? Is the trash bin tucked under a cabinet you can’t reach when the bin’s full? Those details will shape where we move things later.
Map the Workflow Triangle
In a farmhouse kitchen, the classic work triangle (sink, stove, fridge) is still gold, but the distances need to suit a busy farm schedule. Measure the legs of the triangle – ideally each side sits between 1.2 and 2.4 metres. If your sink sits three metres from the stove, you’re losing precious minutes every day.
Think about it this way: every extra step is a step you could be spending checking the livestock or feeding the dogs. If the numbers look off, jot down where you could shift a unit – maybe a portable stainless‑steel prep table could slide closer to the stove without a permanent remodel.
Spot Problem Areas
Look for “traffic jams”. Does the door open onto the main cooking area? Does the island become a barrier when the family gathers for a Sunday roast? Note any spots where you have to duck or sidestep. Those are prime candidates for re‑thinking the layout.
Also, check the lighting. Are there dark corners where you can’t see the work surface? In a farmhouse setting, you’ll want a mix of natural north‑facing light and sturdy LED pendants that survive a bit of dust and the occasional splash of rain.
Here’s a quick checklist to run through:
- Clear pathways of at least 1 metre wide.
- Sink within a metre of the stove.
- Refrigerator easy to reach from both the prep area and the cooking zone.
- Plenty of durable, easy‑to‑clean surfaces.
- Lighting that covers every work zone.
Once you have your notes, you’ll see patterns emerge – maybe the fridge is perfectly placed but the sink is too far, or the island is a great gathering spot but blocks the door. Those insights give you a roadmap for the next steps.
In our experience working on farms from Tamworth to Bourke, the most successful renovations start with this honest audit. It saves time, money, and the inevitable “I wish I’d thought of that” moments once the walls go up.
After you’ve got the lay of the land, you’ll be ready to sketch out a new layout that respects the farmhouse vibe while cutting down on wasted steps. Remember, a solid assessment is half the renovation – the other half is execution, which we’ll cover in the next step.
Take a moment now to walk your kitchen again with fresh eyes. Jot down three things you’d change right away – those will become the backbone of your design brief.
Step 2: Plan Materials and Design for Rural Durability
Now that you’ve mapped the flow, it’s time to think about what’s going to survive the dust, the mud and the occasional outback storm. In a farmhouse kitchen, durability isn’t a luxury – it’s a daily requirement. The right materials keep the space looking fresh after the kids spill juice, the dog drags in a mud‑covered boot, or a sudden downpour sneaks a splash through the back door.
Pick surfaces that love the land
Start with the floor. A solid, sealed timber board or a high‑density fibre‑cement tile can take a lot of abuse. In the Riverina, we’ve seen reclaimed hardwood that’s been sanded, sealed and then left to weather naturally – it looks great and the seal protects against water and dust. For a low‑maintenance option, check out hardwood flooring experts at Millena Flooring – they specialise in finishes that resist stains and can be hosed down without warping.
Next, the benchtops. Stainless‑steel is a favourite on cattle stations because it endures heavy chopping, hot pans and a quick hose‑down. But it can feel cold. A compromise is a concrete‑engineered stone topped with a food‑safe seal. Concrete holds up to temperature swings and, when sealed, won’t crack from a stray hammer blow.
Cabinetry built for the bush
Standard melamine doors might look nice in a city condo, but they’ll buckle if a sudden humidity spike hits. Instead, opt for solid timber or marine‑grade plywood with a UV‑stable veneer. In a recent project near Bourke, we installed cabinets with a water‑repellent finish; the owner swears they still look brand new after a decade of washing the floor with a hose.
Don’t forget the hardware. Stainless‑steel hinges and drawer slides survive rust better than cheap zinc alloys. A simple tip: ask your builder to pre‑drill a small pilot hole for each screw – it stops the wood from splitting when you open the drawer after a long day of feeding the livestock.
Plan for the elements
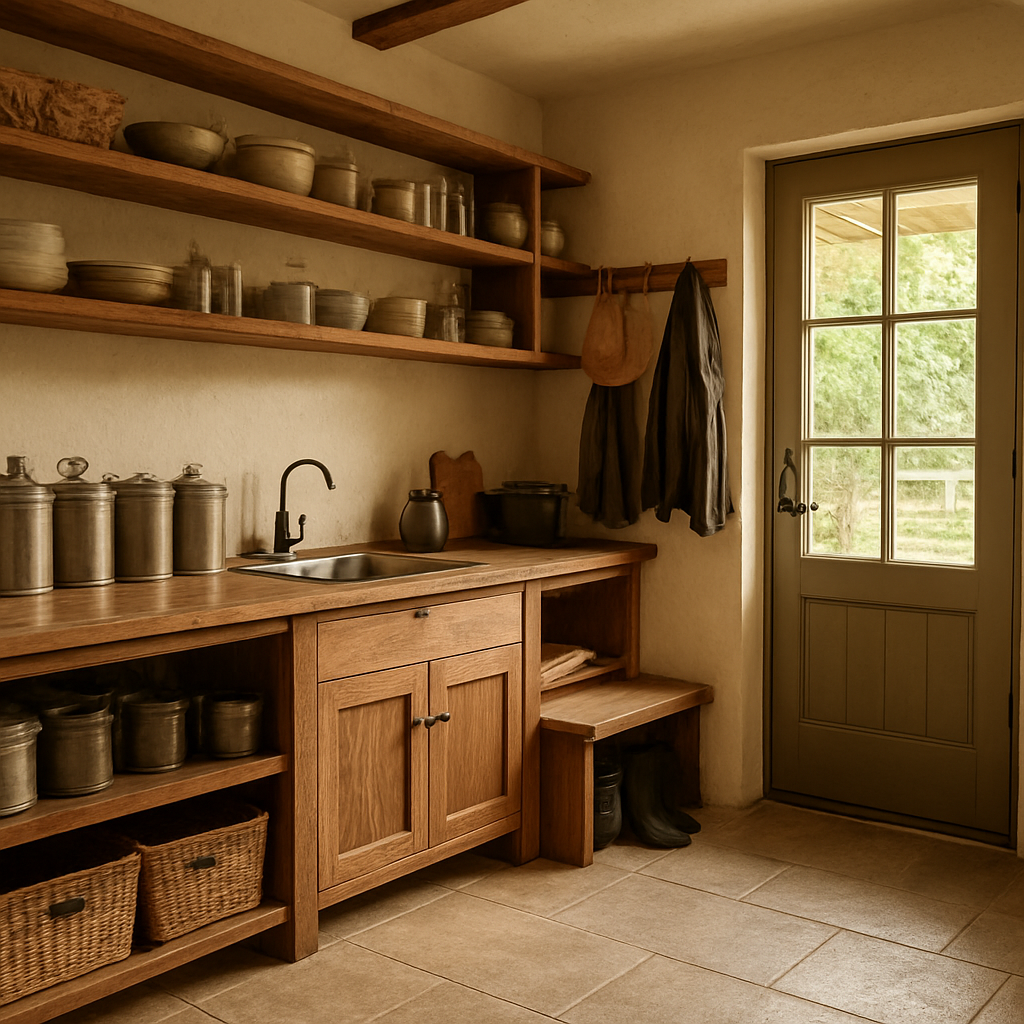
Rural kitchens often double as a place to drop off garden produce, store feed bags or even mop up after a wet morning. Design a dedicated mud‑room entry with a concrete splash‑back and a durable, easy‑to‑clean bench. In Tamworth, we added a “wash‑down” station by the back door – a stainless‑steel sink, a rough‑sawn timber bench, and a drainage line that leads straight to the outdoor soakaway. The family now wipes boots at the door instead of tracking mud onto the main floor.
Ventilation matters too. A roof vent or a high‑capacity extractor fan helps keep humidity low, protecting timber and preventing mould on walls. If you have north‑facing windows, consider installing blackout curtains that also act as thermal blankets – they block summer heat and keep winter chill out, extending the life of your finishes.
Actionable checklist
Grab a clipboard and run through this quick audit before you sign off on any spec sheet:
- Floor: sealed reclaimed timber, fibre‑cement tile, or concrete with a non‑slip coating?
- Benchtop: stainless steel, concrete‑engineered stone, or a sealed stone veneer?
- Cabinets: solid timber or marine‑grade plywood with UV‑stable veneer?
- Hardware: stainless‑steel hinges, full‑extension slides, pre‑drilled pilot holes?
- Mud‑room: dedicated wash‑down sink, drainage, rugged bench material?
- Ventilation: roof vent, extractor fan, insulated window treatments?
Check each item against your budget and climate. If a material looks perfect on paper but costs twice as much as a comparable alternative, weigh the long‑term savings on maintenance. In many of our rural projects, spending a bit more on a waterproof seal on the floor saved hundreds of dollars in repairs over ten years.
Finally, remember that every decision ties back to the story you want your kitchen to tell. A sturdy timber floor that’s been sanded and resealed every few years becomes a family heirloom – just like the bench where you’ve kneaded dough for generations. For more detailed guidance on material choices, swing by our Farmhouse Kitchen Renovations NSW: A Practical Guide for Rural Homes. It walks you through each product option with photos from real farms across New South Wales.
Step 3: Managing Permits and Regulations in NSW
Alright, you’ve sorted the layout and picked the tough‑as‑nails materials – now the paperwork. In rural NSW a farmhouse kitchen renovation can hit a snag if you skip the permits, and trust us, the last thing you want is the council stopping work halfway through because a wall wasn’t approved.
The good news is the rules are pretty straightforward once you break them down. Most of the work we do – swapping cabinets, laying new flooring, installing a stainless‑steel prep bench – falls under the “kitchen, bathroom and laundry renovation” category. That means you’ll need a qualified contractor licence if the job’s price tag tops $5,000 in labour and materials.
First step? Confirm whether the specific items you plan to change are “internal” work or if they affect load‑bearing elements like studs, joists or the roof line. The NSW government makes that distinction clear: anything that touches the structural skeleton usually needs a separate structural licence, and you’ll have to bring a licensed tradesperson on board.
So, how do you actually get the paperwork sorted? Grab a cup of coffee, fire up Service NSW, and look for the “Kitchen, Bathroom and Laundry Renovation Work” page. That page walks you through the licence types, the qualifications you’ll need, and the forms you’ll submit. It even tells you the fines you could face – up to $22,000 as an individual or $110,000 as a company – if you go ahead without the right paperwork. For the official details, see the NSW building licence requirements.
Know When a Permit Is Needed
In practice, you’ll need a permit for any new plumbing, electrical, or gas work – think new sink drains, rewiring lights over the island, or moving a gas hob. You also need approval if you’re adding a window, changing the external wall opening, or installing a roof‑mounted vent. Simple cosmetic swaps – like repainting cabinets or changing hardware – don’t trigger a permit, but they still need to meet the relevant Australian Standards.
Check Your Builder’s Licence
Before you sign a contract, ask the builder for their contractor licence number and make sure it covers the “kitchen, bathroom and laundry renovation” class. You can verify the licence on the NSW Building Commission website – a quick lookup saves you from a nightmare where an unlicensed tradesperson does the work and the council fines you later. If you’re hiring a specialist – say a structural engineer for a new load‑bearing beam – they too must hold the appropriate specialist licence.
Apply Through Service NSW
When you’re ready, head to the Service NSW portal, select “Apply for a licence or certificate”, and choose the category that matches your project’s scope. You’ll need to upload proof of qualifications – usually a Certificate IV in Building or Plumbing – and a signed contract that outlines the works. Processing times are usually a couple of weeks, so factor that into your renovation schedule; we always build a two‑week buffer before ordering custom timber cabinets.
Common Pitfalls and How to Avoid Them
A frequent mistake on farms is assuming the old shed‑style kitchen doesn’t need a permit because it’s “just a shed”. The law doesn’t care how rustic the look is – if you’re altering the floor structure or adding a new vent, you’re in the permit zone. Another trap is forgetting to notify the council about temporary works like scaffolding; they can flag you for a breach if the scaffolding blocks a neighbour’s fire escape. Keep a simple log of every submission, approval date and the contact person – it’s a lifesaver when the next inspection rolls around.
Quick Checklist Before You Start
Before the first nail hits, run through this short list – it’ll keep you on the right side of the regulator and save you a few phone calls.
- Confirm the scope of work and whether it touches structural elements.
- Check that your builder holds a current “kitchen, bathroom and laundry renovation” licence.
- Apply for the permit via Service NSW at least two weeks before ordering materials.
- Retain all approval emails and signed contracts on site.
- Schedule the final inspection before closing out the project.
Step 4: Choosing Appliances and Fixtures – Comparison Table
Now that you’ve nailed the layout and picked the tough‑as‑nails materials, it’s time to decide which appliances and fixtures will actually survive a busy farm kitchen.
You might be thinking, “Do I really need a fancy fridge when I’m already juggling feed bags and a dog that loves to nap on the counter?” The answer is yes – but the right spec makes all the difference.
In our experience, the most common mistake is reaching for the cheapest option because it looks neat in a showroom. On a rural property that means a dishwasher that can’t handle a hose‑down or a range that rusts after a single rainstorm.
Below is a quick comparison table that lines up the three categories we see farm families wrestle with most: cooking appliances, refrigeration, and the small‑scale fixtures that tie everything together.
| Appliance/Fixture | Rural‑Ready Option | Key Considerations |
|---|---|---|
| Cooktop | Stainless‑steel sealed‑burner gas hob | Handles heavy pots, easy to hose‑down after muddy days. |
| Oven | Double‑wall insulated electric oven | Stable temperature, self‑cleaning cycle for less scrubbing. |
| Fridge | Commercial‑grade stainless‑steel refrigerator | Resists temperature swings, built‑in lock, extra durability. |
| Freezer | Chest‑style freezer with heavy‑duty lid | Less prone to leaks, can stack feed bags on top. |
| Dishwasher | High‑temperature stainless‑steel unit with “farm‑friendly” cycle | 70 °C wash, strong spray clears mud and grease. |
| Sink & Taps | Deep stainless‑steel prep sink with pull‑out sprayer | Room for large trays; sprayer makes hose‑downs a breeze. For premium options, check out the range of high‑quality taps and sinks. |
| Lighting | LED pendants + IP‑rated ceiling fan | Bright, energy‑efficient light; fan doubles as vent for steam. |
| Ventilation | Roof‑mounted extractor fan with washable filter | High capacity for dust; filter cleaned every few weeks. |
| Controls | Mechanical knobs (or sealed digital console with battery backup) | Survives power surges; sealed consoles keep dust out. |
Let’s walk through each row so you can see why one choice might be a game‑changer for a farmhouse kitchen renovation.
Cooktop – A sealed‑burner gas hob in stainless steel is the workhorse of a rural kitchen. The sealed design prevents dust and mud from slipping between the burners, and the metal tolerates the occasional hose‑down after a muddy morning.
If you’re on a remote off‑grid site, an induction cooktop can be a lifesaver, but you’ll need a reliable inverter. Most of our clients prefer gas because the fuel is already on‑site for heaters and water heaters, cutting extra wiring costs.
Oven – Look for a double‑wall insulated model with a self‑cleaning cycle. The extra layer keeps the interior temperature stable even when a door is left open for a quick peek at the roast.
Fridge – A commercial‑grade, stainless‑steel fridge with a built‑in door lock stands up to temperature swings and the occasional accidental splash of water. The extra durability is worth the $200‑$300 premium over a domestic unit.
Freezer – A chest‑style freezer with a heavy‑duty lid is less prone to leaks than an upright model, and you can stack feed bags on top without worrying about the door wobbling.
Dishwasher – Choose a high‑temperature, stainless‑steel interior dishwasher that advertises a “farm‑friendly” cycle. Those cycles run hotter (70 °C) and use a stronger spray, so you can load muddy pots and still get a clean finish.
Sink & taps – This is where a little design flair meets practicality. A deep, stainless‑steel prep sink with a high‑arc faucet gives you room for large trays, while a pull‑out sprayer makes hose‑downs a breeze. For premium options, check out the range of high‑quality taps and sinks offered by deVOL Kitchens.
Lighting – LED pendants over the island provide bright, energy‑efficient light without the heat of halogen. Pair them with a rugged, IP‑rated ceiling fan that can double as a vent for steam from a big pot of soup.
Ventilation – A roof‑mounted, high‑capacity extractor fan with a washable filter is essential. In dusty regions like the Riverina, a filter that you can clean every few weeks stops the motor from choking on grit.
Controls – Simple, mechanical knobs survive a farm’s occasional power surge better than fancy touch panels. If you must go digital, look for a model with a sealed console and a battery‑back‑up.
Here’s a quick checklist you can print and stick on the fridge:
- Cooktop: sealed‑burner gas or induction with inverter
- Oven: double‑wall insulated
- Fridge: commercial‑grade stainless
- Freezer: chest‑style
- Dishwasher: high‑temp farm cycle
- Sink: deep stainless with pull‑out sprayer
- Lighting: LED + IP‑rated fan
- Vent: roof‑mounted extractor with washable filter
- Controls: mechanical knobs or sealed digital console
Step 5: Implementing Rustic Finishes and Colour Schemes
Alright, you’ve got the layout, the tough‑as‑nails materials and the right appliances – now it’s time to give your farmhouse kitchen that warm, lived‑in look that makes you want to linger over a cuppa.
Choose a colour story that mirrors the land
Think about the soil colour outside your property. Is it a deep red ochre near Bourke, a dusty yellow in the Riverina, or a cool grey up near Armidale? Pull those tones into your walls and cabinets. A muted terracotta or warm sage works beautifully on plastered walls, while a soft dove‑grey on upper cabinets lets the timber floor steal the show.
Pro tip: paint a large swatch on the kitchen wall and watch it at sunrise and sunset. If it feels right in both light, you’ve nailed the hue.
Embrace reclaimed timber
Nothing says “farmhouse” like timber that’s lived a few lives already. We often source reclaimed pine or hardwood from old barns, then sand and seal it with a matte polyurethane. The grain tells a story, and the matte finish hides inevitable fingerprints from busy hands.
If you’re on a tight budget, look for locally milled boards with a distressed edge – they’re cheaper than full‑on reclaimed pieces but still carry that weathered charm.
Mix finishes for depth
Layering is key. Pair a smooth, sealed concrete benchtop with a rough‑sawn timber sideboard. Add a brushed‑nickel faucet and matte black hardware. The contrast keeps the eye moving and prevents the space from feeling flat.
Remember, rustic doesn’t mean rough all over. A sleek stainless‑steel sink sits perfectly next to a hand‑planed timber island – the mix tells a story of old and new working together.
Introduce texture with textiles
Softening a hard surface is as easy as a well‑chosen rug or a set of linen tea towels. Choose natural fibres – jute, hemp or cotton – in colours that echo your wall palette. A woven rug under the island not only adds warmth but also protects the floor from stray flour spills.
And don’t forget the curtains. Light‑filtering linen in a neutral tone lets morning light flood in while shielding the space from harsh glare.
Accent with metal and pottery
Hand‑forged iron hooks for hanging pots, a copper pot rack or a set of glazed earthenware bowls can become focal points. They’re functional and add a splash of colour that’s easy to swap out when trends shift.
We’ve seen a cattle station near Cobar install a reclaimed steel pot rack above the stove – the rust‑patina deepens over time, giving the kitchen an authentic patina that no paint can mimic.
Step‑by‑step colour rollout
- Start with the biggest surface – walls or cabinets – and commit to a single base colour.
- Layer secondary tones on trim, backsplashes and open shelving.
- Add accent pieces (metal, pottery, textiles) in complementary shades.
- Step back, view from different angles, and adjust if any colour feels out of sync.
Does this feel overwhelming? Take it one corner at a time. Paint the wall first, let it cure, then move on to the cabinets. By the time you’re adding the final metal hook, the colour story will already be breathing life into the room.
Final tip – test durability
Rural kitchens get a lot of wear. Before you seal a timber bench, run a damp cloth over it and let it dry. If the wood swells, choose a higher‑grade marine‑grade finish – it hides fingerprints and is easy to wipe down after a muddy cooking session.
When you’re happy with the look and feel, you’ll know you’ve created a space that’s as tough as the land and as inviting as a Sunday family dinner.
Step 6: Optimising Storage and Workflows for Farm Life
Alright, you’ve nailed the colour scheme and the sturdy benches – now let’s talk about where everything lives and how it moves. In a farmhouse kitchen, storage isn’t just a nice‑to‑have; it’s the backbone that keeps mud‑splattered boots, feed bags and a week’s worth of groceries from turning the room into a chaos zone.
Map the daily rhythm
First thing’s first: spend a typical workday in the kitchen and watch the flow. Where do you drop a dirty pot after a stewing session? Where does the kid stash a snack? Jot down the hot spots – they’ll become the anchors for your storage plan.
What we often see on stations near Bourke is a “prep‑zone wall” right next to the stove, fitted with deep metal bins and a hanging rail for large trays. The idea is simple – everything you need for cooking is within arm’s reach, so you’re not sprinting across the room with a muddy apron on.
Vertical versus horizontal
Space is at a premium on a farm, especially when the shed‑style kitchen doubles as a mud‑room. Go vertical wherever you can. Open‑shelf wall units, sturdy pegboards and wall‑mounted magnetic strips for knives free up floor space and give you a quick glance at what’s available.
But don’t ignore the floor. A low, reinforced timber bench with built‑in drawers works like a mini‑garage for your most‑used tools – think grain bags, a heavy-duty vegetable chopper, or that big cast‑iron pot you only bring out for Sunday roasts. The drawers slide out on full‑extension rails, so you never have to tip the bench over to reach the bottom.
Separate the mud from the meal
One mistake we keep hearing is “just toss the boots in the corner.” It looks tidy until the next rainstorm brings a wall of water through the back door. Install a dedicated mud‑entry bench with a sloped concrete top and a quick‑drain pipe. A simple stainless‑steel sink nearby makes the hose‑down routine a breeze and keeps the main kitchen floor dry.
Pair that bench with a set of lockable metal cabinets that can hold feed bags, cleaning supplies or farm paperwork. The lock keeps critters out and gives you peace of mind when you’re away on a cattle muster.
Smart zones for a smoother workflow
Think of the kitchen as three zones: prep, cook and clean. Keep the prep zone close to the fridge and pantry, the cook zone around the stove and oven, and the clean zone next to the sink and dishwasher. When the zones line up, you’ll shave minutes off every meal – minutes that add up when you’re juggling a herd and a homework schedule.
On a recent project near Cobar, we moved a bulk‑flour cabinet from the far wall into the prep zone and added a rolling cart that slides right under the sink. The farmer told us he now saves “about five minutes” on every bake because the ingredients are right there, not a trek away.
Quick‑grab accessories
Metal hooks, sliding rails and magnetic spice tins are cheap, durable and look right at home in a rustic kitchen. Hang a couple of heavy‑duty hooks on the prep wall for pot lids, a rolling rack for cutting boards, and a magnetic strip for steel knives. You’ll spend less time hunting for tools and more time actually cooking.
Don’t forget the kids – a low, open shelf at child height lets them help with snacks without you having to stoop down every time. It also keeps the “high‑up” cabinets free for the big items you only need once a week.
Checklist before you lock the doors
- Identify daily hot‑spots and map a prep‑cook‑clean zone layout.
- Install vertical storage: pegboards, open shelves, magnetic strips.
- Add a low, reinforced bench with drawers for heavy tools.
- Create a dedicated mud‑entry station with a sloped concrete top and nearby sink.
- Use lockable metal cabinets for feed bags, chemicals and paperwork.
- Hang sturdy metal hooks and magnetic knife strips for quick access.
- Place a child‑height open shelf for easy snack access.
Once you’ve ticked these boxes, you’ll notice the kitchen feels larger, cleaner and far less stressful on those busy farm mornings. It’s the kind of optimisation that lets you focus on the thing that matters most – feeding your family and your livestock without the extra headache.
And remember, a well‑organised space isn’t just about looks; it’s a safety net. When everything has a place, there’s less chance of a slipped pot or a stray feed bag causing a mishap.
Take a step back, walk through your new layout, and picture the next Sunday roast. If you can move from fridge to stove to sink without a back‑and‑forth shuffle, you’ve nailed the workflow.
Need a visual cue? Here’s a quick sketch idea to try on a napkin before you order any cabinets.
FAQ
What is the first step in a farmhouse kitchen renovation?
Start by mapping your daily flow – where you grab the milk, where you chop, and where you clean up. Walk through a typical morning on the farm and note the hot‑spots. Sketch a simple floor plan, draw the work triangle and flag any traffic bottlenecks. In our experience, a clear layout blueprint saves weeks of re‑work once the cabinets arrive.
How do I choose materials that survive dust, mud and harsh NSW weather?
Pick surfaces that you can hose down without worrying about warping. sealed timber or fibre‑cement tiles for the floor, stainless‑steel or concrete‑engineered benchtops, and solid timber or marine‑grade plywood for cabinets. Look for UV‑stable finishes and stainless‑steel hardware – they resist rust even after a rainy season. We often recommend a non‑slip coating on concrete so it stays safe when boots track in moisture.
Do I really need a building permit for a kitchen remodel on a farm?
Yes, if the work touches plumbing, electrical, gas or any structural element. NSW classifies “kitchen, bathroom and laundry renovation” as licensed work once the cost exceeds $5,000. A simple permit for a new sink or a vent can be applied through Service NSW and usually takes a couple of weeks. Skipping it can lead to fines or having to undo work later.
What are the most farm‑friendly appliances for a rustic kitchen?
Look for stainless‑steel or heavy‑duty models that can handle a hose‑down. A sealed‑burner gas hob, a double‑wall insulated electric oven, and a commercial‑grade fridge with a lock are staples. Dishwashers with a “farm‑friendly” high‑temp cycle clear mud and grease. Mechanical knobs survive power spikes better than touch panels, which is a plus when you’re on a remote outback grid.
How can I keep mud and livestock traffic out of the cooking zone?
Create a dedicated mud‑entry bench by the back door – a sloped concrete slab, a stainless‑steel sink and a quick‑drain pipe. Pair it with lockable metal cabinets for feed bags and cleaning chemicals. A simple rubber mat outside the door catches the bulk of the grit before it reaches the main floor. We’ve seen this cut floor cleaning time by half on stations near Bourke.
What storage tricks make a farm kitchen feel bigger?
Go vertical with open‑shelf wall units, pegboards and magnetic knife strips. Use low, reinforced timber benches with full‑extension drawers for heavy tools like grain bags or a cast‑iron pot. Keep a child‑height open shelf for snacks – it keeps the high cabinets free for bulk items. Group like items together in lockable metal cabinets so you never have to hunt for a feed bag during dinner prep.
How do I stay on budget without compromising durability?
Prioritise the high‑wear zones first – floor sealing, benchtop surface and mud‑room bench. For the rest, consider locally milled timber with a distressed edge instead of exotic reclaimed wood; it looks authentic and costs less. Get multiple quotes from rural‑focused builders who understand 4×4 site access – that can shave logistics costs. Awesim Building Contractors, for example, often bundles material delivery with on‑site installation to keep travel expenses transparent.
Conclusion
After digging through layouts, materials, permits and storage, you’ve probably felt a mix of excitement and a hint of overwhelm – that’s normal.
What matters most is that every decision you make ties back to one simple idea: a farmhouse kitchen renovation should work with the land, not against it. If the floor can survive a muddy boot and the bench can hold a cast‑iron pot, you’ve already won half the battle.
So, what’s the next step? Grab a notepad, walk the kitchen as you would on a busy farm morning, and tick the quick‑check list we’ve built into each section. Spot any missing mud‑entry bench, double‑check that your hardware is stainless‑steel, and confirm the permit paperwork is on the shelf.
In our experience, the projects that stick around for generations are the ones where the builder respects the farm’s rhythm – scheduling around shearing season, using 4×4‑ready deliveries, and choosing finishes that can be hosed down without a fuss.
When you finish, you’ll have a space that feels like a well‑worn family kitchen: sturdy, easy to clean, and ready for the next Sunday roast. Ready to get started? Let’s turn that vision into reality.
Remember, a solid farmhouse kitchen renovation protects your home and your peace of mind for years to come.


