

Ever stood in the middle of a dusty paddock, watching a rust‑ed shed sway in the breeze, and thought, ‘I could have a better place for the tractor and the mower’?
You’re not alone. Most farm and rural property owners in NSW hit that moment when the old outbuilding just can’t keep up with the equipment they rely on.
That’s where solid machinery shed plans come in – a blueprint that turns a vague idea into a structure that actually works with your daily routine, the soil type, and the weather up here.
In our experience, the most common mistake is grabbing a generic shed design off the internet and hoping it fits a 12‑metre bay, a concrete slab, and a roof that can survive a summer storm. It ends up costing extra labour, extra steel, and a lot of frustration.
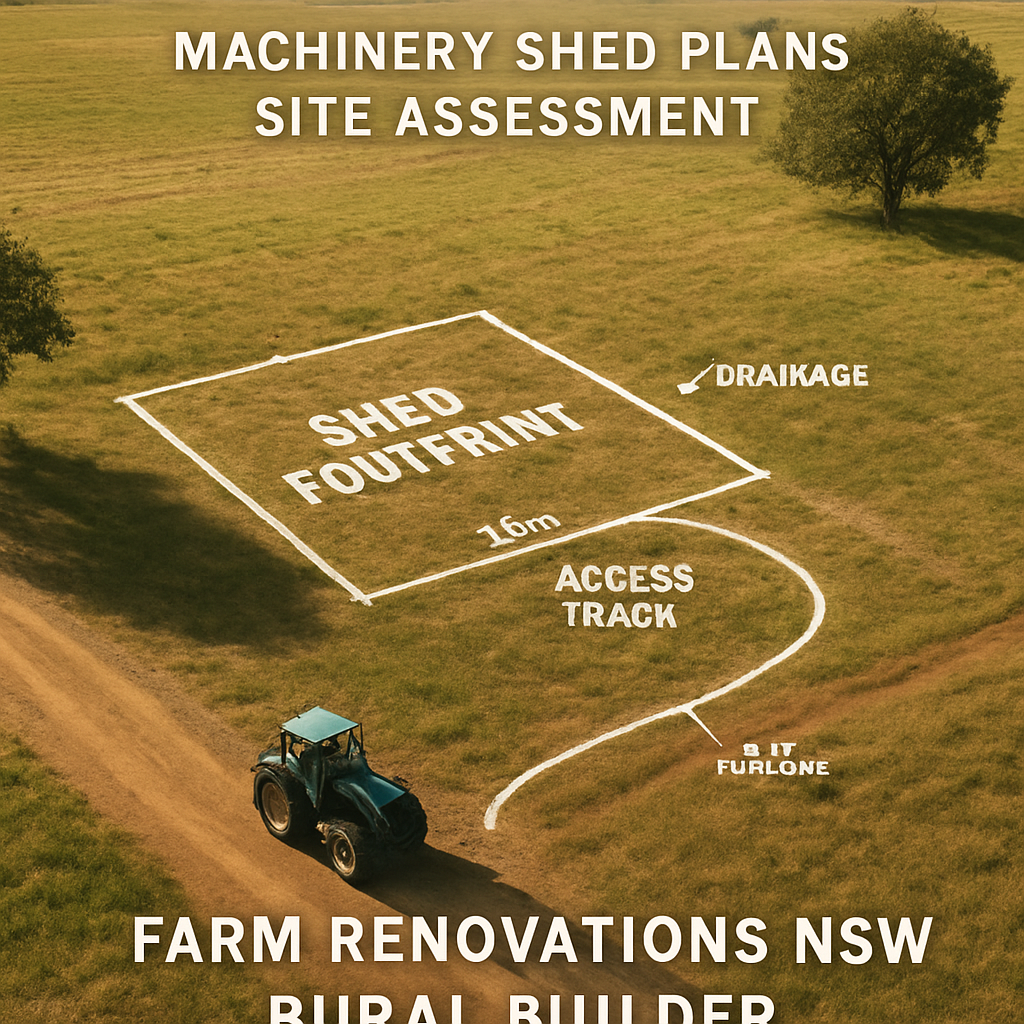
So, what should a smart farmer look for? First, a clear layout that marks where the tractor will turn, where the feed bins sit, and how the doors line up with the driveway. Second, a foundation plan that matches the ground conditions – whether you’re on a sandy creekside or a compacted clay field. Third, roof pitch and cladding details that keep the interior dry during a sudden downpour.
When you start sketching your own machinery shed plans, we always recommend a quick on‑site check with a 4×4 vehicle. It lets you see the exact access angle, any low‑lying water lines, and the space you actually have between the barn and the fence. That little step saves a day’s work later.
And don’t forget future growth. A shed that can accommodate a second piece of machinery or an extra storage loft will pay for itself when your operation expands. A simple loft frame or a reinforced roof truss can make that possible without a full rebuild.
Bottom line: Good machinery shed plans are the foundation of a functional, long‑lasting outbuilding. They give you confidence that the shed will stand up to the NSW outback, protect your equipment, and fit seamlessly into your farm’s workflow.
Ready to turn that vision into a solid set of plans? Let’s dive into the details and see how a well‑thought‑out design can save you time, money, and a heap of headaches.
TL;DR
Good machinery shed plans turn a vague idea into a sturdy, weather‑proof outbuilding that fits your farm’s layout, soil and future growth, saving you time, money and countless headaches. By following our step‑by‑step guide you’ll know exactly how to design foundations, roof pitch and access lanes so your shed stands strong in the NSW outback for years to come.
Step 1: Assess Site & Regulations
Let’s be blunt: a great shed starts before the first nail. You can have perfect machinery shed plans on paper, but if the site floods or local rules forbid bay doors where you want them, you’ll be back to square one.
First, walk the site at different times. Drive a 4×4 into the spot and imagine turning your biggest tractor. Mark where water pools after rain. Note whether the ground is sandy, heavy clay or rocky, each needs a different foundation approach. In our experience, this simple on‑site check saves days and dollars later.
Check council and planning rules
Different shires in NSW have different thresholds for sheds that need approval. Does your local council require a development application for buildings over a certain size? Are there easements, heritage overlays, or bushfire construction requirements that affect cladding and setbacks? Call the council or check their planning maps early. It’s a small phone call that prevents a major headache.
Utilities, access and safety
Where will power, water and drainage run? If you’re planning lighting, 3‑phase power or an office space inside the shed, plan those trenches now. Think about access—are gates, fences or low bridges going to limit delivery trucks? Note clearances for hay trailers and forklifts. Also check for buried services; a simple dial‑before‑you‑dig search is a must before excavation.
Next, consider environmental risk. Is the site on a flood plain? Do prevailing winds drive dust across the proposed doors? If you’re near bushland, bushfire attack level (BAL) ratings can change material choices. These are not abstract rules, I’ve seen sheds rebuilt because cladding wasn’t compliant for local conditions.
So, what should you do next? Use this quick on‑site checklist:
– Walk the turning circle for your largest machine, mark it on the plan.
– Note high and low points and take photos after heavy rain.
– Record soil type and any obvious rock or roots.
– Check local council thresholds, overlays and bushfire zones.
– Confirm access for delivery trucks and equipment.
– Dial‑before‑you‑dig and locate buried services.
– Decide early on power, water, and drainage needs.
Does this really work? Yes. When we prepare machinery shed plans for farmers around Tamworth, Moree or Dubbo, these checks let us design the right slab, set sensible door sizes and avoid costly repositioning. If you want help translating site notes into buildable plans, Awesim Building Contractors can perform a site assessment and advise on local regulations before you lock anything in. No hard sell, just practical advice so your shed goes up once and stands right.
Wrap up: spend time on the ground, ring council, and check services. Do that and your machinery shed plans will be practical, compliant and ready to build.
If you’d like, book a site visit so measurements and local rules are taken care of up front. It’s the best insurance for getting your machinery shed plans right the first time.
Step 2: Design Layout & Size
Now that the site is mapped and the council boxes are ticked, it’s time to pull out the ruler and start shaping the space where your tractor will live.
Designing the layout isn’t just about drawing a rectangle on paper – it’s about fitting the daily rhythm of your farm into a structure that works for years to come.
Map your workflow before you draw the plan
Grab a notebook and walk the paddock with a cup of coffee. Where does the 4‑wheel drive turn? Where do you park the trailer after a day’s work? Sketch those pathways first, then drop the shed in the middle. In our experience, farms that let the shed sit on the “high‑traffic” line end up re‑routing everything later – a costly nightmare.
Tip: use coloured tape on the ground to visualise the turning circle. A 12‑metre bay needs roughly a 4.5‑metre radius for a standard 3.5‑metre tractor plus a trailer. If the tape overlaps a fence or water tank, you’ve spotted a conflict before the first steel beam arrives.
Size the bay for today and tomorrow
Start with the biggest piece of machinery you own – a 4‑WD, a combine, or a hay‑baler. Measure its width, height and length, then add at least 600 mm of clearance on each side. That extra space becomes a safety buffer for doors, ramps and future add‑ons.
Real‑world example: a cattle station near Bourke added a 3‑metre wide mezzanine loft after the first year because the original 10‑metre span left no room for a grain hopper. By planning a 12‑metre span from the outset, they avoided a second foundation pour and saved around $8,000 in labour.
Roof pitch and headroom – more than just looking good
In NSW the summer storms can dump 150 mm of rain in an hour. A roof pitch of at least 15° (1:4) encourages water to run off quickly, reducing ponding on the cladding.
For tall equipment like a front‑loader, you’ll want a clear internal height of 4.2 metres at the ridge. That means a higher pitch or a shallow‑slope “skillion” roof with extra purlins. The key considerations for a new farm shed include checking door clearance – the roller‑door drum alone can need half a metre of extra room.
Layout tricks that keep the flow smooth
- Drive‑through lanes: If you can line up two doors on opposite walls, you eliminate the need to reverse a tractor inside the shed – a huge safety win.
- Column‑free zones: Use open‑web trusses (UB columns) to create a clear 6‑metre wide centre aisle. This avoids a support beam in the middle of a large combine’s path.
- Utility pockets: Allocate a corner for power sockets, water outlets and a small pump house. Keep these utilities out of the main traffic lane.
We’ve seen farms in Armidale lose an entire day of work because a water tank was placed directly behind a roller door, forcing the driver to back up and risk damage. A quick layout tweak – moving the tank 2 metres to the side – solved the issue before any concrete was poured.
Actionable checklist for your machinery shed plans
- List every piece of equipment you’ll store, noting width, length and height.
- Draw the tractor turning circle on the ground; record the radius.
- Choose a roof pitch of at least 15°, then calculate ridge height for the tallest equipment.
- Decide if you need a drive‑through layout – place doors opposite each other if possible.
- Mark column‑free zones using open‑web trusses for a clear centre aisle.
- Plan utility zones (power, water, lighting) away from main traffic lanes.
- Sketch the final layout on graph paper or a simple CAD tool, then compare it to the tape‑marked ground truth.
- Run the sketch past a neighbour or farm manager – a fresh eye often spots a clash you missed.
When the checklist feels solid, hand it over to your builder. Awesim Building Contractors will use it to size the foundations, order the right amount of steel and ensure the roof can bear the local wind loads.
And remember, a well‑thought‑out layout saves you not just money, but countless hours of manoeuvring on a hot summer day. If you’re still unsure about the perfect span, have a look at the range of custom farm sheds options for inspiration – the dimensions they offer can give you a quick sanity check against your own measurements.
Take a few minutes this week to lay out the tape, walk the lines and tick the checklist. The effort you put in now will pay off every time you roll a tractor in and out, rain or shine.
Step 3: Choose Materials & Construction Methods
Alright, you’ve mapped the site and settled on a layout – now the real fun begins. Picking the right material and the way you’ll actually build the shed can be the difference between a structure that lasts thirty years and one that needs a new roof after the first storm.
Start with the frame: steel vs timber
In most NSW farms we see two clear choices. Structural steel frames are almost unbeatable when you need a high‑load, column‑free bay for a combine or a hay‑baler. They’re resistant to rot, termites and the occasional flood‑soaked ground. If you’re leaning that way, take a look at the guide on structural steel sheds in NSW – it breaks down the key things to ask a supplier.
Timber is still a solid option when you’re on a tighter budget or the shed will house lighter equipment. Just be sure the timber is treated, the joist spacing matches the span, and you add extra bracing for wind loads that can exceed 120 km/h in the outback.
Cladding and roofing – durability meets cost
Colourbond steel is the go‑to for most farm owners because it’s rust‑proof, UV‑stable and easy to clean. A 26 gauge sheet will shrug off a 150 mm rain event without sagging. If you prefer a more traditional look, corrugated iron still does the job, but expect a higher maintenance cadence.
For roofs, aim for at least a 15° pitch – it helps water shed quickly and reduces the risk of ponding on the cladding. If your shed will store tall machinery, consider a skillion roof with a higher ridge; the extra headroom can save you a costly interior modification later.
Foundation choices – don’t skimp here
Even the toughest steel frame will flop if the slab isn’t up to spec. A compacted gravel pad works for light sheds on firm ground, but most machinery sheds need a reinforced concrete slab of at least 150 mm thick, with steel mesh and proper footings. This meets most council bearing‑capacity requirements and gives you a level platform for heavy rollers.
When you’re on a marginal soil – say a sandy creek side near Gunnedah – a sand‑filled trench or a blinding layer of hardcore under the slab can boost stability without a massive cost increase.
Construction method – kit vs custom build
If you enjoy a hands‑on approach, the kit method from suppliers like large machinery shed kits gives you pre‑cut members, a clear bill of materials and step‑by‑step drawings. It’s fast, and you can often get a discount for bulk ordering.
When the design is more bespoke – say you need a mezzanine loft or an integrated feed‑bin – a custom build with a local builder (like Awesim) lets you tweak truss spacing, add extra bracing, or integrate utility pockets exactly where you need them.
Quick checklist before you order
- Confirm frame material (steel or timber) based on load and budget.
- Choose cladding that balances price, colour and corrosion resistance.
- Set roof pitch ≥15°; calculate ridge height for your tallest equipment.
- Specify concrete slab thickness, reinforcement, and any sub‑base needed for soil type.
- Decide between a pre‑fabricated kit and a custom‑built design – factor in lead times and on‑site labour.
- Ask your builder for a “Bill of Materials” so you can cross‑check quantities before the first steel arrives.
When you tick these boxes, you’ll have a set of machinery shed plans that not only fit your farm’s workflow but also stand up to the harsh NSW climate. And remember, the right material choice today saves you a heap of repair work down the road – something every farmer in Armidale, Moree or Bourke can appreciate.
Step 4: Budgeting & Cost Comparison
Now that you know what size, layout and materials you need, the next thing that keeps most farmers up at night is the budget. It’s easy to feel overwhelmed when the numbers start adding up, but the good news is you can break the cost picture into bite‑size pieces and compare options side‑by‑side.
Start with a simple spreadsheet
Grab a piece of paper or open a new sheet in Excel – whatever feels easiest. List every major line‑item: frame, cladding, roof, slab, labour, permits and a small contingency (5‑10%). Seeing the totals in front of you takes the mystery out of “how much will this cost?”
Tip: colour‑code the columns – green for fixed costs (like a pre‑cut steel kit) and orange for variables (like on‑site labour). It helps you spot where you might shave a few hundred dollars without compromising safety.
Frame material – steel vs timber
Steel frames usually carry a higher upfront price, but they’re low‑maintenance and last longer in the harsh NSW climate. A typical 12‑metre bay steel kit from a local supplier can run between $8,000 and $12,000, depending on gauge and finish. Timber frames might start at $5,000, but you’ll need to factor in treatment, extra bracing and the higher risk of rot or termite damage down the track.
In our experience, farms that go steel save on future repair costs, especially after heavy summer storms. If cash flow is tight, consider a hybrid – steel columns with timber purlins – and run the numbers in your sheet.
Cladding and roofing – where the dollars stack up
Colourbond steel cladding is the go‑to for durability; a 26‑gauge sheet costs roughly $35 per square metre installed. Corrugated iron is a little cheaper, around $28 per square metre, but it needs more frequent repainting. Roof sheeting follows the same pattern – the more gauge, the higher the price, but also the longer the lifespan.
Don’t forget accessories: ridge caps, flashing and guttering can add another $1,000‑$1,500 if you want a fully sealed roof that won’t leak after a sudden downpour.
Concrete slab – foundation is non‑negotiable
A solid slab is where most budget surprises hide. A 150 mm reinforced slab with steel mesh typically costs $90‑$110 per square metre, including formwork and finishing. If your soil is marginal, you might need a sand‑filled trench or extra hardcore base, nudging the price up by $5‑$10 per metre.
Awesim Building Contractors can provide a detailed quote for the slab work, and they’ll make sure the mix meets the council’s bearing‑capacity requirement – you won’t have to guess.
Labour and permits – the hidden line items
Labour rates in regional NSW vary, but a good rule of thumb is $70‑$90 per hour for a skilled crew. Multiply that by the estimated days (usually 5‑7 for a standard shed) and you have a solid labour estimate. Permit fees differ by council – some charge a flat $200, others a percentage of the project value. Always ask for a written estimate before you sign.
And yes, you should always add a contingency – 5 % for minor price swings, 10 % if you’re dealing with unpredictable soil or remote site access.
Quick cost‑comparison table
| Item | Cost Range (AUD) | Key Considerations |
|---|---|---|
| Frame material | $5,000‑$12,000 | Steel = higher upfront, low maintenance; timber = cheaper but may need extra treatment. |
| Cladding & roof | $2,500‑$5,500 | Colourbond steel offers longevity; corrugated iron saves money now but needs repainting. |
| Concrete slab (150 mm) | $9,000‑$13,500 | Includes reinforcement; add $5‑$10/m² for poor soil base. |
Seeing those numbers side‑by‑side helps you decide where to invest a little extra for long‑term peace of mind.
Finally, run a simple “what‑if” scenario. What if steel rises 10 %? What if you add a 2 metre mezzanine later? Adjust the spreadsheet and you’ll instantly see how those choices affect your bottom line.
Bottom line: budgeting isn’t about cutting corners, it’s about understanding where every dollar goes, comparing options, and building a buffer for the unexpected. With a clear cost breakdown, you can walk into a meeting with Awesim Building Contractors confident that your machinery shed plans are not just solid on paper, but also solid for your wallet.
Need a real‑world price snapshot? Check out the range of custom farm sheds on Best Sheds – they list base model prices that give a useful reference point for your own spreadsheet.
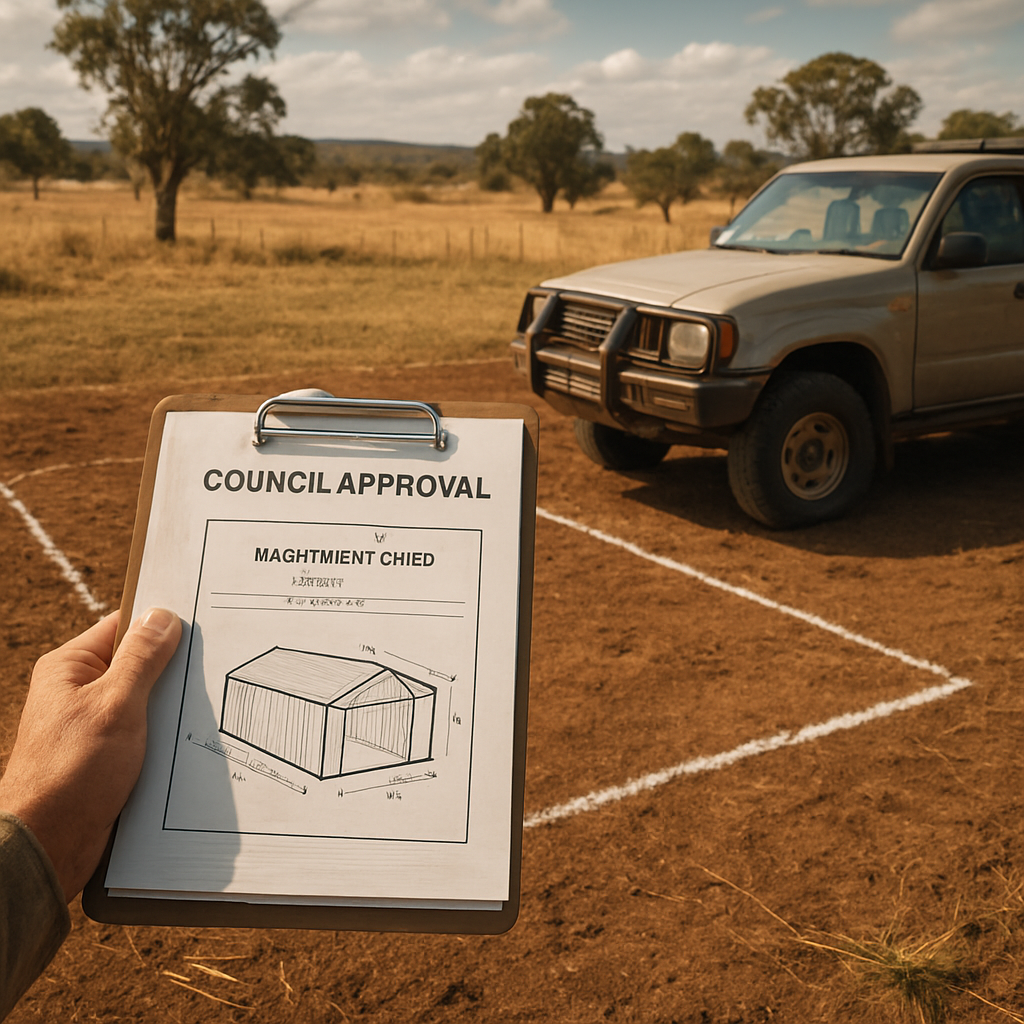
Step 5: Obtain Permits & Approvals
Alright, you’ve nailed the layout, picked the frame, and even scoped out the slab. The next thing that can trip up a shed project is paperwork – the kind that makes you wonder why you ever wanted a shed in the first place. Trust me, we’ve all stared at a council form and felt the urge to drive the 4×4 straight back to the paddock. But getting those permits sorted early saves you weeks, if not months, of back‑and‑forth.
First off, grab the development application (DA) pack from your local council’s website. In most NSW shires, the DA is required if your shed exceeds 30 sqm, sits within a certain distance of a property line, or is classified as a “high‑risk” structure because of its height. Look for sections titled “Shed & Outbuilding Regulations” or “Rural Building Codes”. If the council offers a downloadable checklist, print it out – you’ll end up crossing items off far more often than you think.
Key documents you’ll need
- Site‑assessment sheet (the one you compiled in Step 1).
- Detailed floor plan with dimensions, roof pitch, and door locations.
- Structural calculations for the frame and slab – councils often ask for a certified engineer’s stamp.
- Stormwater management plan if your shed is near a creek or low‑lying area.
- Heritage or environmental overlay clearances, if applicable.
Tip: Bring a copy of your farm new builds brief to the council office. It shows you’ve already thought through the design and can speed up the review.
Second, don’t underestimate the power of a quick phone call. Call the planning officer, mention your project size, and ask if any “hidden” requirements apply – like a fire‑break distance of 12 metres in bush‑prone zones or a minimum 300 mm setback from power lines. A five‑minute chat can prevent a surprise fee later.
Step‑by‑step permit process
- Submit the DA pack with all supporting documents (digital PDF is usually fine).
- Pay the council fee – it ranges from $150 to $600 depending on the shire.
- Wait for the council’s assessment (typically 10‑20 business days). Use this time to finalise your material orders.
- If the council asks for revisions, address them promptly. Common tweaks involve adjusting setbacks or adding a drainage detail.
- Once approved, you’ll receive a ‘Construction Certificate’ (CC). This is the green light to start digging.
During the waiting period, double‑check your slab design against the approved bearing capacity. If the council mandated a 150 kPa minimum and your soil tests show only 120 kPa, you’ll need a thicker slab or a sand‑filled trench beneath. It’s cheaper to adjust the design now than to re‑pour concrete later.
Third, keep a dedicated folder (physical or cloud) for all permit correspondence. Every email, stamped form, and engineer’s certificate should be stored together. If a neighbour raises an objection, you’ll have the paperwork ready to show you’re compliant.
And here’s a real‑world story: a dairy farm near Gunnedah applied for a 40 sqm shed without checking the local fire‑break rule. The council rejected the DA, costing the farmer an extra $2,000 to move the shed 10 metres back. After the setback was corrected, the approval came through in under a week. Lesson learned – a quick check on fire‑break distances can save a small fortune.
Finally, don’t forget to think about what happens if water does get in. A well‑designed shed should have a drainage plan, but nature can be unpredictable. For that extra peace of mind, have a look at the Emergency Water Damage Checklist for Homeowners. It walks you through steps to protect your new shed from flooding – from installing proper gutters to sealing door thresholds.
Once you’ve got the Construction Certificate in hand, you can schedule the concrete pour, order the steel columns, and lock in your builder’s start date. Remember, the permit process isn’t just bureaucracy – it’s your safety net ensuring the shed meets Australian building standards and can stand up to the harsh NSW outback for decades.
Bottom line: treat permits like the foundation of your shed plan. Get the paperwork sorted early, double‑check council quirks, keep everything organised, and you’ll walk onto the site with confidence, not a stack of rejected forms.
Step 6: Build & Maintain Your Machinery Shed
Now that your paperwork is sorted and the slab is ready, it’s time to roll up our sleeves and get the shed standing. If you’ve ever watched a crew struggle with mis‑aligned steel, you know the difference a clear, step‑by‑step plan makes. That’s where solid machinery shed plans become your on‑site cheat sheet.
Kick‑off the build with a quick site walk‑through
Before the first beam hits the ground, do a 5‑minute walk around the marked footprint. Check that the string lines are still taut, the formwork hasn’t shifted, and any temporary drainage swales are clear. A quick “is everything where it should be?” once you arrive can save you a day of re‑work.
Does the ground still look even? If you spot a low spot, a little sand‑bag fill now prevents a future dip in the slab that could trap water under the shed floor.
Set the steel columns – the backbone of your shed
We usually start with the corner columns because they lock the whole geometry together. Use a laser level or a good old carpenter’s level to make sure each base plate sits within 10 mm of level. When the column is plumb, bolt it down, then double‑check the vertical using a plumb bob – a small step that stops a wobbly roof later.
In our experience across the New England region, a mis‑aligned column can add up to a metre of extra truss length, which means extra material and a weaker roof.
Raise the roof trusses and secure the purlins
Once the columns are solid, lift the pre‑fabricated trusses onto the brackets. If you’re using a kit, the trusses should come with pre‑drilled holes – line them up, bolt, and tighten. Remember to install temporary bracing until the roof sheeting is on; wind can be a real nuisance on a bare frame.
Tip: a simple 2×4 “C‑brace” across each bay holds the trusses in place while the crew works on the next one. It’s a cheap trick that keeps the whole structure from swaying.
Cladding, roofing and sealing the envelope
Colourbond steel is the go‑to for most NSW farms because it laughs at rust and UV. Lay the sheets from the eave up, overlapping each strip by at least 150 mm. Slip the ridge cap on last, then seal all flashings with a high‑grade butyl sealant. A tight envelope means the next rainstorm won’t sneak through the joints and soak your tractor.
Don’t forget the gutter downspouts. Position them a metre away from the slab edge so water drains clear of the door threshold. A well‑placed gutter can be the difference between a dry floor and a puddle that rusts steel wheels.
First‑fix utilities – power, water and lighting
Run conduit for power sockets along the side walls, keeping them at least 300 mm off the ground and away from the main traffic lane. If you need a water tap for cleaning equipment, install a quick‑connect valve near the door – it saves you a trip with a hose every time you finish a day’s work.
We always recommend a low‑voltage LED strip on the interior ceiling. It’s cheap, bright, and won’t attract insects like a fluorescent tube would.
Ongoing maintenance checklist
Even the toughest shed needs a bit of love each season. Here’s a quick 6‑point routine you can run every spring and autumn:
- Inspect roof panels for loose screws or dents; tighten or replace as needed.
- Clear gutters and downspouts of leaves and twine.
- Check the slab for cracks – seal any you find with a polymer‑based crack filler.
- Lubricate door hinges and check the roller‑door drum for wear.
- Verify that all electrical sockets are dry and the conduit is intact.
- Walk the perimeter for any new vegetation that could encroach on the setback line.
Why bother? A small fix now stops a big repair later – think of it as the “oil change” for your shed.
When to call in the pros
If you notice any movement in the columns, a sagging roof line, or water pooling inside after a heavy rain, it’s time to get a qualified contractor involved. Awesim Building Contractors can pop out with a 4×4, assess the issue, and recommend a repair plan that respects your budget and timeline.
Remember, the goal isn’t just to get a roof over your tractor; it’s to create a reliable base that protects your investment year after year. Follow the steps above, keep a tidy maintenance diary, and your machinery shed will keep working as hard as you do.
FAQ
What should be included in my machinery shed plans before I start building?
First off, you need a clear footprint – think of it as the shed’s “birth certificate.” Mark the exact dimensions, set‑back lines, and where the doors will sit. Next, sketch the roof pitch (at least 15° in NSW) and note the ridge height for your tallest equipment. Add a column‑free zone if you’ll be driving large combines through the centre. Finally, list utilities – power sockets, water points, and any drainage details. Having all that on paper (or a simple CAD file) saves you from costly changes once the concrete’s poured.
How do I decide whether a steel or timber frame is right for my shed?
Think about the load you’ll be putting on the frame. If you’re storing a 4‑WD tractor plus a trailer, steel columns and trusses give you the strength you need without wobble. Timber can work for lighter gear, but you’ll have to treat it against rot and termites, and you might need extra bracing for wind loads that exceed 120 km/h in the outback. In our experience, the extra upfront cost of steel pays off in lower maintenance and a longer lifespan.
What are the key things to check on my concrete slab before the shed goes up?
Start with the bearing capacity – most councils in rural NSW ask for at least 150 kPa. If a soil test shows lower numbers, you’ll need a thicker slab or a sand‑filled trench underneath. Make sure the slab is level within 10 mm across the whole area; any low spot will become a puddle under a heavy roof. Reinforcement is non‑negotiable – a mesh of steel rebar or welded wire should be spaced no more than 200 mm. Finally, seal the edges with a cured‑in‑place sealant to keep moisture out.
Do I really need a drainage plan for a machinery shed?
Absolutely. Even a well‑pitched roof can dump water onto the slab if the gutters are too close to the doors. A simple plan should show where gutters discharge, the slope of the surrounding ground, and any soak‑away pits or swales. In one of our projects near Gunnedah, a missing swale caused water to pool around the slab’s edge, leading to a cracked perimeter after just one heavy rain. Adding a shallow ditch redirected the flow and saved a few thousand dollars in repairs.
How often should I inspect and maintain my shed once it’s built?
We treat it like an oil change for a tractor – twice a year, preferably in spring and autumn. Walk the perimeter and look for vegetation encroaching on setbacks. Check roof panels for loose screws or dents, tighten as needed, and clear gutters of leaves and twine. Inspect the slab for hairline cracks and seal them with polymer‑based filler. Lubricate door hinges and give the roller‑door drum a quick spin to catch any wear early. A 10‑minute walk every six months keeps the whole thing happy.
What’s the best way to keep my shed’s doors from warping in the heat?
Choose Colourbond or a similar coated steel for the door skins – they resist UV‑induced warping better than plain corrugated iron. Fit a rubber‑sealed threshold to stop heat‑induced expansion from pulling the door off its tracks. Regularly check the hinges and replace any that show rust or play. If you notice the door sagging, add a small shim under the bottom rail; it’s a quick fix before the whole frame starts to shift.
When should I call a professional like Awesim Building Contractors during the build?
If you spot any movement in the columns, a sagging roof line, or water pooling inside after a storm, that’s a red flag. Also, if you hit a soil condition you didn’t anticipate – like a soft, silty patch that can’t hold the slab’s weight – bring in a qualified builder. They can re‑engineer the foundation on the spot, saving you from a costly rebuild later. In our experience, early intervention cuts downtime and keeps your budget on track.
Conclusion
We’ve walked through everything from layout tricks to budgeting, and now the big picture is clear: solid machinery shed plans are the backbone of a hassle‑free farm upgrade.
Think about the last time a door jammed or a slab cracked – those headaches could have been avoided with a simple checklist and a bit of foresight. By mapping your equipment, locking in the right roof pitch, and nailing down a reinforced concrete slab, you’re not just building a shelter, you’re future‑proofing your operation.
So, what’s the next step? Grab that checklist, walk the tape on the ground, and run your numbers through a quick spreadsheet. If anything feels off – a low‑lying spot, a missing fire‑break, or a surprise on the budget – tweak the plans now before the first steel beam arrives.
Remember, a few minutes of planning today saves you days of rework down the line. And when the build is done, a twice‑yearly 10‑minute walk‑through will keep the shed performing like new.
Need a hand turning those plans into reality? Our team at Awesim Building Contractors is ready to roll out to your property, 4×4 style, and make sure every detail lines up with the tough NSW outback.
Finally, keep the conversation going – share your progress with fellow growers, ask for tweaks, and treat your shed plan as a living document that evolves with your farm’s needs.


