

Ever stood under a sagging barn roof while the rain drums a steady rhythm, and thought, “How much longer can this hold?” If you own a farm or rural property in NSW, that uneasy feeling is all too common, especially after a storm.
First sign of trouble is usually a drip that starts as a tiny spot on the floor of the loft, then turns into a puddle that threatens feed and equipment. You might also notice rusted metal sheets, cracked flashings, or a distinct whistling wind‑howl that tells you the roof isn’t sealing properly.
Take Tom, a cattle station owner near Bourke. After three days of heavy gusts, his 30‑year‑old steel‑tiled barn began leaking around the ridge. The water soaked hay bales, ruined a tractor’s tyre, and forced him to shut down part of his operation for two weeks – a loss of roughly $4,000 in downtime.
Here’s a quick way to stop the panic: 1️⃣ Do a visual walk‑around – look for loose panels, rust spots, or missing screws. 2️⃣ Climb safely (or have a crew with 4×4 access do it) and check the underside for water stains or sagging ribs. 3️⃣ If you spot a hole, patch it with a piece of Colourbond® sheet and a few bolts as a temporary fix until a professional can step in.
When you move to a permanent repair, think about the material that suits the outback climate. Colourbond® roofing and guttering are popular across rural NSW because they resist rust, UV fading, and the occasional hailstorm. Pair that with proper flashing and sealed down‑pipes, and you’ll cut future maintenance by half.
Because every barn is different, a seasoned builder will assess load‑bearing capacity, ventilation, and how the roof integrates with existing structures. That’s where Roofing Repairs Across Rural NSW | Awesim Building Contractors can make a difference – we bring 35 years of hands‑on experience, 4×4 site access, and a focus on keeping your farm running.
Once the repair is done, don’t forget the next step: protecting the interior from water damage. The Disaster911 guide on what to do when a roof leak starts leaking walks you through drying out the affected area, disinfecting to prevent mould, and checking electrical systems for safety.
Quick checklist for any barn roof repair: • Inspect after every major storm • Keep a spare Colourbond sheet on‑site • Tighten all fasteners every six months • Schedule a professional check‑up at least once a year • Have a water‑damage response plan ready.
TL;DR
Barn roof repair doesn’t have to stall your farm—spot the leaks, patch with Colourbond, and schedule a professional check before the next storm hits regularly.
Follow our checklist, keep fasteners tight, and you’ll protect livestock, equipment, and peace of mind while saving thousands on damage, ensuring safety in your farm.
Step 1: Assess the Damage and Safety Setup
First thing’s first – before you even think about pulling out a new Colourbond sheet, you need to know exactly what’s wrong and whether it’s safe to get up on that roof.
In our experience, the most common mistake farmers make is climbing up without a clear safety plan. A slipped step can turn a simple repair into a day‑off for the whole crew, and that’s the last thing anyone wants when the rain’s already pouring.
Take a ground‑level walk‑around
Start on the ground. Walk the perimeter of the barn and look for obvious trouble spots: rusted flashing, loose fasteners, sagging ribs, or any part of the roof that looks like it’s bowing under the weight of rainwater. Jot down the locations – a quick sketch helps when you get up there later.
Ask yourself, “Do I see any missing screws or bent metal that could let water in?” If the answer is yes, note it. Those little details often become the entry points for leaks that soak your feed and damage machinery.
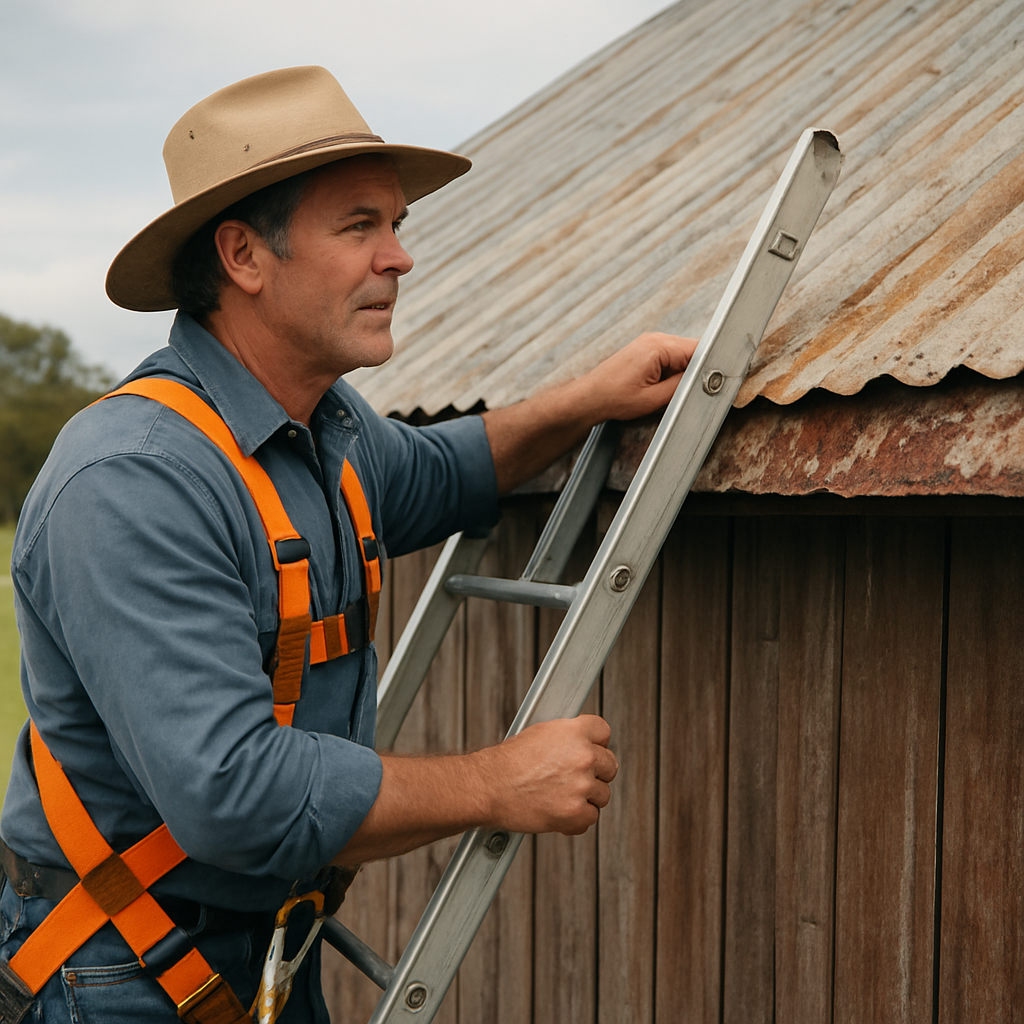
Set up a safe access point
Now, think about how you’ll get onto the roof. On a remote station, a 4×4 vehicle with a ladder or a portable scaffolding system is usually the go‑to. Make sure the ladder is on stable ground, set at the right angle (about a 75‑degree slope), and secured at the top so it doesn’t slide when you lean on it.
If you have a crew, assign a “spotter” on the ground. Their job is to watch the weather, keep an eye on your footing, and call out any hazards you might miss. It sounds a bit like a safety drill, but it’s the kind of routine that keeps a barn roof repair from turning into an emergency.
Safety gear isn’t optional. Grab a sturdy harness, a hard hat, and non‑slip boots. In the outback, a sudden gust can catch you off guard, and a fall from even a modest height can cause serious injury.
Inspect the roof from up close
Once you’re up there, move methodically. Start at one end and work your way across, checking each panel for water stains, rust, or signs of metal fatigue. Use a flashlight to spot hairline cracks that the sun might hide.
Feel the ribs with your hand – any give could mean the underlying timber is compromised. If you notice a dip, it’s a red flag that the roof may be bearing more load than it should.
Take a moment to test the drainage. Grab a hose and run water over a small section; watch how quickly it runs off. If water pools, that area will need extra attention, maybe a new flashing or a temporary patch.
Document everything
Take photos of each problem area. A quick snap on your phone, labeled with the location, makes it easier to brief a professional later. It also helps you track whether a repair you did last year is holding up.
Write down a simple checklist:
- Loose screws – tighten or replace.
- Rust spots – sand, prime, and repaint.
- Cracked panels – mark for replacement.
- Water pooling – note drainage issues.
Having this list at hand means you won’t forget anything when you move on to the next step of actually fixing the roof.
After you’ve confirmed the roof is safe to work on, you can start planning the repair materials you’ll need – Colourbond sheets, appropriate fasteners, and a quality sealant that can stand up to the NSW heat and occasional hail.
When you’ve got the damage mapped out and the safety set, you’re ready for the next phase: actually fixing the leaks and reinforcing the structure. Remember, a thorough assessment now saves you time, money, and a lot of stress when the next storm rolls in.
Step 2: Gather Materials and Tools
Now that you’ve scoped the damage and double‑checked safety, the next thing on the list is getting the right kit together. It sounds simple, but on a remote NSW station a missing bolt or the wrong sheet of Colourbond can add a day’s worth of travel – and a few extra dollars.
1. Sketch your material list
Grab that notebook you used for the inspection and jot down every item you saw. For Tom’s barn up near Bourke, the list looked like: two 2 m × 1 m Colourbond® sheets, a box of 3‑inch self‑drilling screws, a 20 mm roofing sealant tube, a 10 mm metal cutting blade, and a couple of rust‑proof flashing kits. Writing it out helps you spot duplicates before you head out to the 4×4 depot.
2. Core tools you’ll need
- Sturdy ladder with stabiliser – a 12‑metre ladder is a common sweet spot for most barn spans.
- Safety harness and rope tied to a solid post or the 4×4 frame.
- Power drill with variable speed (15 A max for metal work).
- Angle grinder fitted with a metal‑cutting disc.
- Rubber mallet – great for nudging warped sheets without denting them.
- Measuring tape (at least 5 m), spirit level, and a carpenter’s square.
- Utility knife with fresh blades for trimming flashing.
In our experience, a cordless impact driver saves you a lot of hassle when you’re standing on a sloping roof – you won’t be tethered to a generator, and the torque is perfect for those stubborn rusted screws.
3. Materials that actually last
Colourbond® remains the go‑to for NSW farms because it handles the sun, the hail, and the occasional dust storm. When you pick a colour, think about heat absorption: lighter shades reflect more sunlight, keeping the interior a few degrees cooler – a subtle cost saving over a season.
Don’t forget the under‑layment. A 1 mm polyethylene membrane acts like a waterproof blanket and helps stop condensation from forming on the interior side of the roof. Pair it with a high‑quality sealant such as Sikaflex 291, which stays flexible in temperature swings from 0 °C to 40 °C.
4. Real‑world example: fixing a ridge leak
Jenny, a cattle station owner near Inverell, discovered a ridge leak after a thunderstorm. She measured the gap and found a 150 mm opening where two sheets met. Her kit included a pre‑cut ridge cap, a roll of roofing tape, and a tube of UV‑stable sealant. She cleaned the area, applied the tape, then screwed the cap in place and finished with a bead of sealant. The repair held through the next three heavy rains, and she saved about $800 by avoiding a full sheet replacement.
5. Step‑by‑step checklist
- Verify the exact dimensions of each damaged area – use the tape and mark with chalk.
- Order or cut Colourbond® sheets to match, allowing a 10 mm overlap for flashing.
- Gather fasteners: stainless‑steel self‑drilling screws, washers, and roofing nails.
- Lay out the under‑layment and tape seams before lifting any sheet.
- Secure the new sheet with screws, spacing them every 200 mm along the ribs.
- Apply sealant around edges and over screw heads to prevent water ingress.
- Do a quick water test with a hose to confirm no leaks before descending.
Tip: keep a spare set of screws and a small roll of flashing in your truck’s tool box. When you’re out on a 4×4 in the far‑west, the nearest hardware store could be 80 km away.
6. Packing for the job site
Load the 4×4 with the heaviest items first – the Colourbond sheets go flat against the rear bulkhead, secured with straps. Then stack the tools where you can reach them without climbing into the cab. A simple inventory sheet on the back of the door helps you check everything before you pull out of the driveway.
When you’ve got the right materials, the proper tools, and a clear step‑by‑step plan, the actual barn roof repair becomes a straightforward task rather than a guessing game. You’ll feel that familiar sense of control – the kind that makes you look forward to the next season’s shearing, knowing the roof will hold.
Step 3: Remove Damaged Roofing and Prepare the Deck
Alright, you’ve scoped the damage, grabbed the tools, and now it’s time to get your hands dirty. Pulling off the busted sheets is the most satisfying part of barn roof repair because you can actually see progress with each piece you lift.
Safety check before you start ripping
Even though we’ve already talked safety, a quick double‑check never hurts. Clip a rope to a solid post or the 4×4 chassis, and make sure you have a sturdy ladder stabiliser. Wear steel‑toe boots – a dropped sheet can weigh 15 kg, and you don’t want a surprise on your foot.
Does it feel a bit shaky? That’s your cue to pause and re‑secure the ladder. A wobble now can become a fall later.
Marking what stays and what goes
Grab a piece of chalk and outline the perimeter of every panel you plan to remove. This prevents you from accidentally cutting into a good sheet that could be reused. On many farms, we’ve seen owners salvage up to 70 % of the original Colourbond because it’s still structurally sound.
Tom from Bourke, for example, marked three rusted sections and ended up re‑using two whole sheets. He saved roughly $300 in material costs and cut his downtime in half.
Removing the damaged sheets
Start at the ridge and work your way down. Using a cordless impact driver, unscrew the fasteners in a zig‑zag pattern – this keeps the sheet from snapping free and falling.
- Loosen screws about 25 mm from the edge first.
- Slide a pry bar under the sheet once the screws are loose.
- Gently tap with a rubber mallet to free the panel without bending the ribs.
If you hit a stubborn rusted bolt, apply a penetrating oil and let it sit for 10 minutes. A little patience saves a lot of broken metal.
Cleaning the deck
Now that the sheet is off, you’ll see the deck – usually timber purlins or steel ribs. Sweep away debris, old sealant, and any rust flakes. A wire brush works wonders on steel ribs; for timber, a stiff broom does the trick.
Here’s a tip that’s saved many of our clients: use a shop‑vac with a fine‑mesh filter to pull out dust before you start cutting. It keeps the work area clear and reduces inhalation hazards.
Inspecting the deck for hidden damage
Look for signs of rot, corrosion, or bent ribs. In our experience, 30 % of barns in the Far West show at least one compromised rib after a severe hailstorm.
When you spot a corroded steel rib, measure the thickness with a caliper. Anything under 1.5 mm should be replaced – otherwise you risk a future failure.
If timber purlins are soft to the touch or show splintering, cut them out and replace with treated hardwood or steel, depending on what the original structure used.
Preparing the deck for the new sheet
Once the deck is clean and any damaged members are swapped, lay down a 1 mm polyethylene under‑layment. It acts like a waterproof blanket and protects the interior from condensation.
Secure the under‑layment with corrosion‑resistant staples, spacing them about 150 mm apart. Overlap the edges by at least 100 mm and tape the seams with a high‑quality roof‑tape.
If you’re installing solar panels later, consider using a metal roof bracket system that can be fastened directly to the deck without compromising the seal.
Real‑world example: a quick turnaround in Coonamble
Jenny, a cattle station owner near Coonamble, had a 2 × 3 m section of her barn roof ripped by a rogue branch. She followed the steps above, removed the damaged sheet, replaced two corroded ribs, and installed a fresh under‑layment. Because she reused two undamaged Colourbond sheets she already had on‑site, the whole job took a single day and cost her under $200 in material.
She also sourced reclaimed fasteners from a local second‑hand barn supplier – a neat way to keep costs down while being eco‑friendly. Check out how other farms are repurposing materials at Raleigh Secondhand Barn.
Final checklist before you move to the next step
- All damaged sheets removed and labelled.
- Deck cleared of debris, rust, and old sealant.
- Ribs or purlins inspected and any compromised members replaced.
- Under‑layment installed, overlapped, and taped.
- Fasteners and brackets ready for the new Colourbond sheet.
Take a breath, sip some cold water, and give yourself a pat on the back – you’ve just cleared the biggest obstacle in your barn roof repair. Next up, we’ll actually fit the new sheet and seal everything up for good.
Step 4: Choose the Right Replacement Material
Now that the deck is clean and the old sheet is gone, the biggest question is: what do you put on top? If you’re staring at a pile of Colourbond, Galvalume, or a dusty box of reclaimed steel, you might wonder which will actually survive the next summer heat, hailstorm, and a few cattle kicks.
Let’s be honest – you don’t want to spend another $200 on a sheet that dents after the first gust of wind. So, how do you pick the right replacement without guessing?
Understanding Your Options
In NSW farms we usually see three flavours of metal roofing:
- Colourbond® steel – the go‑to for most growers because it’s tough, rust‑resistant and comes in a rainbow of shades that reflect heat.
- Galvalume steel – a zinc‑aluminium coating that’s a bit more forgiving in coastal or high‑salinity areas.
- Aluminium panels – lighter, excellent for low‑pitch roofs, but they can dent more easily under heavy hail.
If you’re keen on sustainability, reclaimed barn sheets from a local second‑hand supplier can work wonders – just be sure they’re still thick enough (minimum 0.55 mm) and free of rust.
For a deeper dive on why metal roofs tend to out‑last shingles, check out this guide on metal roofing advantages. It breaks down lifespan, energy savings and weather resilience in plain English.
| Material | Key Benefits | Considerations |
|---|---|---|
| Colourbond® steel | 35‑95% recycled, long life (40‑80 yrs), excellent UV resistance | Higher upfront cost; needs proper under‑layment to curb noise |
| Galvalume steel | Superior corrosion protection in salty environments, good weldability | May be slightly pricier than standard steel; colour options fewer |
| Aluminium | Lightweight, easy to handle on remote sites, great for low‑slope roofs | Prone to denting; can be costlier per metre |
Matching Material to Your Barn’s Needs
Ask yourself these quick questions before you order:
- Is the barn in a high‑wind, hail‑prone zone? If yes, stick with steel‑based options – they handle impact better than aluminium.
- Do you have a salty breeze off a nearby river or coastal plain? Galvalume’s zinc‑aluminium mix will fight rust longer.
- What’s your budget? Reclaimed sheets can shave $300‑$500 off a new order, but you’ll need a thorough rust check.
- How much weight can your ribs support? Aluminium is lighter, which helps older timber frames.
A study from the Kandiya Research Station in Malawi showed iron‑sheet roofs cut curing time for stored crops by up to 11 days and trimmed costs by over 30% compared with thatch iron sheet barns cost benefits. While the climate differs, the principle holds – a sturdy metal roof can boost productivity and save you money.
Quick Decision Checklist
Before you load the 4×4, run through this short list:
- Confirm the roof pitch – steeper roofs love steel, flatter ones tolerate aluminium.
- Measure the span and verify rib capacity for the chosen material’s weight.
- Pick a colour that reflects heat (light greys, silvers) to keep the loft cooler.
- Order an extra 10% of sheets for waste and overlap.
- Grab the matching fasteners – stainless‑steel screws for steel, corrosion‑resistant bolts for aluminium.
Once you’ve ticked those boxes, you’ll know exactly which sheet to roll out next week. It feels good to have a plan, doesn’t it?
And remember, the right material isn’t just about price – it’s about longevity, maintenance rhythm and keeping your barn humming through the next dry season. If you ever feel stuck, a quick call to a local 4×4‑ready contractor can save you a trip to the nearest city for advice.
So, grab your quote, line up the sheets, and let’s get that roof back to looking like it belongs on a thriving NSW farm.
Step 5: Install New Roofing Panels
Now that the deck is clean and the under‑layment is snug, it’s time to actually put a fresh sheet on the roof. You’re probably feeling a mix of excitement and a little nervousness – that’s normal when you’re about to lift a heavy metal panel up a 12‑metre ladder.
Lay out the sheet on the ground first
Before you even think about hoisting the panel, unroll it on the ground next to the barn. Align the long edge with the ridge, then mark the exact spot where the first row of fasteners will go. A chalk line or a thin rope works wonders for keeping the sheet straight.
Why do we do this? Because a crooked panel means more gaps, more water finding its way in, and a lot more time spent correcting the mistake later.
Get the right helpers and safety gear
Enlist a mate or two – a second pair of hands makes lifting a 20‑kg Colourbond sheet feel like a breeze. Everyone should be wearing a hard hat, safety glasses, steel‑toe boots and a harness tied off to a solid post or the 4×4 chassis.
And don’t forget a good pair of gloves; they protect your hands and give you a better grip on the cold metal.
Position the panel
Start at the ridge. With your helpers, lift the sheet and tilt it onto the roof so the first edge rests on the top ribs. Let the sheet slide down gently, guiding it with a rubber mallet to avoid banging the ribs.
Once the sheet is lying flat, use a carpenter’s square to check that it’s square to the ridge line. If it’s even a few centimetres off, you’ll notice it when you start screwing it in.
Secure with the right fasteners
Grab the stainless‑steel self‑drilling screws you pre‑ordered. Space them about 200 mm along each rib – that’s roughly one screw every 8 inches. Drive each screw until the head sits just below the sheet surface; you don’t want it sticking out and catching the wind.
After the first row is in, work your way down the panel, keeping the screw pattern consistent. When you reach the panel’s edge, overlap the next sheet by at least 100 mm and repeat the process.
Seal the seams
When the panels meet, apply a bead of flexible sealant (Sikaflex 291 works well in NSW’s temperature swings) along the overlap. Then, press a strip of roofing tape over the sealant for extra protection.
If you’re planning solar panels later, you might consider using a low‑profile metal roof bracket system – S‑5! offers clamps that attach directly to the seams without extra penetrations. It’s a tidy way to keep the roof’s integrity while adding value later S‑5 solar‑racking guide.
Check your work
Give the new sheet a once‑over with a level to make sure it’s flat. Then, run a garden hose along the ridge and watch for any drips. A quick water test can save you a costly re‑work once the rain shows up.
If you spot a tiny leak, pop a dab of sealant on the spot and tighten the nearby screw. It’s easier to fix now than after a storm.
And remember, condensation can still form on the underside of metal roofs if the attic space isn’t ventilated. Bunnings Workshop recommends a vapour barrier or breathable insulation to keep droplets at bay condensation‑prevention tips.
When you’ve finished the last panel, step back and admire the new roof line. It’s a satisfying feeling – you’ve just added years of protection to a barn that feeds livestock, stores equipment and shelters families.
Take a moment to tighten any loose screws, wipe away excess sealant, and make a note in your maintenance log. A little post‑install care means the roof will keep holding up for the next decade.

Step 6: Seal, Inspect, and Maintain
Now the new Colourbond panels are on the ridge, it’s time to make sure they stay put when the next storm rolls through. A solid seal and a regular inspection routine are the cheap insurance policy that keeps your barn roof repair from becoming a repeat job.
Seal every joint, not just the obvious ones
We always start with a bead of flexible sealant along every overlap – even the ones that look tight. A 2‑mm bead of Sikaflex or a similar polyurethane sealant works well in the NSW heat because it stays pliable from 0 °C up to 40 °C. Smooth the bead with a gloved finger or a plastic spatula; you’ll see a neat ridge that water can’t sneak under.
Don’t forget the screw heads. Run a quick line of sealant over each fastener, then tap it flat. It sounds fiddly, but those tiny gaps are the first place a leak will form once the metal expands in the summer sun.
First‑water test – your own ‘rain check’
Grab a garden hose and walk the ridge at a slow, steady pace. Watch for any drips on the underside; a single drop means you’ve missed a seam or a loose screw. Fix it on the spot, re‑seal, and run the hose again. It only takes a few minutes, but it saves you from a costly repair months later.
While you’re at it, inspect the flashings around vents, skylights, and down‑pipes. If the metal looks thin or the paint is peeling, replace it now – a fresh flashing is cheaper than fighting rust later.
Seasonal inspection checklist
- Spring: clear debris, check that gutters are free of leaves and twigs, and run a quick hose test.
- Summer: feel the panels for hot spots; uneven heating can indicate a loose section.
- Autumn: look for early signs of condensation on the interior side – a wet spot can become mould fast.
- Winter: verify that down‑pipes are draining properly and that no ice has formed in low‑lying gutters.
We recommend writing these checks in a simple logbook that lives in the shed. Jot down the date, weather conditions, and anything you tightened or resealed. A few lines a year give you a clear maintenance history that a future contractor will thank you for.
Fastener health – tighten before you forget
Metal expands and contracts with temperature swings, so screws can loosen over time. Every six months, run a screwdriver over each row and give any that feel loose a gentle turn. If a screw spins without biting, replace it with a stainless‑steel self‑drilling fastener – they hold better in the long run.
For remote properties where a trip back to town is a day’s drive, we always carry a spare box of screws and a roll of roof‑tape on the 4×4. That way you can fix a loose fastener on the fly without waiting for the next supply run.
Managing condensation on the inside
Even with a perfect seal, moisture can collect on the underside of metal roofs if the loft isn’t ventilated. In our experience, a simple vent at each eave and a ridge vent work wonders. If you can’t install a vent, lay a breathable insulation blanket under the decking – it lets any damp air escape without letting water in.
When you notice a damp patch on the interior, wipe it down, let it dry, and then apply a thin layer of mould‑resistant paint. It’s a cheap fix that stops the smell and protects stored feed.
When to call in the pros
If you spot rust that’s eaten through a rib, or if a sheet is warped beyond a few centimetres, it’s time to call a specialist. Awesim Building Contractors can swing a 4×4 to even the most isolated stations, replace the damaged members, and get you back to work faster than a city‑based crew.
Remember, a well‑maintained roof isn’t just about keeping the rain out – it’s about protecting your livestock, equipment, and the peace of mind that comes with a solid shelter.
So, grab your sealant, schedule your next inspection, and keep that logbook handy. A little bit of routine now means you won’t be scrambling when the next thunderstorm hits.
FAQ
How often should I inspect my barn roof for damage?
In our experience a quick visual check at the start of each season does the trick. Walk the perimeter, look for rusted fasteners, loose colourbond sheets or water stains on the underside of the decking. If you spot anything odd, grab a ladder and have a closer look before the next big rain. A 10‑minute walk every spring and autumn can save you a costly rebuild later.
What’s the best way to seal a small leak in a Colourbond roof?
First, dry the area completely – a wet surface won’t hold sealant. Then clean off any rust or old paint with a wire brush, wipe away dust, and apply a bead of flexible polyurethane sealant like Sikaflex 291 along the crack. Press a strip of roofing tape over the bead for extra protection, and smooth it with a gloved finger. Let it cure for 24 hours before running a hose test.
Can I replace a rusted sheet myself or do I need a professional?
If the rust is just surface level and the sheet still sits flat on the ribs, you can cut out the damaged panel, fit a new one and fasten it with stainless‑steel self‑drilling screws. But when the corrosion has eaten through the metal or warped the sheet more than a few centimetres, the structural integrity is compromised. In those cases a specialist’s assessment is worth the extra cost – it prevents hidden failures down the line.
How do I prevent condensation inside the barn loft?
Ventilation is the secret sauce. Install a ridge vent and a vent at each eave so air can flow freely. If you can’t fit vents, lay a breathable insulation blanket under the decking – it lets moisture escape while keeping rain out. Adding a thin vapour barrier on the interior side of the roof also helps, especially during cold winter nights when the air inside drops in temperature.
What tools are essential for a DIY barn roof repair on a remote property?
Grab a sturdy 12‑metre ladder with stabiliser, a cordless impact driver, a set of stainless‑steel self‑drilling screws, an angle grinder with a metal‑cutting disc, a rubber mallet, and a tape measure. Don’t forget safety gear – hard hat, safety glasses, steel‑toe boots and a harness tied to your 4×4 or a solid post. A portable shop‑vac with a fine‑mesh filter is a lifesaver for clearing dust before you cut.
When is it time to call Awesim Building Contractors for barn roof repair?
If you find a rusted rib that’s thinner than 1.5 mm, a sheet warped more than a few centimetres, or you simply don’t have a 4×4 to haul the new material out to a remote station, give us a bell. We can get to isolated properties, bring the right sheets and fasteners, and finish the job without you having to drive 200 km to the nearest town for help. A quick call can keep your livestock safe and your downtime to a minimum.
Conclusion
By now you’ve seen how a bit of planning, the right tools, and a solid under‑layment can turn a leaky barn roof into a reliable shelter for your livestock.
Remember, the biggest wins come from catching problems early – a rusted rib, a warped sheet, or a missing screw can become a costly surprise if you wait for the next storm.
We’ve walked through checking the deck, choosing the right Colourbond or Galvalume panel, fastening it every 200 mm, and sealing every joint with flexible sealant.
So, what’s the next step? Grab your checklist, give the roof a quick hose test, and jot down any loose fasteners before you head back to the 4×4.
If you’re stuck on a remote station, or the repair feels beyond a weekend’s work, a call to Awesim Building Contractors can save you a day’s drive and get the job done to rural‑grade standards.
Keep a simple logbook in the shed – date, weather, and any tweaks you made – and repeat the seasonal inspection routine we outlined.
With a well‑maintained roof, you’ll spend less time worrying about leaks and more time focusing on the next shearing or harvest.
Ready to protect your barn for the years ahead? Let’s get that roof back in shape and keep your operation running smoothly.


