

Fixing timber floor scratches really comes down to matching the right method to the depth of the damage. For a light scuff, a simple touch-up pen might do the trick, but a deep gouge is a different story, often needing a full sand and refinish. The first step is always figuring out exactly how deep the scratch is.
Handling Scratches On Rural NSW Timber Floors
Keeping timber floors looking their best in rural New South Wales is a unique challenge. Life on a farm or a regional property is tough on floors, a world away from what you’d see in the city. Muddy boots, the odd dropped tool, and the general hustle and bustle of a busy household can quickly leave their mark.
These aren't just blemishes; they're signs of a life well-lived. Whether it's a homestead near Tamworth or a property out past Dubbo, the story is often the same. The demanding Australian climate and the practicalities of country life call for floors that are not only beautiful but also incredibly durable.
Overcoming The Challenge Of Remote Locations
One of the biggest hurdles we face when working on properties across regional NSW is simply getting there. Many homes are miles down unsealed roads or tucked away in terrain that a standard delivery truck just can't handle. This can make bringing in supplies and heavy equipment a logistical nightmare, often delaying or preventing crucial maintenance work.
To get around this, we've invested in a specialised 10 tonne 4×4 truck to bring in materials and supplies for the most remote properties around New South Wales. This beast is the heart of our remote service operations.
This unique asset allows us to bring in labour, materials and equipment where & when it's needed the most. From a full-sized sanding machine for a large homestead to specific timber for a patch repair, we can get to even the most isolated properties in New South Wales.
It means that no matter how far off the beaten track you are, you get the same top-quality timber floor scratch repairs and broader property and building maintenance services as someone living in town. We can haul everything from heavy-duty sanders and coatings to a full crew of skilled tradespeople, making sure your project gets done right and without the usual logistical headaches. This capability is what allows us to deliver real, effective solutions that can truly stand up to the rigours of country life.
How to Accurately Assess Floor Damage
Before you even think about reaching for a repair kit, the first and most critical step is to accurately diagnose the damage. Getting this wrong is a classic rookie mistake that can turn a simple fix into a much bigger headache, costing you more time and money in the long run. The main thing you need to figure out is whether the scratch is just sitting in the top layer of finish, or if it's actually dug into the timber itself.
The easiest way to check this is a trick as old as the trade itself: the fingernail test. Simply run your fingernail gently across the scratch. If it glides right over without catching, you're in luck. That's likely just a superficial scuff in the protective topcoat. But if your nail snags in the groove, you know the scratch has gone deeper, breaking through the finish and damaging the wood fibres.
Distinguishing Between Surface and Deep Scratches
Beyond the feel, a bit of visual detective work will tell you a lot. A surface-level scratch often just looks like a faint, whitish line, especially on floors with a polyurethane finish. It appears more like a mark on the floor rather than a groove in it. These are the everyday battle scars from things like a dog's claws skittering across the hall or a chair being dragged out from the table.
A deep scratch or gouge, on the other hand, is impossible to ignore. You'll see a clear indentation, and the colour inside the mark will often be lighter than the surrounding area – a dead giveaway that you're looking at raw, exposed timber. This kind of damage usually comes from something more dramatic, like dropping a heavy tool or dragging a fridge across the floor. Getting this distinction right is the key to choosing the correct repair method.
To help you quickly identify what you're dealing with, I've put together this simple guide. It breaks down the different scratch types you’ll encounter on a rural property and points you toward the best solution.
Scratch Severity Identification Guide
| Scratch Type | Appearance and Feel | Common Causes in Rural Homes | Recommended Action |
|---|---|---|---|
| Superficial Scuff | A light, whitish line. Your fingernail glides over it. Often only visible from certain angles. | Boots tracking in grit, pet claws, kids' toys being pushed around. | Simple DIY fix. A good quality polish or a scratch concealer pen is usually enough. |
| Moderate Scratch | Your fingernail catches slightly. The scratch has breached the topcoat but hasn't deeply damaged the wood. | Dragging a piece of furniture, a dropped kitchen utensil, rocks stuck in shoe treads. | A more involved DIY repair. Often requires a light sand and reapplication of finish to the affected area. |
| Deep Gouge | A definite groove you can feel. The colour inside is often the lighter shade of raw wood. | Dropping something heavy (like a piece of firewood), moving appliances, damage from farm equipment. | Professional help is strongly recommended. This requires filling, sanding, colour-matching, and refinishing. |
Ultimately, this table helps you make an informed first call. While minor scuffs are well within reach for a weekend DIY project, deeper damage needs a more considered approach to avoid a patchy, obvious repair.
This flowchart can also help you visualise the decision-making process when you're faced with a scratch on your floor.
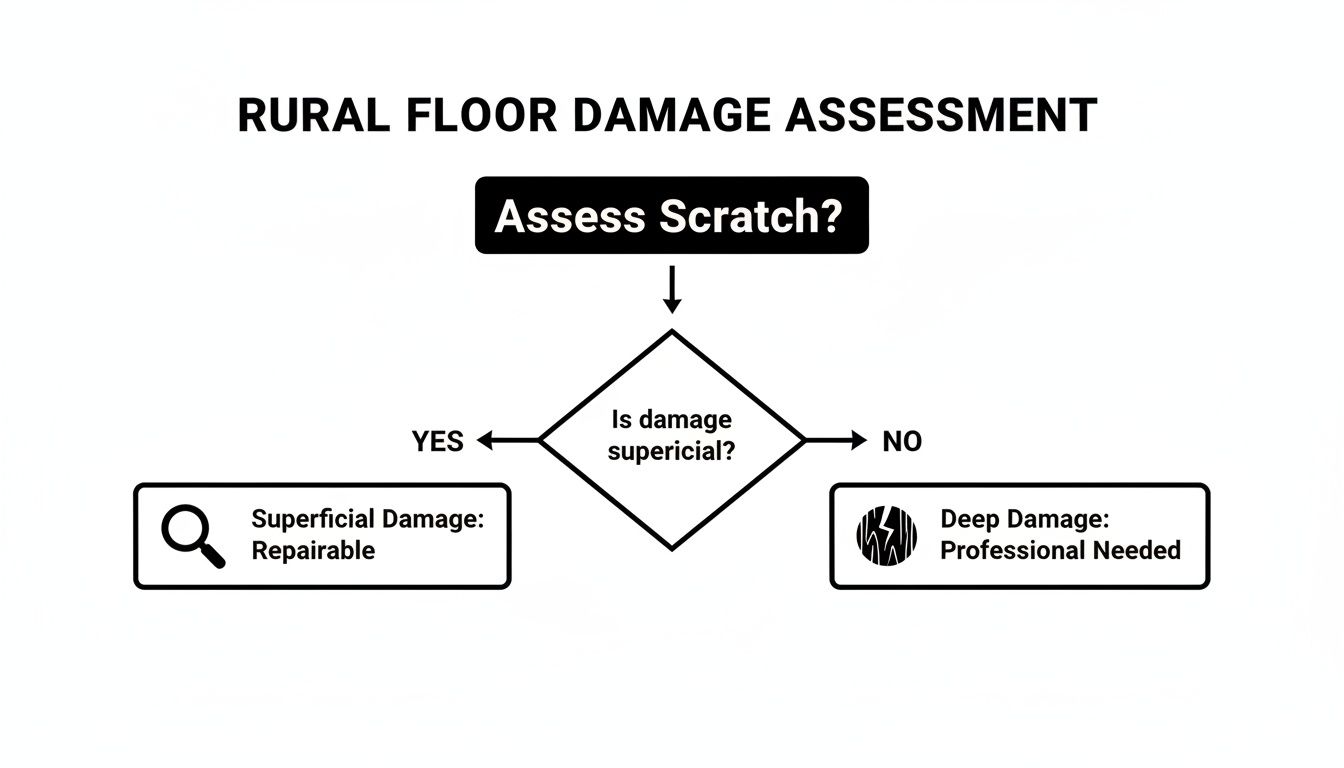
As you can see, the depth of the scratch is what really dictates the repair path you need to take.
Knowing When to Call for Help
For anyone living out in regional New South Wales, the decision to DIY or call a pro isn't just about skill – it's about practicality. Getting the right materials and finding someone with the right expertise can be a real challenge, so you want to be sure of your assessment from the get-go.
As a solid rule of thumb, if you can feel the scratch with your fingernail and it runs across more than one floorboard, it's a strong sign you need professional help. Tackling widespread or deep damage without the proper sanding equipment can leave you with an uneven, blotchy finish that’s far more noticeable and difficult to fix later.
Don’t forget, our specialised 10 tonne 4×4 truck is fully equipped to handle the unique access challenges of rural and remote properties. We bring all the labour, materials, and heavy-duty machinery required for timber floor scratch repairs directly to your doorstep, no matter how far out you are. It means you can get even the most severe damage fixed properly, restoring the beauty of your floors without any logistical nightmares.
DIY Fixes for Minor Scuffs and Scratches
When you’re dealing with those annoying surface scuffs—the kind that haven't actually broken through the floor’s protective finish—a DIY approach is almost always the best first move. For this kind of surface-level damage, there are plenty of simple solutions you can try at home. In fact, there's a whole world of easy DIY fixes for removing scratches from hardwood floors out there. These methods are perfect for homeowners in places like Parkes or Moree who want to sort out minor imperfections without calling in the pros.
Most minor timber floor scratch repairs are easily handled with products you can pick up from your local hardware store. The real trick is to match the repair method to your specific floor type and its finish. What works a treat on a satin polyurethane finish might look completely out of place on a natural oiled floor.
Choosing Your Repair Method
For the lightest of scuffs, sometimes all you need is a bit of elbow grease. A microfibre cloth paired with a quality hardwood floor cleaner can often be enough to buff out faint marks from shoes or dragged furniture. But for scratches that are a bit more obvious, you’ll need to step up your game.
Two of the most effective and user-friendly tools for this job are wax filler sticks and timber touch-up pens. Each has its own strengths, making them suitable for different situations.
-
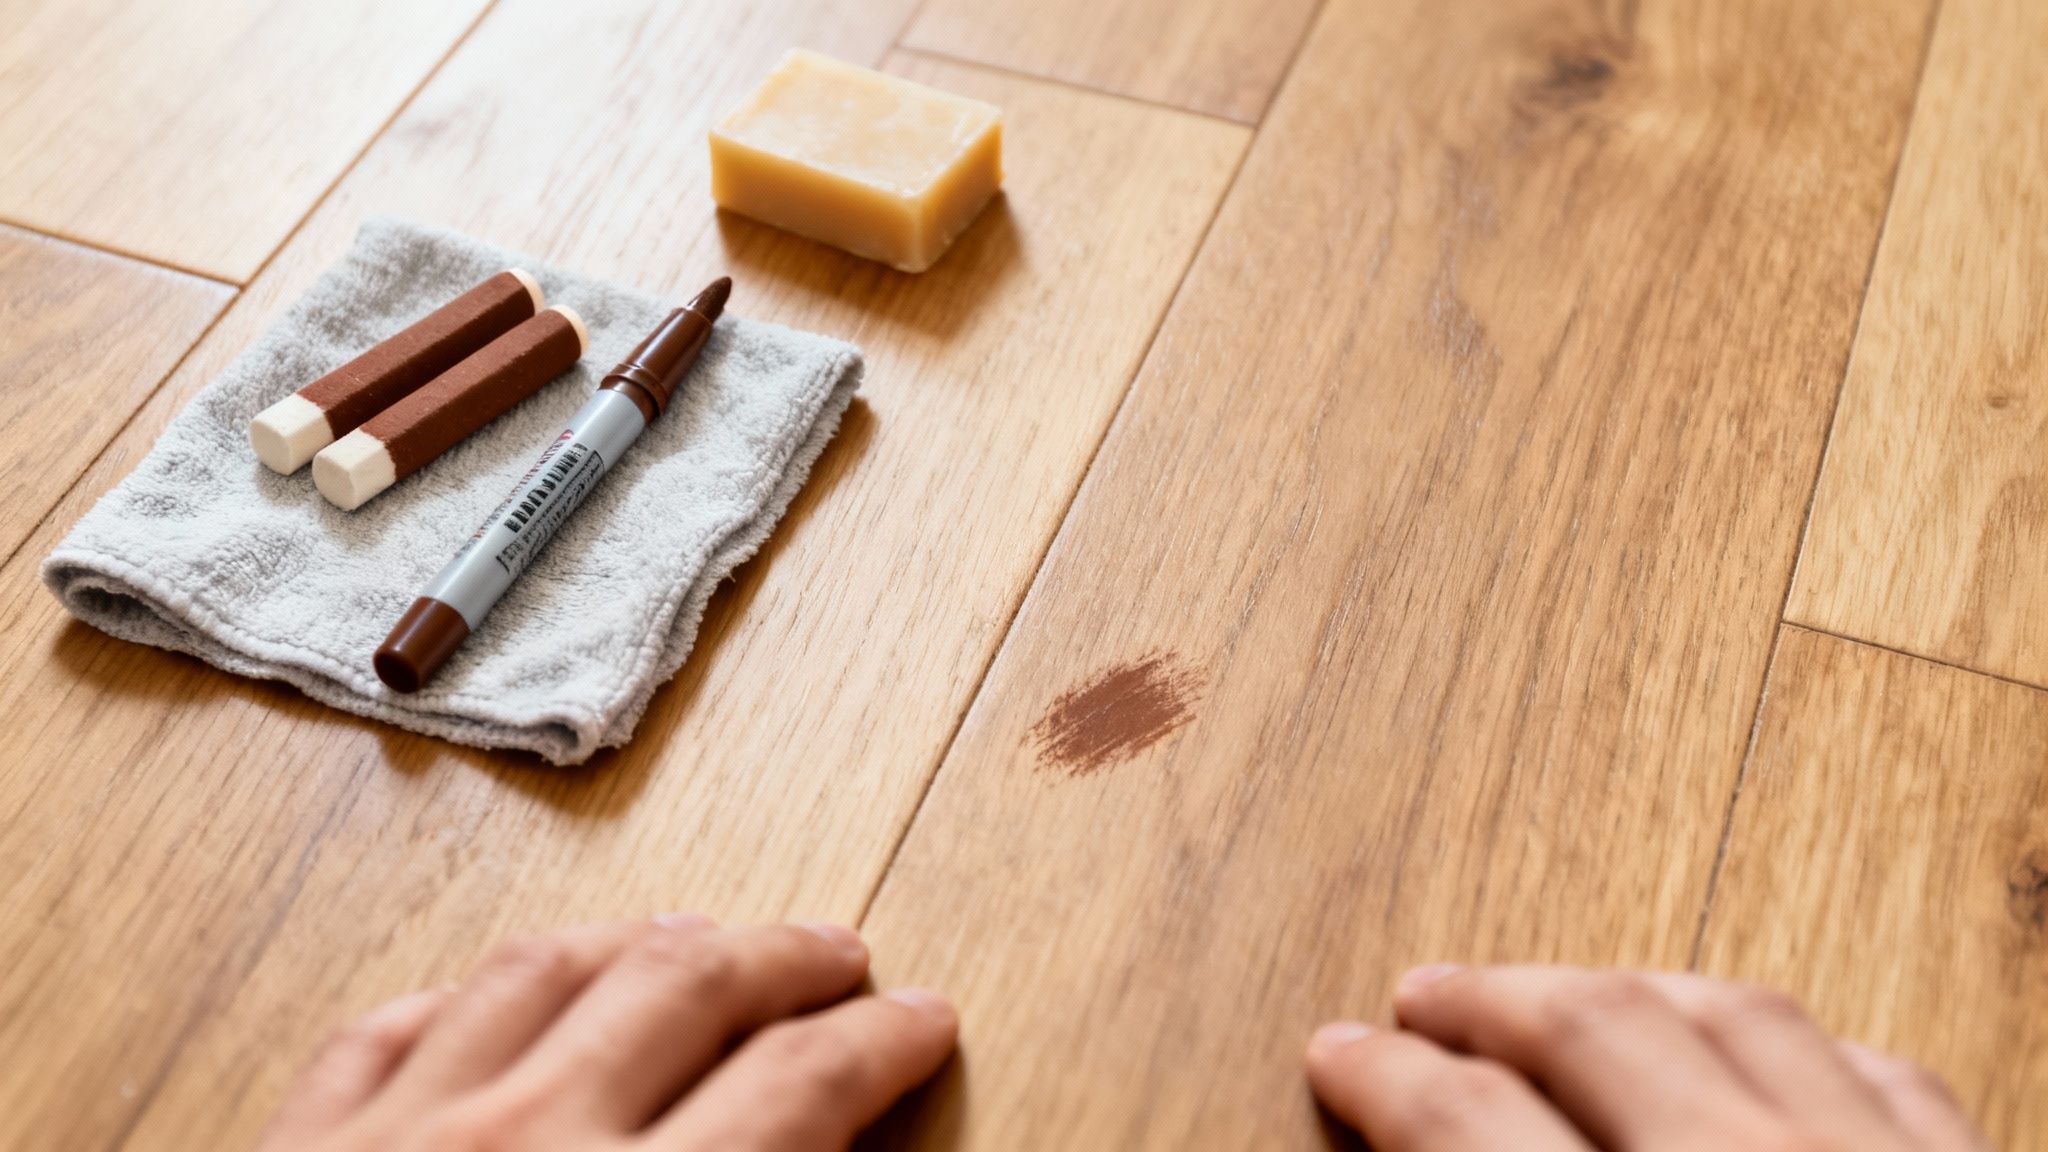
Wax Filler Sticks: These are fantastic for scratches that have a tiny bit of depth but haven't caused major damage. You simply rub the stick over the scratch to fill the gap, then buff off the excess. They come in a massive range of colours to match just about any timber you can think of.
-
Timber Touch-Up Pens: Think of these as felt-tip markers filled with wood stain. They are perfect for colouring in scratches where the finish has been scraped away, revealing the lighter, raw wood underneath. They do a brilliant job of restoring colour but won't fill any physical dent.
The golden rule for any DIY timber floor scratch repairs is simple: always test your product in an inconspicuous area first. Try it under the sofa, inside a cupboard, or in a corner hidden by a rug. This quick check ensures the colour and sheen are a good match, preventing a small scratch from becoming a very obvious, mismatched patch.
A Practical Guide to Using Repair Products
So, let's say you've spotted a light scratch in the living room, probably from a piece of furniture being shifted. You've run your fingernail over it, and it just skims the surface. Here's how you’d tackle it.
First up, give the area around the scratch a thorough clean with a pH-neutral wood floor cleaner and let it dry completely. Any dirt or grit left behind can get trapped in your repair, making it look messy and unprofessional.
If you're going with a wax stick, pick the colour that most closely matches your floor. Rub it firmly across the grain of the scratch until the indentation is filled. Then, use a soft cloth or a small plastic scraper to gently remove any excess wax from the surrounding floor before buffing the area to blend the sheen.
For a touch-up pen, the process is even more straightforward. Carefully apply the stain directly into the scratch, doing your best to stay within the lines. It's much better to build up the colour in thin layers than to apply too much at once. Immediately wipe away any excess that gets onto the finished part of the floor with a clean, dry cloth.
Remember, the goal of a DIY repair isn't absolute perfection. It's about making the scratch disappear from a normal standing height. These methods are a fantastic way to maintain your floors between professional services, keeping them looking their best against the daily wear and tear of rural life.
When Deep Gouges Require a Professional's Touch
While the DIY methods we've covered are brilliant for minor scuffs, deep gouges from something heavy being dropped are another beast entirely. When a scratch has torn through the finish and dug deep into the timber itself, a DIY fix can often fall short, sometimes even making the damage more obvious. That's when calling in a professional isn't just an option; it's the only way to get a flawless, lasting result.
Significant damage needs more than a quick touch-up. It calls for a systematic approach to blend the repair seamlessly with the rest of your floor. An expert brings specialised techniques and machinery to the table, restoring not just the look of your floor but its structural integrity, ensuring the repair can handle the rigours of country life.
The Professional Repair Process
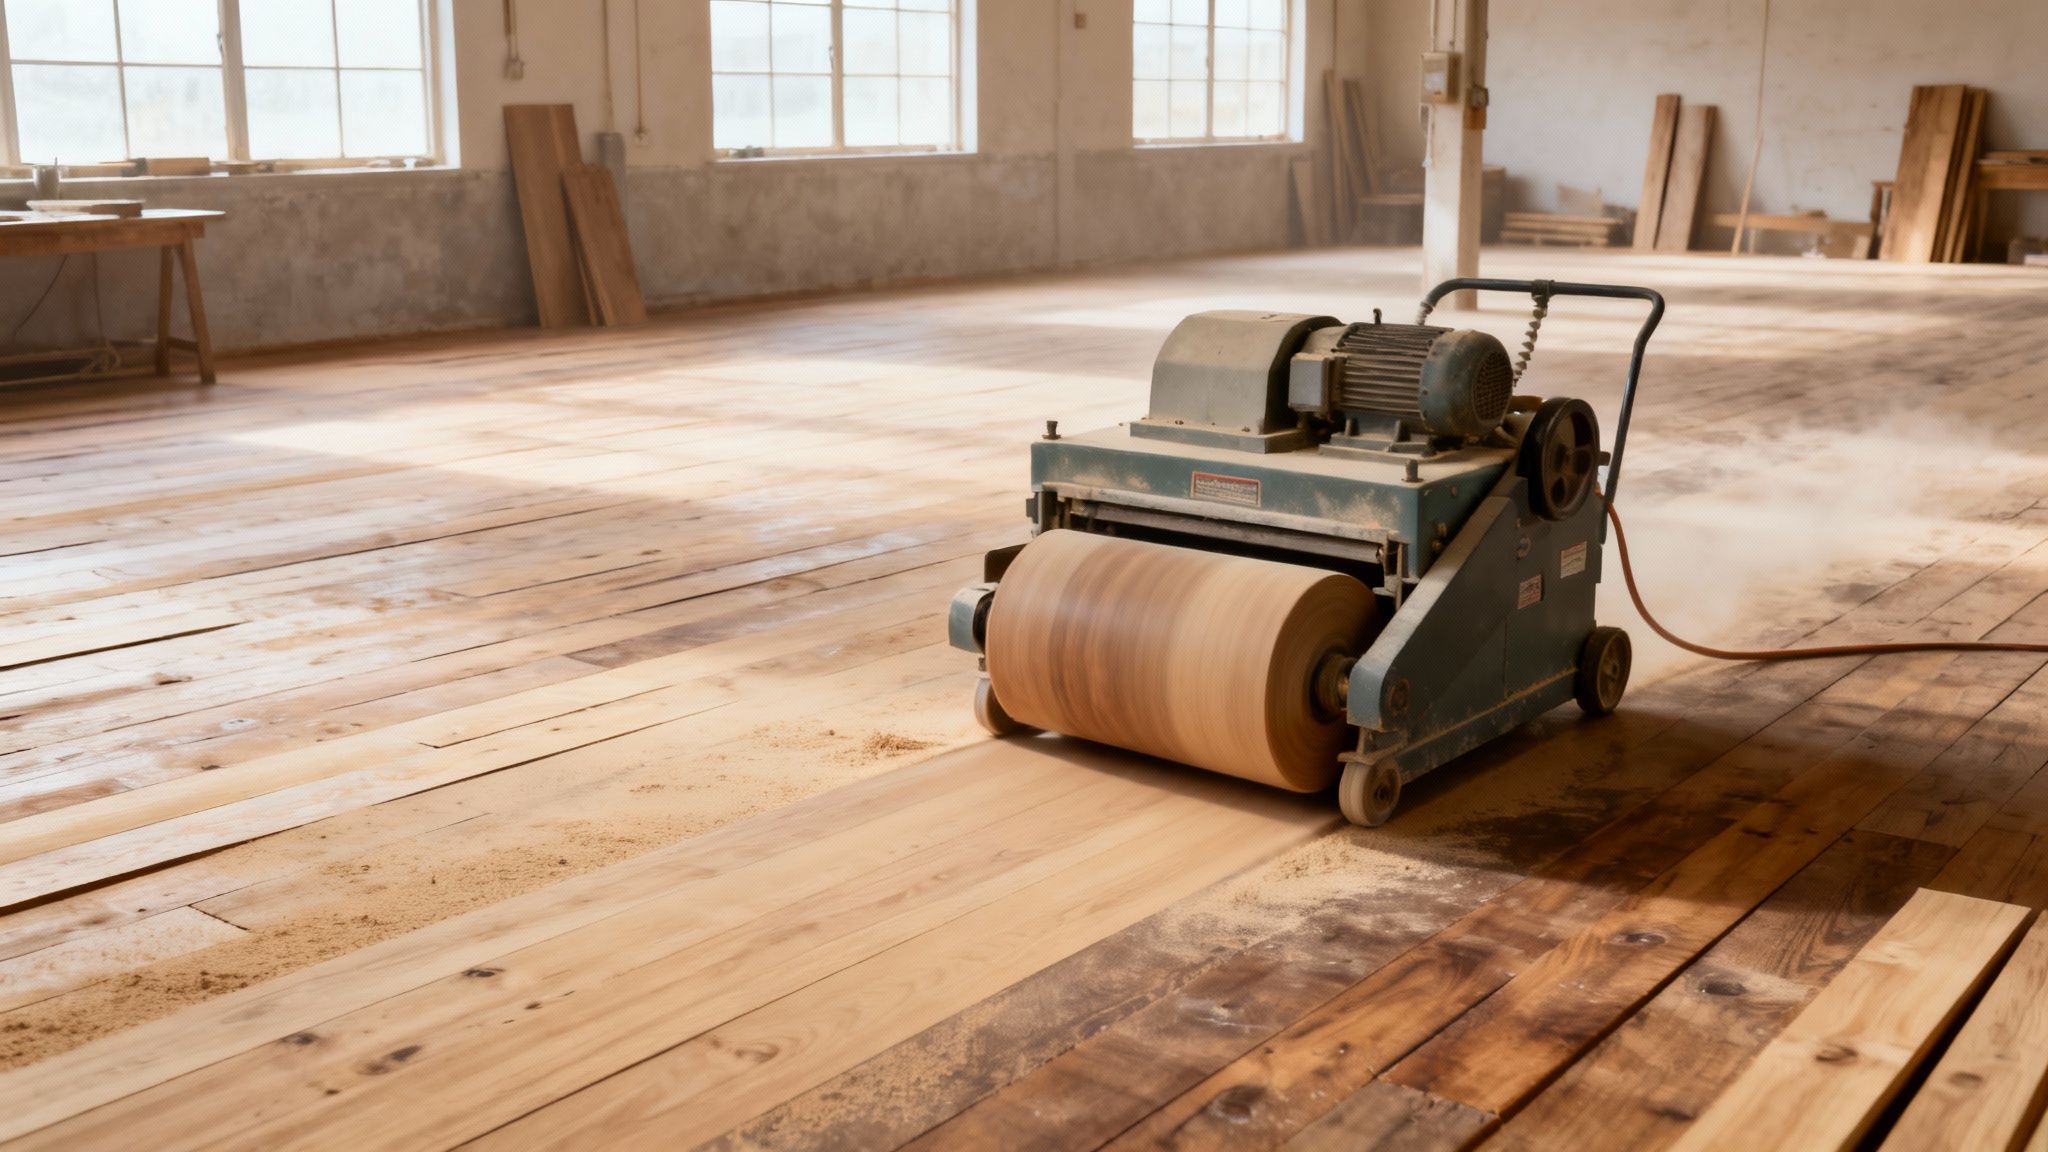
Forget simple wax sticks. A professional timber floor scratch repair is a multi-stage process. It usually starts with machine sanding—not just the gouge itself, but often the entire board or a small section to guarantee a perfectly level surface. We use industrial-grade edgers and drum sanders to take off a wafer-thin layer of wood, which completely removes the gouge without creating any noticeable dips.
After sanding, the area is meticulously filled. A pro will use high-quality, colour-matched putties and fillers, carefully selected to mimic the specific grain and tone of your timber. This precision is what makes or breaks a repair; a poor colour match sticks out like a sore thumb. Once the filler is set and sanded smooth, the final step is applying a durable, commercial-grade finish that protects the wood and perfectly matches the sheen of your existing floor.
Understanding Repair Costs in Rural NSW
Out here in rural NSW, a few unique factors can influence the cost of a professional repair. Deep gouges from dropped tools or even stray cattle hooves are surprisingly common, and repairs can run anywhere from $200 to $500 per affected board in areas from Moree across to Nyngan.
In fact, a recent report noted that 42% of regional homesteads see some form of severe floor damage each year, often during renovations. While tempting, DIY steam-and-sand attempts on these deep gouges are only successful about 15% of the time, and you risk making things worse, especially in our humid farm climates. In stark contrast, a professional with an industrial edger can remove material with absolute precision for a perfect finish. You can get more insights on the cost factors for wood floor repair on surfacescare.com.au.
Experience isn't just a buzzword; it's the difference between a repair that lasts and one that fails in six months. With over 35 years in the field, we've seen every challenge a rural floor can face. We use Australian-made products formulated for our harsh climate, ensuring your repaired floor is as tough as it is beautiful.
Remote Access Is No Barrier to a Quality Job
For many property owners in remote New South Wales, logistics are a major headache. Getting skilled tradies, heavy equipment, and the right materials to a property that's miles down a dirt road can feel like an impossible task. This is exactly why we invested in a 10 tonne 4×4 truck. It's our mobile workshop and supply depot, allowing us to bring everything needed for the job straight to your door, no matter how rugged the terrain.
This means you never have to compromise on quality just because you live out of town. Whether it's a small but deep gouge that needs fixing or you need more extensive flooring work as part of a bigger project, our team is equipped to handle it. If you need a reliable crew for various jobs, you can learn more about our professional handyman services in Tamworth NSW and the surrounding regions.
When Spot Repairs Just Won’t Do: The Full Restoration
Sometimes, the damage goes beyond a few isolated marks. When your floors have seen years of traffic, accumulating countless scratches, scuffs, and sun-faded patches, a complete sand and refinish is the only way forward. This isn't just a repair; it's a full-scale restoration that brings the timber back to its original, breathtaking beauty.
Think of it as the ultimate reset for your floors. We're not just covering up the problem. We're systematically removing the entire damaged surface layer with industrial-grade drum sanders to reveal the fresh, untouched timber beneath. It's the most effective solution for widespread timber floor scratch repairs, turning a worn-out floor into the stunning heart of your home again.
The Sanding and Refinishing Process
It all starts with the heavy lifting. The first pass with a coarse-grit sandpaper strips away the old, tired finish and grinds down any deeper imperfections. From there, it's a process of refinement. We work our way through progressively finer grits of sandpaper, with each pass making the surface smoother and more uniform until it feels like silk.
This methodical preparation is the secret to a flawless result. Once the floor is perfectly smooth and we’ve meticulously cleared away every speck of dust, it’s time to apply the new protective coatings. We only trust high-quality, Australian-made finishes that are specifically designed to handle our tough rural climate, providing a durable barrier against future wear while highlighting the timber's natural character.
Bringing Our Service to Every Corner of New South Wales
We know that for homesteads around Bourke, Walgett, and other remote areas, logistics can be a nightmare. Getting the right gear and materials out to the property is often the biggest hurdle to getting a professional job done. We've built our entire operation to solve that problem.
Our secret weapon? A purpose-built 10 tonne 4×4 truck. This beast is our mobile workshop, designed to haul everything we need—labour, industrial sanders, and premium coatings—to the most isolated properties across New South Wales. We bring the workshop to you, wherever you are.
This unique capability means we can manage a full restoration with minimal disruption, no matter how far off the beaten track you are. In rural NSW, timber floor scratches are a constant battle for farmers and property owners. While a minor fix might cost $50-$100 in the city, regional jobs often see a 20-30% price jump purely due to travel. With up to 65% of homesteads seeing timber damage in the first five years, keeping your floors in top condition is essential for property value. You can find more details on repair costs for timber floors on quicksandflooring.com.au.
Our all-inclusive approach ensures your investment is protected from start to finish. We handle every detail to revitalise your home’s interior and deliver a finish that’s truly built to last. To see what a full restoration involves, take a look at our dedicated page on professional flooring repairs.
Common Questions About Timber Floor Care
Living in rural NSW throws a few unique curveballs at your timber floors. You've got everything from sun-bleached patches near the windows to a never-ending war against grit and dust. Keeping them looking their best requires a bit of practical know-how, so here are some of the most common questions we get asked.
How Can I Prevent Scratches on a Busy Farmhouse Floor?
When it comes to floor care, an ounce of prevention is truly worth a pound of cure. Your first and best line of defence is a set of high-quality doormats at every single entrance. These are non-negotiable for trapping the abrasive dirt and sand before it even gets a chance to scratch the surface.
Another simple but incredibly effective trick is to put felt pads on the legs of all your furniture. Pay special attention to chairs and tables that get dragged around a lot.
Get into the habit of a regular sweep or vacuum using a soft-bristle head. For those really high-traffic areas like the mudroom or kitchen, think about putting down a durable area rug to take the brunt of the foot traffic. And honestly, a strict "no work boots inside" rule can make a staggering difference.
Can a Repair Match My Sun-Faded Timber Floor?
This is a tricky one. Matching a fresh repair to a sun-faded floor is a real art, and it's where professional experience really counts. The intense UV we get in regional NSW can dramatically change the colour of timber over time, which means a new spot repair can stick out like a sore thumb.
For a truly seamless result, we almost always recommend sanding and refinishing the entire room. This process removes that top, sun-bleached layer and lets us apply a consistent stain and protective coat. It’s the only way to guarantee a perfect colour match across the whole floor.
How Long Does Professional Floor Refinishing Take?
The timeline really hinges on the size of the room and the type of finish we're applying. For an average-sized room, say 25-30 square metres, the sanding itself usually takes a full day.
Applying the finish is what takes a bit more time. Each coat needs to dry properly, so that part will add another one to two days to the job. All up, you should plan for the area to be out of action for about 3 to 5 days. We always map out a clear project schedule with you beforehand to keep any disruption to your home or farm operations to an absolute minimum. To better understand the various aspects of long-term floor preservation and restoration, consider the distinctions between preventive versus corrective maintenance.
It doesn’t matter where you are in New South Wales, from the heart of Tamworth to the most remote properties, our team is equipped and ready to help. Our specialised 10 tonne 4×4 truck brings all the labour, materials, and machinery needed right to your doorstep.
Contact Awesim Building Contractors today to talk about your timber floor scratch repairs or any other building needs.
Find out more at https://awesim.au.


1 Comment