

Ever walked into a dusty farmhouse bathroom and thought, “This could be a lot prettier, but I don’t know where to start?”
You’re not alone – most country homeowners feel that mix of pride in their rugged setting and a yearning for a bit of comfort.
That’s why I’m going to share a handful of country bathroom renovation ideas that blend timeless rural charm with modern ease, all without breaking the bank.
First, imagine swapping those cracked, uneven tiles for reclaimed timber planks or matte‑finished stone that echo the surrounding paddocks, yet stay sturdy enough for muddy boots.
Then, think about a freestanding claw‑foot tub tucked behind a reclaimed timber screen – it feels like a private retreat, and the wood protects the tub from dust when you’re not using it.
Lighting is another game‑changer; a simple pendant made from salvaged farm metal casts a warm glow and keeps the space feeling airy even on cloudy days.
Don’t overlook storage – open timber shelving with metal brackets lets you display vintage jars and fresh towels, while keeping the floor clear for easy cleaning after a rain‑soaked day.
If water pressure is a headache on the outback, a low‑flow rain shower head can give you that gentle cascade without guzzling precious gallons, and it fits right in with the rustic vibe.
And because rural sites often mean limited access for large deliveries, we always plan the layout so most fixtures arrive in standard‑size boxes that fit a 4×4 back‑door.
I’ve seen these ideas work on properties from the rolling hills of Armidale to the flat stretches near Bourke, and the results always spark that ‘wow’ moment when you step inside.
So, whether you’re a seasoned cattle station owner or a weekend farmer dreaming of a cozy bath, these country bathroom renovation ideas can turn a functional space into a welcoming haven.
Ready to get started? Let’s dive in and explore each idea in more detail, so you can picture the finished look and plan the next steps with confidence.
TL;DR
If you’ve ever stared at a dusty farmhouse bathroom wondering how to blend rustic charm with modern comfort, these country bathroom renovation ideas show you simple, budget‑friendly tricks—like reclaimed timber floors, salvaged metal lighting, and low‑flow rain showers—that turn a plain space into a welcoming haven.
We’ll walk you through each step, from planning delivery logistics for remote NSW properties to choosing durable finishes, so you can picture the finished look and start your renovation with confidence today.
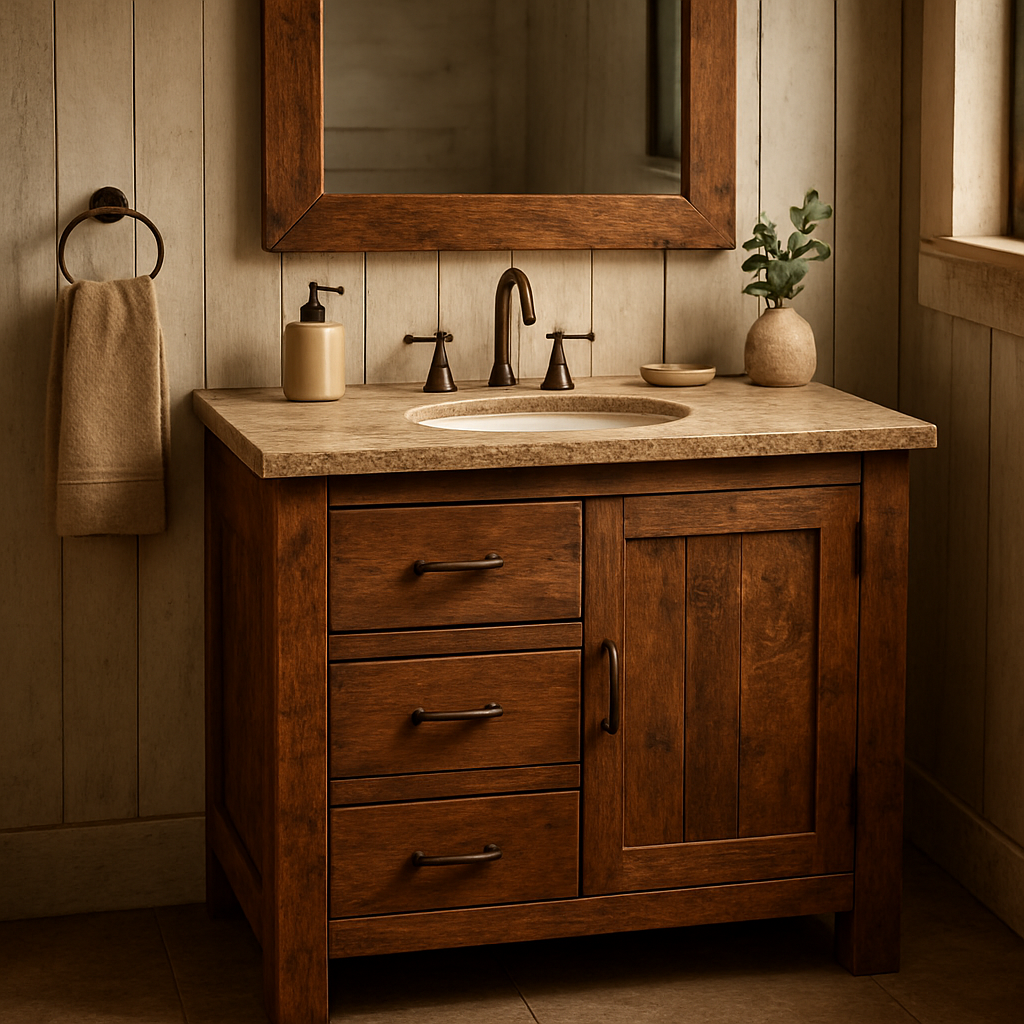
Idea 1: Rustic Timber Vanity
Picture walking into a country bathroom and the first thing that catches your eye is a solid timber vanity, its grain warm enough to make you think of the old farm shed you grew up in. That rustic feel isn’t just nostalgia – it’s a functional centerpiece that can hold everything from a hefty stone sink to a stack of fresh towels.
Why choose timber? For starters, reclaimed pine or seasoned hardwood can take a spill of water and still look good after a decade. It ages beautifully, developing a patina that tells a story. And if you’re worried about maintenance, a simple oil‑based sealant keeps the wood waterproof without turning it into a plastic‑looking slab.
Here’s a quick checklist to get your timber vanity right:
- Source reclaimed timber locally – you’ll save on transport and get that authentic weathered look.
- Opt for a floating design if floor space is tight; it creates a sense of openness.
- Include deep drawers with soft‑close hardware – no more slamming doors when the kids are rushing out.
- Pair the vanity top with a low‑profile stone or concrete slab for durability.
And don’t forget the hardware. Brushed bronze handles echo the farm’s metal tools, while a simple rail can double as a towel rack. It’s the little things that pull the whole look together.
Now, let’s talk about the visual impact. A timber vanity framed by a reclaimed timber wall panel makes the bathroom feel larger, especially when you add a large mirror. If you need help choosing the right mirror size, our Country Bathroom Renovations: A Practical Guide for Rural NSW Homes walks you through the basics.
Feeling inspired yet? You might be wondering how to finish the space without it looking cluttered. A simple, open‑shelf above the vanity lets you display a few pretty jars, a potted eucalyptus, or those hand‑picked bath accessories you love. Speaking of which, adding a few curated pieces can turn a functional vanity into a spa‑like retreat. Check out some hand‑picked bath gift sets for that finishing touch.
After the video, you’ll see a real‑world example of a timber vanity installed in a Tamworth farmhouse. Notice how the vanity sits under a window with moisture‑resistant plantation shutters – a perfect blend of style and practicality. If you’re hunting for shutters that can stand up to the humidity of a bathroom, Monroe Plantation Shutter Pros offers options that won’t warp.
Quick tip: when you order the timber, ask for a few extra centimetres on each side. On a remote NSW property, you’ll thank yourself when the delivery truck can’t fit a perfect‑size board through a narrow gate.
Finally, think about lighting. A pendant made from salvaged farm metal hung just above the vanity adds a warm glow and keeps the space feeling airy even on overcast days. Combine that with a low‑flow rain shower and you’ve got a bathroom that whispers “relax” while still being built to survive the outback.
So, to sum up: choose reclaimed timber, seal it well, pair it with simple hardware, add a touch of curated accessories, and you’ve got a rustic vanity that’s both beautiful and built for country life.
Idea 2: Open‑Plan Shower with Natural Stone
Ever stood in a cramped, tiled shower and thought, “There’s got to be a way to make this feel bigger, brighter, more like the outback itself?”
That’s exactly what an open‑plan shower with natural stone can do for a country bathroom. By dropping the walls and letting a slab of locally‑sourced stone stretch across the floor and up the side walls, you instantly create a space that feels as expansive as the paddock beyond your back door.
Why natural stone works in a rural setting
First off, stone is tough as nails. It handles the occasional splash of mud, the grit from boots, and the harsh NSW sun without cracking. Second, the earthy tones – warm sandstone, speckled limestone, or rugged slate – echo the surrounding landscape, so you get a seamless transition from garden to bathroom.
And because stone is a natural insulator, it stays cool on a scorching summer morning and holds a bit of warmth on a chilly winter night – perfect for those early‑morning showers when you’re still shaking off the cold.
Real‑world example from the field
Last year I helped a family at a wheat farm near Gunnedah replace their old shower cubicle with a single 2‑metre by 1‑metre sandstone slab. We left the stone exposed on three sides, added a simple glass divider at the back, and installed a low‑flow rainhead. The result? Their bathroom looks like a mini‑outback oasis, and the kids actually love waiting for their turn because it feels like a spa.
Another client in the Bourke region opted for reclaimed slate that had been used on an old shed roof. We polished it, sealed it with a breathable marine‑grade sealant, and it now serves as both shower floor and wall – no grout lines to clean, just one solid surface.
Step‑by‑step guide to pulling it off
1. Plan the layout. Measure the space where you want the open area. A minimum of 900 mm width gives enough room to move comfortably.
2. Choose the stone. Look for a local quarry or supplier who can cut the slab to size. Sandstone and limestone are easier to work with, while slate offers a slip‑resistant texture.
3. Prep the sub‑floor. A concrete slab with a minimum 25 mm thickness provides a solid base. Add a vapour barrier to protect against moisture rising from the ground.
4. Seal the stone. Use a low‑VOC, breathable sealant so the stone can “breathe” while staying water‑tight. This step is crucial for rural homes where humidity can swing dramatically.
5. Install drainage. A linear drain that runs the length of the stone slab works best – it hides the pipe and keeps the floor level.
6. Fit the shower fixtures. Pair the stone with a rain‑shower head mounted on a wall‑hung arm. A thermostatic valve helps you keep the water temperature steady, even when the water pressure drops after a rainstorm.
7. Finish with lighting. A recessed LED strip along the top edge of the stone adds a soft glow that highlights the natural veining.
Tips that keep the stone looking great for years
• Regular sealing. Re‑apply a thin coat of sealant every 12‑18 months, especially after a heavy cleaning.
• Gentle cleaning. Skip harsh chemicals; a pH‑balanced stone cleaner and a soft brush do the trick.
• Slip safety. Add a few anti‑slip pads in the shower zone or choose a naturally textured stone like slate.
• Mind the edges. Use a subtle bullnose profile on the slab’s edge to avoid sharp corners that can chip.
Thinking about how to source the stone without a massive delivery truck? Because Awesim’s 4×4 fleet can haul up narrow farm tracks, we can bring the slab right to your site and set it in place without the need for a crane.
So, does an open‑plan stone shower sound like the right move for your country bathroom?
When you combine the durability of stone with the freedom of an open layout, you end up with a bathroom that feels both rugged and refined – exactly what a farm home needs.
Idea 3: Heritage‑Style Claw‑Foot Tub
Picture this: you pull the door open after a long day in the paddocks and the first thing you see is a deep‑soaking claw‑foot tub that feels like it belongs in a 1920s homestead, yet fits perfectly in your modern country bathroom. That moment of stepping into a warm, freestanding soak is the kind of quiet luxury that makes a rural renovation feel truly personal.
So, why does a heritage‑style tub make sense for a farm property? Because it’s built for durability, it hides the mess of a shower curtain, and it adds that nostalgic charm you get when you see an old wagon wheel or a weathered fence post.
Why a heritage‑style tub works in rural homes
First off, the classic cast‑iron or enamel‑on‑steel construction can take a few knocks from boots without denting. In the outback, you’ll occasionally have mud tracked in, and a sturdy tub can handle that without a squeak.
Second, the low‑profile, rounded feet keep the tub stable on uneven concrete slabs – a common situation on older farmhouses where the floor isn’t perfectly level.
And let’s be honest, there’s something about the curved silhouette that makes you pause and think, “This is exactly the centerpiece my bathroom has been missing.” It’s a visual anchor that ties timber vanities, reclaimed timber screens, and stone showers together.
Choosing the right material and finish
If you’re hunting for a tub that can survive the NSW heat in summer and the chill of winter mornings, go for a double‑coated enamel finish. It’s resistant to rust, easy to clean, and the colour options range from classic ivory to a soft, dusty teal that mimics the sky over a wheat field.
Prefer a lighter look? Acrylic tubs mimic the look of cast‑iron but are about a third of the weight – handy if your 4×4 delivery truck can only handle a certain payload.
Don’t forget the faucet style. A floor‑mounted, cross‑handle mixer with a brushed brass finish not only complements the vintage vibe but also stays away from the wall where dust can settle.
Step‑by‑step installation checklist
1. Measure the floor space. Leave at least 90 cm of clearance on each side so you can move around comfortably.
2. Check the sub‑floor. A level concrete slab, at least 100 mm thick, gives the tub a solid base. If the slab is uneven, a thin self‑levelling screed does the trick.
3. Plan the plumbing. Position the drain and overflow so the pipe runs straight to the existing waste line – this avoids long, hidden runs that can leak.
4. Choose your water‑supply route. A flexible copper or PEX line that runs under the floorboards keeps the look tidy and protects the pipe from farm dust.
5. Secure the tub. Most heritage tubs come with pre‑drilled anchoring points. Use stainless‑steel brackets and silicone sealant to keep it steady and water‑tight.
6. Install the faucet. A floor‑mounted mixer bolts to the tub’s footplate; tighten the connections and test for leaks before sealing the surrounding floor.
7. Finish the floor around it. A slip‑resistant stone or textured timber deck not only looks gorgeous but also helps mop up any stray water.
Maintenance tips to keep it looking fresh
Because you’ll be using the tub often, a quick weekly wipe‑down with a mild soap solution prevents soap scum from building up. Avoid abrasive cleaners – they can scratch the enamel.
Every 12‑18 months, give the enamel a light polish with a non‑abrasive bathroom polish to bring back the shine. If you opt for an acrylic model, a simple vinegar‑water rinse does the job.
And here’s a little trick: place a small, breathable mat under the tub’s feet. It protects the concrete from moisture wicking up and adds a cosy touch that feels like a welcome mat for your feet.
Thinking about the next step? Start by scouting local farm‑supplied tub dealers – many will deliver straight to your site using our 4×4 fleet, so you won’t need a crane or a massive truck.
When the tub is finally in place, you’ll notice how the whole bathroom feels slower, more intentional – the kind of space where you can sit with a cuppa, watch the sun set over the fields, and let the water melt the day’s dust away.
Idea 4: Solar‑Powered Heated Floors
Imagine stepping out of a chilly morning shower onto a floor that’s already warm, like the sun itself has been waiting just for you. In a country bathroom, that kind of comfort feels like a small luxury that doesn’t break the bank – especially when the heat comes straight from the roof.
So, how do you make that happen on a farm where power can be spotty and the budget tight? The answer is a solar‑powered radiant floor system. It’s basically a thin electric mat or a network of water‑filled tubes that sit beneath your tiles, and the electricity or heat they need comes from a solar panel array you already have on the property.
Why solar‑heated floors click with rural life
First off, solar panels are already a familiar sight on many NSW farms. They’re built to survive dust, wind and the occasional stray cattle. Using that same setup to feed a floor‑heating circuit means you’re not adding a whole new piece of equipment – you’re just rerouting existing power.
Second, because the floor is the biggest heat emitter in the room, you use less energy than you would with a traditional space heater. That translates into lower electricity bills and a smaller carbon footprint – a win‑win for the farmer and the environment.
And because the system runs low voltage, it’s safer around kids and pets, which is a big plus when the bathroom doubles as a mud‑splatter zone after a long day out in the paddocks.
Three ways to set it up
Below is a quick comparison of the most common solar‑heated floor approaches. Pick the one that matches your site’s sunlight, budget and DIY comfort level.
| System | How it works | Pros | Cons |
|---|---|---|---|
| Solar‑thermal water loop | Solar collectors heat water that circulates through polyethylene tubing under the floor. | Very efficient in sunny regions; low running cost. | Higher upfront cost; requires a boiler‑style controller. |
| PV‑powered electric mat | Photovoltaic panels feed a dedicated inverter that powers low‑voltage electric heating mats. | Simple install; works with existing solar PV; easy to expand. | Electricity cost depends on panel size; may need battery for night use. |
| Hybrid solar‑PV + backup grid | PV supplies most power; grid supplies extra during cloudy periods. | Reliability year‑round; smaller battery needed. | Requires grid connection; slightly higher operational cost. |
Which one sounds right for you? If you already have a decent solar array and a sunny roof, the PV‑powered electric mat is usually the quickest route. If your farm gets a lot of direct sun in winter, a solar‑thermal loop can be a bit more efficient.
Step‑by‑step checklist
1. Audit your solar capacity. Check how many kilowatts your panels currently generate and whether there’s spare headroom for floor heating.
2. Choose the floor finish. Tile, stone or engineered timber all work, but make sure the surface conducts heat well – stone is a natural winner.
3. Lay the heating layer. For electric mats, roll them out over the sub‑floor, snap them together, and connect to the inverter. For water loops, splice the tubing into a manifold before covering with a thin screed.
4. Install a thermostat. A smart thermostat lets you set a comfortable temperature and even schedule heating for those early‑morning showers.
5. Connect to solar. Have your electrician tie the system into the existing PV inverter or add a small dedicated inverter for a thermal loop.
6. Test and seal. Run the system low for a few hours, check for hot spots, then finish the floor surface.
That’s it. Once it’s up and running, you’ll notice the floor staying warm for hours after the sun sets – a subtle but priceless comfort.
Real‑world tip from the field
Last season I helped a cattle station near Bourke install a PV‑powered mat under a reclaimed timber floor. The owner told me the first time he stepped out of the shower, “It feels like the sun followed me in.” He’s now using the same setup in the kitchen, proving the system scales nicely across the house.
One thing to remember: because rural sites often have uneven concrete slabs, make sure the sub‑floor is level before you lay the heating layer. A quick self‑levelling screed saves you from lumpy tiles later.
Ready to add that gentle, sun‑kissed warmth to your bathroom? Start by measuring your current solar output and chatting with a local electrician who understands farm‑grade installations. You’ll be surprised how quickly a few panels and a thin heating mat can turn a chilly outback bathroom into a cosy retreat.
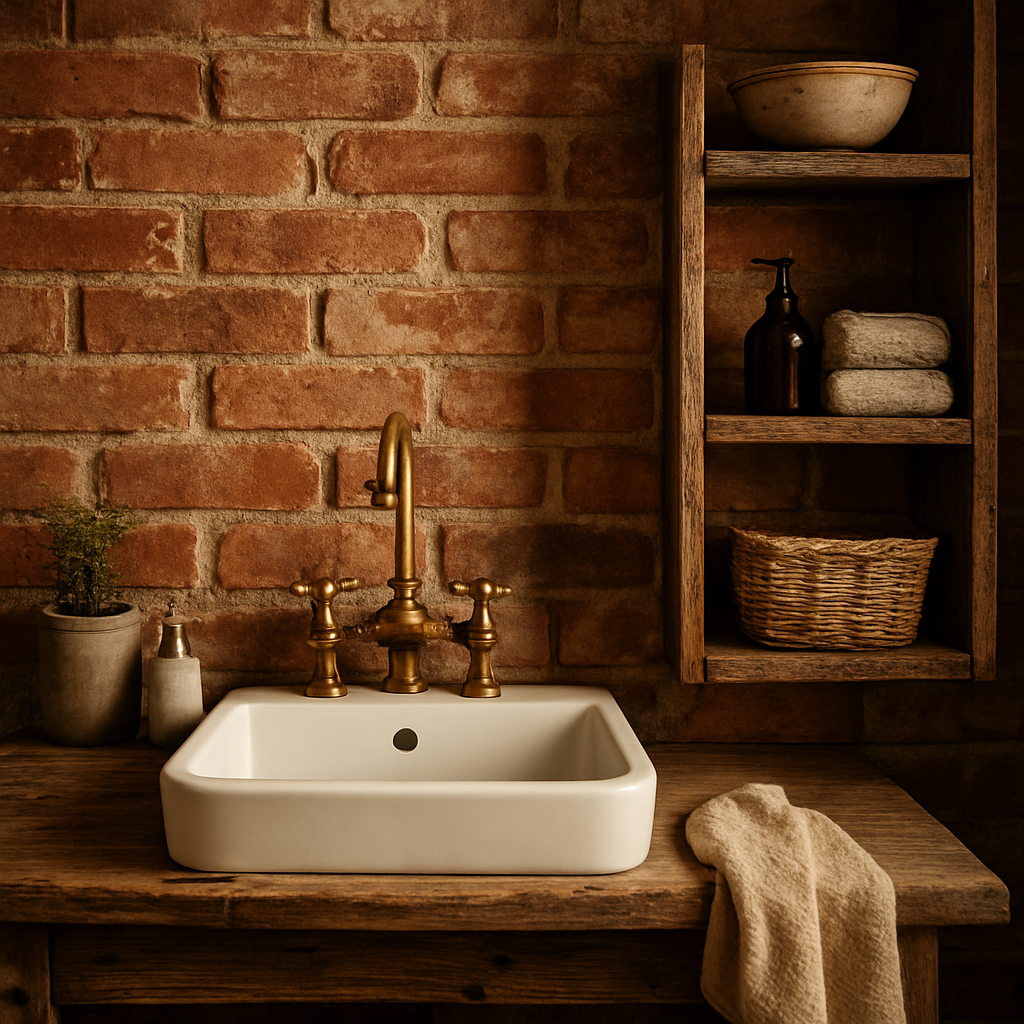
Idea 5: Reclaimed Brick Accent Wall
Ever walked into a country bathroom and thought, “The walls look a bit too plain for this setting?” You’re not alone. A reclaimed brick accent wall can turn a functional space into a warm, lived‑in backdrop that feels straight out of a farmhouse memoir.
Why does brick work so well in a rural bathroom? Because it’s literally a piece of the land you’re already on – it’s sturdy, it ages beautifully, and it hides the occasional splash of mud from boots without a fuss.
Why reclaimed brick feels right at home
First, the colour palette of weathered red or earthy tan instantly mirrors the surrounding paddocks. Second, brick’s natural texture adds depth without needing extra décor. And third, it’s surprisingly easy to keep clean – a quick wipe with a mild soap and water does the trick.
In fact, the rustic bathroom ideas guide suggests exposing part of an old brick wall to create a stunning feature, even if you paint it a neutral hue first. That little touch can become the room’s focal point.
Finding the right reclaimed bricks
Start by scouting local demolition sites, old farms, or salvage yards. You’ll often find bricks that have been sun‑baked for decades – those are the ones that develop that soft, lived‑in look we love.
Ask the seller about any structural damage. Small cracks are fine; they add character. Large crumbling pieces should be avoided unless you plan to repair them yourself.
Don’t forget to check the size. Standard NSW bricks are about 230 mm × 110 mm × 76 mm. If you’re mixing sizes, lay a few test rows on the floor to see how the pattern reads.
Step‑by‑step: Installing your reclaimed brick wall
1. Prep the surface. Clean the existing wall, remove loose paint, and apply a bonding primer. If the wall is concrete, a thin‑set mortar base works best.
2. Lay a moisture barrier. A sheet of 6‑mil polyethylene on the wall stops any rising damp from seeping into the brick.
3. Mix mortar. Use a Type N mortar for interior applications – it’s strong enough for brick but still workable.
4. Start at the bottom. Apply a 10 mm bed of mortar, press the first brick in, and tap it level with a rubber mallet. Use a spacer to keep even joints, typically 10 mm.
5. Stagger the joints. Like laying a garden path, offset each row by half a brick. This not only looks authentic but adds structural stability.
6. Check for level. Every few bricks, run a spirit level horizontally and vertically. Small adjustments are easier now than once the mortar sets.
7. Finish the joints. Once the mortar firms (about 30 minutes), use a pointing trowel to smooth the joints. For a softer, weathered look, pull a little of the mortar out with a brush.
8. Seal (optional). If you expect a lot of steam, a breathable, water‑based sealant helps protect the bricks without trapping moisture.
Take a step back after a few rows – you’ll see the wall start to breathe life into the whole bathroom.
And here’s a little pro tip: before the final coat, tuck a small piece of reclaimed timber behind a few bricks. It adds a surprise pop of colour when you’re cleaning the wall later.
Maintenance is a breeze. Sweep dust off with a soft broom, and once a month give the bricks a light scrub. If any mortar cracks appear after a heavy rain, just re‑point the affected area – it’s a quick fix that keeps the wall looking fresh.
So, does a reclaimed brick accent wall feel like the missing piece in your country bathroom renovation ideas? Give it a go, and you’ll end up with a space that feels both timeless and unmistakably yours.
Idea 6: Multi‑Functional Farmhouse Sink & Laundry Combo
Ever feel like your country bathroom is doing double duty – washing you in the morning and then begging for a place to toss the muddy laundry later in the day?
That’s the exact moment I started thinking about a sink‑and‑laundry hybrid. On a farm, space is a premium, the back‑door is often a narrow 4×4 track, and every square metre counts when you’re juggling boots, towels and buckets of water.
Why a combined unit makes sense
First off, you get two workstations for the price of one. A deep farmhouse sink with a generous overflow can handle everything from a quick hand wash to soaking a wool blanket, while the adjoining laundry trough lets you pre‑rinse muddy overalls without flooding the whole floor.
Second, because the plumbing stays simple. One cold‑water line and one drainage pipe feed both the sink and the wash tub, meaning fewer connections to chase down the back of the house – a real win when you’re dealing with concrete slabs that have settled over the years.
And because the whole thing sits on a single, sturdy base, you eliminate the need for a separate laundry cabinet that would otherwise eat up precious wall space.
Design details that keep the rural vibe
Think reclaimed timber framing, a brushed‑copper faucet, and a stone‑topped laundry trough. The stone can be a locally‑sourced sandstone slab that matches the reclaimed brick accent wall you just installed in the previous idea.
Below the sink, add a shallow shelf made from the same timber – perfect for soap dishes, a small basket of wool‑cleaning brushes, or that tin of lavender sachets you keep for fresh‑smelling linen.
For the laundry side, a stainless‑steel trough with a slight lip prevents water from spilling over when you’re scrubbing a muddy pair of boots. A simple, hand‑operated wringer (you can even repurpose an old farm gate hinge) lets you squeeze out excess water before the spin cycle, saving energy on the dryer.
Step‑by‑step checklist
- Measure the footprint. Aim for a 120 cm wide by 80 cm deep unit – big enough for a full‑size sink but still narrow enough to slide through a 4×4 back‑door.
- Choose the sink depth. A 20‑cm deep farmhouse basin lets you submerge larger items without splashing.
- Pick the laundry trough size. A 30‑cm wide by 40‑cm long trough gives you room for a quick soak.
- Source reclaimed timber. Look for barn beams that have been air‑dried for at least two years – they’re less likely to warp.
- Lay the base slab. Use a concrete pad at least 100 mm thick, level it, and apply a moisture barrier before the timber frame goes on.
- Install plumbing. Run a single cold‑water line to a dual‑outlet valve – one outlet feeds the sink faucet, the other feeds a low‑flow tap on the laundry trough.
- Seal all joints. Marine‑grade silicone around the sink and trough prevents damp from seeping into the timber.
- Finish the wood. A low‑VOC oil finish brings out the grain and adds a protective layer against occasional spills.
Now, step back and picture the scene: you’re standing on a slightly raised timber platform, the sink glinting in the morning light, the laundry trough waiting with a bucket of warm water, and the whole setup feels like it was built for you, not for a showroom.
Real‑world tip from the field
Last season I helped a sheep station near Gunnedah install a combo unit right next to a mud‑room. The farmer told me he’d been washing the shearing shears in the sink and then sliding the same basin over to the trough to rinse the wool blankets. He said the set‑up cut his cleaning time by half and saved a whole load of detergent because the water could be reused for the second wash.
Because Awesim’s 4×4 fleet can deliver the timber and stone right to the track, you won’t need a crane or a massive truck – just a crew that knows how to work around the dusty, wind‑blown yard.
Quick win to get you started
Before you order any custom fabrications, sketch a simple layout on graph paper. Mark where the sink faucet will sit, where the laundry tap will be, and where the drainage pipe will exit. A quick visual will catch any clashes early, and you’ll feel more confident when the builder shows up with the timber beams.
And remember, the goal isn’t just to look pretty – it’s to make daily chores feel a little less like a chore. A well‑designed sink‑and‑laundry combo can turn a cramped country bathroom into a functional hub that serves the whole farm family.
FAQ
What are the best low‑maintenance materials for a country bathroom renovation?
When you’re working out a country bathroom renovation ideas plan, pick surfaces that laugh at dust and mud. Engineered stone for the countertop is heavy‑duty, resists stains and doesn’t need regular sealing. For walls, a water‑based, low‑VOC paint on primed timber holds up against steam and the occasional splash of rainwater. And a matte, slip‑resistant tile in the shower saves you from endless grout scrubbing. These choices cut upkeep time and let you focus on the next farm task.
How can I keep the cost down when adding a reclaimed‑brick accent wall?
A reclaimed‑brick accent wall feels massive, but you don’t have to break the bank. Start by sourcing bricks from a local demolition yard – they’re often free or cheap, and the transport cost stays low because our 4×4 crew can haul them straight to your property. Lay the bricks on a thin cement‑board backer with a modest 10 mm mortar joint; you’ll save on both material and labour. Finish with a breathable sealant only if you expect heavy steam, otherwise the wall will age beautifully on its own.
Can I install a solar‑heated floor myself, or do I need a specialist?
You can’t just roll out a PV‑powered heating mat and call it a day – the electrical work still needs a qualified electrician, especially on a farm where the power supply may be off‑grid. That said, the physical installation is DIY‑friendly: lay the mat on a level sub‑floor, snap the sections together, and connect to the thermostat. If you already have a solar array, the extra load is usually under 1 kW, which most rural inverters can handle without a upgrade.
What plumbing tricks help avoid frozen pipes on a remote NSW farm?
Cold winters up in Bourke or Armidale can freeze exposed pipework, so we always tuck the water lines inside the wall cavity or run them through insulated conduit. A simple trick is to loop a small length of flexible PEX inside a foam pipe wrap and secure it to the studs – it’s cheap, easy, and keeps the water above freezing. Adding a low‑voltage thermostat‑controlled pipe heater at the farthest point of the run is another fail‑safe that costs pennies per season.
Is it worth using a dual sink‑and‑laundry combo in a small bathroom?
A sink‑and‑laundry combo does more than save space; it trims the plumbing footprint, which on a remote site means fewer fittings that could leak. Position the sink on the wall side you use most for hand‑washing, and let the laundry trough sit right next to the mud‑room door – that way you can roll dirty boots straight into the water without tracking mud across the floor. The dual‑outlet valve lets you control flow to each side independently, so you never waste water when you only need a quick hand wash.
How do I choose a stone slab that won’t crack in harsh outback weather?
When you pick a stone slab for an outback shower, look for a low porosity type – sandstone with a tight grain or engineered quartzite tends to resist cracking when temperatures swing from 40 °C down to below freezing. Have the slab cut to a slightly larger size than the finished opening; that extra margin lets you install a flexible, uncoupled mortar bed that absorbs movement. Seal the stone with a breathable, marine‑grade sealant so moisture can escape but stains stay out – a small maintenance task that pays off for years.
What maintenance schedule keeps timber vanities looking fresh year after year?
Timber vanities look gorgeous, but the NSW sun can dry them out if you don’t treat them right. Start with a low‑VOC, penetrating oil finish and re‑apply every six months – a quick wipe‑down with a damp cloth followed by a thin oil coat does the trick. Keep the vanity out of direct afternoon glare by adding a simple shade or a frosted glass panel. Finally, check the hardware quarterly; tightening any loose screws prevents the wood from shifting and the veneer from cracking.
Conclusion
We’ve taken a quick walk through a handful of country bathroom renovation ideas that feel both doable and a little bit dreamy for a farm home.
First up, choosing a low‑porosity stone slab – like tightly grained sandstone or engineered quartzite – and giving it a breathable seal keeps the surface strong when the outback swings from scorching heat to a frosty night.
Next, a heritage‑style claw‑foot tub adds that nostalgic charm while standing up to boots, mud and the occasional knock, especially when you pick a double‑coated enamel finish that resists rust.
Then there’s the solar‑powered heated floor – a thin electric mat or water loop fed by the panels you already have, giving you a warm step in the morning without a hefty energy bill.
Don’t forget the reclaimed‑brick accent wall and the multi‑function farmhouse sink‑and‑laundry combo; they bring texture, durability and a clever use of space that every rural bathroom needs.
So, what’s the next move? Grab a notepad, sketch a simple layout of your favourite ideas, and give Awesim Building Contractors a call – we’ll bring the 4×4 fleet, the know‑how and a practical plan straight to your property.
Remember, a renovation that respects the land and the rhythm of farm life will pay off for years to come, keeping your bathroom both beautiful and built to last.


