

A truly successful rural homestead designs start with a deep, practical understanding of the land itself, long before you even think about floor plans. It’s all about creating a resilient, functional home that works with its environment, not against it. This means taking a hard look at everything from sun paths and water flow to the local council rulebook to make sure your build is safe, compliant, and a perfect fit for your unique slice of New South Wales.
Foundations of a Resilient Rural Homestead Design
Building a homestead is so much more than putting up a house; it’s about laying the groundwork for a self-sufficient and lasting lifestyle. The effort you put into this initial assessment phase directly impacts the success and longevity of your whole project. I’ve seen it time and again—rushing this stage almost always leads to costly design flaws and compliance headaches later on.
One of the biggest hurdles in many rural builds is simply getting materials to the site. We’ve tackled this head-on with our specialised 10-tonne 4×4 truck. It allows us to bring in materials and supplies for the most remote properties around New South Wales. This capability means we can bring in labour and materials where and when it’s needed the most, removing those logistical nightmares that can grind a project to a halt.
Reading the Land: Your Building Envelope
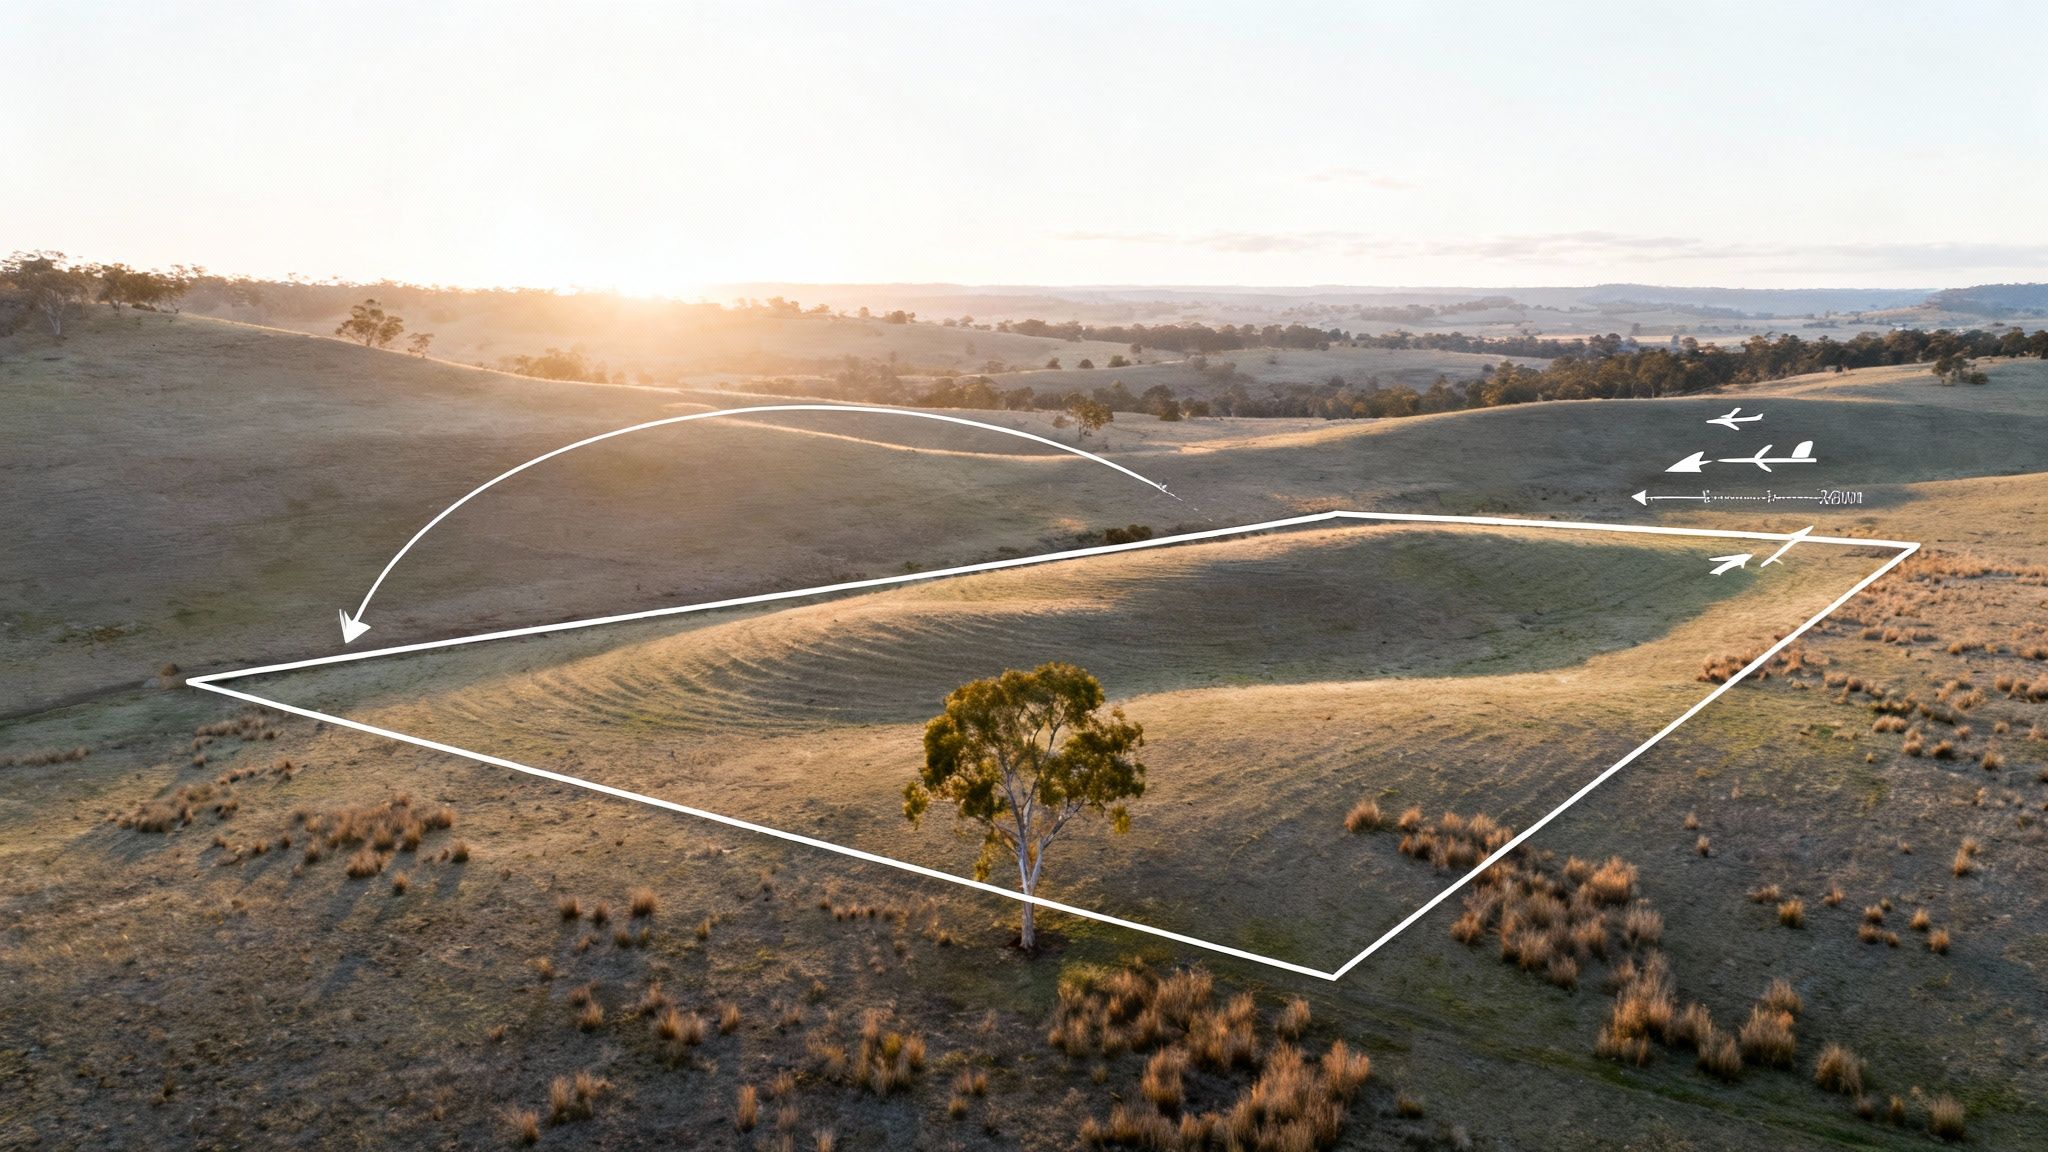
Before you can sketch a single line, you need to pinpoint the ideal building envelope—that specific patch on your property where the house and key infrastructure will live. This isn’t just about picking a spot with the best view; it’s a strategic decision grounded in several critical environmental factors.
A proper site analysis means getting to grips with these core elements:
- Solar Orientation: You want to position the house to welcome the low winter sun for passive heating, while designing eaves and verandahs to block out the harsh summer sun. Getting this right can dramatically slash your energy bills for years to come.
- Prevailing Winds: Figure out where the dominant winds come from. This helps you design for natural cross-ventilation to cool the home and tells you where to plant shelterbelts or position sheds for protection.
- Water Flow and Drainage: After a good downpour, walk the block and see how the water moves. This is absolutely vital for siting your house, sheds, and septic system to prevent future issues with waterlogging, runoff, or erosion.
Getting Your Head Around Key Council Regulations
In NSW, navigating local council requirements is simply non-negotiable. Every Local Government Area (LGA) has its own Local Environmental Plan (LEP) and Development Control Plan (DCP), which are the rulebooks for what you can build and where.
One of the most common oversights I see from new homesteaders is underestimating the impact of environmental overlays and bushfire regulations. Getting a professional assessment early can save you thousands in redesigns and, more importantly, ensure your family’s safety.
Getting these fundamentals right is crucial. For instance, your property will be assigned a Bushfire Attack Level (BAL) rating, which ranges from Low to the extreme Flame Zone (FZ). This rating directly shapes your design, dictating everything from specific construction materials and window types to the amount of clearing required around your home.
Practical Steps for Your Site Assessment
When you first walk your block, try to switch off the “dream home” part of your brain and think like a builder. Where will the access road go? And not just for your ute, but for heavy trucks and machinery during construction. How will you connect to services like power and water, or what are the best spots for off-grid systems like solar panels and water tanks?
This early, practical planning ensures your rural homestead design is solid from the ground up. It’s about creating a place that’s not only beautiful but also truly functional, fully compliant, and in complete harmony with the natural landscape of your NSW property.
Getting the Lay of the Land: Layout and Flow
A good rural homestead is more than just a house on a block. It’s a living, breathing system where every part works together. Shifting from a suburban lot to acreage is a complete mental reset. The real skill is in designing a layout that flows with the natural contours of your land, making the connection between your home, your sheds, and your access roads feel effortless.
Putting serious thought into this layout now is probably the most important thing you’ll do. A smart plan saves you time and hassle every single day for years to come. Get it wrong, and you’re in for a world of frustration. It’s all about making the property work for you, not the other way around.
Think in Zones, Not Just Acres
The best way I’ve found to organise a property is to use a “zone planning” approach. It’s a simple idea that has a massive impact. You basically arrange everything based on how often you need to get to it. This keeps the things you use daily right on your doorstep and saves you thousands of unnecessary steps over the life of your property.
Here’s a practical breakdown of how it works:
- Zone 1: Your Doorstep. This is the heart of your operation—the house itself, your outdoor living spaces, and maybe a small herb or salad garden right near the kitchen.
- Zone 2: Daily Visits. These are the spots you’ll be at least once a day. Think the chook shed for collecting eggs, the main veggie patch, the workshop, and the clothesline.
- Zone 3: Weekly Errands. This zone is for things you access a few times a week. This is where you’d place your orchard, larger paddocks for sheep or goats, and the main machinery shed.
- Zone 4: The Back Paddock. This is the outer ring of your property. It’s for larger grazing areas, the woodlot you source firewood from, and dams or other water sources that don’t need constant attention.
Mapping your property out like this creates a logical flow. It just makes daily chores that much easier and more efficient.
All-Weather Access is Not a ‘Nice-to-Have’
On a rural block, access is everything. I’m not just talking about getting your car to the house. I mean genuine, all-weather access for everything from the feed supplier to a concrete truck. A muddy track in the middle of winter can stop a critical delivery in its tracks and bring your entire project to a grinding halt.
This is where you need to think like a logistician. We know that many of the best blocks in New South Wales are a bit off the beaten path. It’s why we invested in a specialised 10-tonne 4×4 truck. This beast is our secret weapon, allowing us to bring in labour and materials where & when it’s needed the most on remote sites where other builders would be stuck on the bitumen.
Your driveway and internal roads are as critical as your house foundations. Plan for the turning circle of a large truck, make sure the gradient isn’t too steep, and lay down a solid surface like compacted road base that can take the weight, rain or shine.
Work With the Land, Not Against It
The best rural designs have always been shaped by the environment. The old Australian homesteads were a masterclass in this. Built from local timber and stone, their defining feature was almost always the wide, shady veranda—a simple and brilliant response to the harsh climate. In fact, data from the Heritage Council of Victoria shows that around 70% of surviving 19th-century rural homesteads feature these verandas. It’s a testament to a design that just plain works.
That same principle of working with nature applies to managing water. Good drainage is essential for protecting your buildings and preventing erosion. Take the time to watch how water moves across your land during heavy rain. You can then use simple, natural solutions like swales and gentle slopes to guide that water away from your house and sheds and send it down to your gardens or a dam where it can be put to good use.
This is the kind of intelligent design we’re talking about—blending today’s needs with timeless, practical wisdom. It’s how you create a homestead that’s not just functional, but truly belongs to the landscape.
Choosing Materials Built for the Australian Climate
The materials you choose are going to make or break your homestead. Seriously. They’re the difference between a place that stands strong for decades and one that needs constant, expensive upkeep. In the harsh NSW climate, this isn’t just about looks—it’s a long-term investment in durability and resilience against everything from blistering heat to torrential downpours and bushfires.
This is where your grand plans meet the muddy reality of a building site. Before you get too attached to a particular design, you need to weigh up how each material actually performs out here. It’s a constant balancing act between upfront cost, lifespan, and the sheer hard work of installation and maintenance.
And let’s talk logistics. Getting tonnes of steel, timber, and concrete out to a remote block can be a nightmare. We’ve seen it all. That’s why we have a 10-tonne 4×4 truck to bring in materials and supplies for the most remote properties around New South Wales. This allows us to bring in labour and materials where & when it’s needed the most, keeping your project moving, no matter how far off the grid you are.
This infographic really drives home how access, layout, and drainage all have to work together.

Think of it this way: your ability to get materials delivered is just as crucial as where you place your shed or how you manage water runoff.
Homestead Material Comparison for NSW Conditions
Choosing the right materials from the get-go saves a world of headaches down the track. Below is a quick comparison of the workhorses of rural construction, tailored for what they’ll face in New South Wales.
| Material | Best Use Cases | Durability & Maintenance | Bushfire Resistance (BAL) | Estimated Lifespan |
|---|---|---|---|---|
| Colorbond Steel | Roofing, wall cladding, sheds, water tanks, fencing | High durability; low maintenance (occasional wash down) | Excellent (non-combustible) | 50+ years |
| Treated Timber | Structural framing (H2), decks/verandahs (H3/H4), in-ground posts (H4/H5) | Good, but requires correct treatment level; potential for recoating | Poor to Moderate (combustible) | 15-40 years |
| Concrete Slab | House foundations, shed floors, driveways, workshop bases | Extremely durable; very low maintenance (sealing recommended) | Excellent (non-combustible) | 100+ years |
| Hardwood | Feature posts, decking, cladding, high-end structural elements | Very durable but requires regular oiling/staining to prevent greying | Moderate (some species offer better fire resistance) | 25-50+ years |
This table gives you a solid starting point for discussions with your builder, helping you match the material to the job and your budget.
The Superiority of Colorbond Steel
There’s a reason you see Colorbond steel everywhere in the Aussie bush—it just works. It’s been engineered specifically for our brutal environment, making it the go-to for roofing and cladding on rural homesteads. The baked-on finish is incredibly tough, so you’re not spending your weekends repainting flaky, sun-blasted surfaces.
Crucially, it’s non-combustible. In a bushfire-prone area, this is non-negotiable. A properly installed Colorbond roof and wall system is one of your best defences against ember attack, a critical factor for any property with a high BAL rating. The lighter colours also do a fantastic job of reflecting heat, which helps keep your home cooler and your power bills down in summer.
Using Treated Timber Smartly
Timber adds a classic, warm look to any build, but out here, you have to be smart about it. Using the wrong type is like putting out a welcome mat for termites and rot. This is why treated timbers are absolutely essential for any structural work.
It’s all about matching the treatment level to the job:
- Structural Frames: Inside the walls, H2-treated pine is the minimum. It’s protected from rain but still needs to ward off termites.
- Decks and Verandahs: Anything outdoors needs a higher grade of protection. You’ll be looking at H3 or H4-treated pine, or a naturally durable hardwood, to handle the moisture and pests.
- Fencing: For posts going into the ground, you can’t skimp. They need an H4 or H5 treatment to have any chance of lasting.
By choosing the correct treatment level for each part of the build, you’re buying longevity and saving yourself from a world of pain and costly repairs later on. It’s simple: use the right tool for the job.
If you’re keen on exploring more eco-conscious choices, we’ve put together a complete guide to sustainable farm building materials that delves deeper into your options.
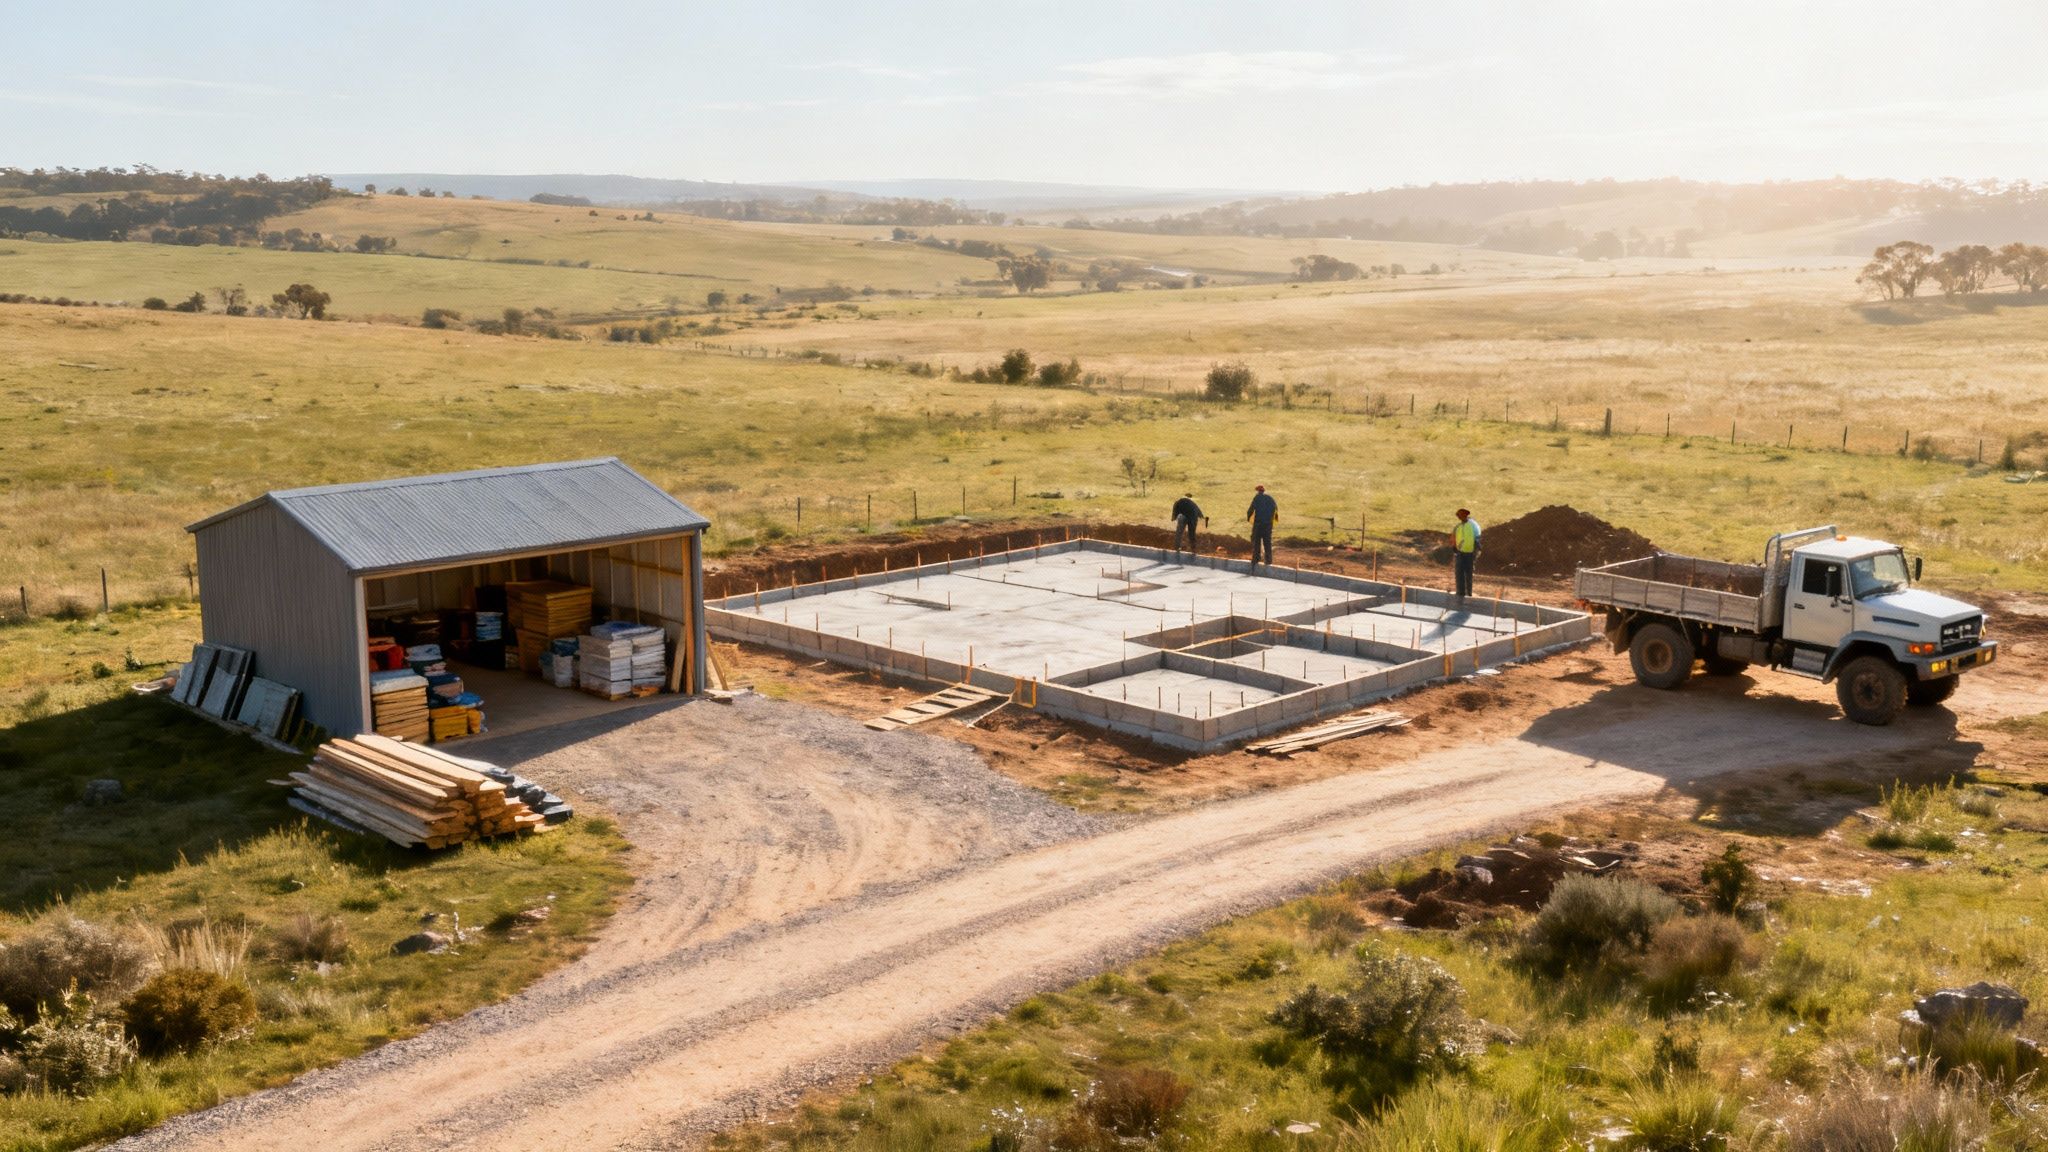
The Unshakeable Foundation of Concrete Slabs
For your house and any decent-sized machinery shed, you can’t beat a professionally engineered concrete slab. It provides incredible strength and stability and forms a permanent barrier against termites. But the final slab is only as good as the prep work that goes into it.
It all starts with proper levelling and compaction of the site—get this wrong and you’re in trouble from day one. Next, steel reinforcement mesh is laid to give the concrete its tensile strength, which stops it from cracking under the massive weight of a house or a heavy tractor. The exact specs for thickness and reinforcement will depend entirely on what the slab is for; a workshop floor needs to be far more robust than a simple patio base. You can even choose the finish, from a practical non-slip broom finish for the shed to a sleek polished surface for your main living areas.
Navigating Council Approvals in New South Wales
So you’ve got a solid plan for your rural homestead. The next big hurdle? Getting it through council. This is where the dream meets reality, and navigating the approvals process is a critical step that can make or break your timeline.
The journey from a Development Application (DA) to a Construction Certificate (CC) might seem intimidating, but it’s a logical process. Think of it as the council’s way of making sure your build is safe, compliant with local rules, and a good fit for the area. Understanding how it works is the best way to avoid expensive hold-ups.
From Development Application to Construction Certificate
First up is lodging your DA with the local council. This is the big-picture review. The council will pull out their Local Environmental Plan (LEP) and Development Control Plan (DCP) to see if your proposal ticks all the boxes. They’re looking at things like zoning, environmental impact, and especially in rural areas, bushfire safety compliance.
To get your DA across the line, you’ll need a comprehensive package of documents. This isn’t the time for guesswork; everything needs to be detailed.
You’ll typically need:
- Detailed Site Plans: These aren’t just sketches. They must show the exact location of your house, sheds, driveways, and septic systems.
- Environmental Impact Reports: Depending on your block, you might need flora and fauna surveys or even an Aboriginal heritage assessment.
- Waste Management Plans: Councils want to see a clear plan for managing both construction waste and your ongoing household waste and wastewater.
Once your DA gets the green light, don’t start ordering materials just yet. You still need a Construction Certificate (CC). This is the nitty-gritty technical review. The CC confirms your final construction plans meet the Building Code of Australia (BCA) and any special conditions from your DA approval. It’s all about how the structure will be built safely and to standard.
Getting the Right Team on Your Side
You don’t have to go it alone. In fact, you shouldn’t. Pulling together a solid team is the smartest move you can make. At a minimum, you’ll need a draftsman or architect for the technical drawings and a certifier—either from the council or a private firm—to issue your CC.
The process can get even more complex if you’re dealing with a heritage property. Australia is home to some incredible historic places, with over 1,200 homesteads on the Australian Heritage Database. If you’re lucky enough to be restoring one, expect a much more detailed approval process to ensure its character is preserved. You can learn more about the incredible legacy of these historic homesteads in Australia and the work being done to save them.
My best advice? Find a rural builder who knows your local council inside and out. They’ve been through it all before, know the common sticking points, and can help you put together an application that anticipates questions before they’re even asked. That kind of insight is invaluable.
Thinking About Logistics and Practicalities
Council approval isn’t just about what’s on paper. You also have to prove your plan is practical. One of the biggest things they’ll look at is site access. Can you guarantee all-weather access for heavy construction vehicles and, just as importantly, emergency services? If your site is steep or remote, this can be a major roadblock if you haven’t thought it through.
This is where a builder with real-world logistical experience proves their worth. For instance, we have a 10-tonne 4×4 truck to bring in materials and supplies for the most remote properties around New South Wales. It means we can get the job done, and it gives the council confidence that the project is actually feasible from day one by allowing us to bring in labour and materials where & when it’s needed the most.
While your main house needs the full DA process, what about smaller sheds and outbuildings? The rules can be a bit different. For a full rundown, check out our guide on whether you need council approval for a shed in NSW.
Getting through the approvals process really boils down to good preparation and having the right people on your team. Address the potential issues head-on, submit a professional application, and you’ll find this bureaucratic step is just a smooth part of the journey to building your homestead.
How to Budget and Stage Your Homestead Build
A great homestead design is only half the battle; the other half is a realistic budget. A solid financial plan and a practical, staged construction timeline are the bedrock of any project that finishes on time and without blowing the bank.
It’s about seeing the whole picture, not just the cost of the house itself. You need to break down every single expense, from the big-ticket items down to the garden taps, to create a clear financial roadmap.
Breaking Down the Major Cost Centres
When you’re budgeting for a rural build, the per-square-metre cost of the house is just one piece of the puzzle. Country properties come with a unique set of expenses that can quickly derail a budget if you haven’t planned for them from the get-go.
I always tell clients to think of their budget in these four main buckets:
- Site Preparation: This is all your initial earthworks, clearing the building envelope, and, crucially, establishing a solid, all-weather access road. Don’t underestimate this one.
- Service Connections: Costs here can swing wildly. Bringing in mains power and water across a few hundred metres is a significant expense, as is setting up off-grid systems like solar, batteries, and septic tanks.
- The Main Build: This is the nuts and bolts—the cost of the house, sheds, and any other structures, which should be clearly detailed in your builder’s contract.
- Finishing and Landscaping: Think of everything that makes the place liveable: flooring, painting, driveways, fencing, water tanks, and starting your gardens.
Site access is often one of the biggest variables we see. That’s exactly why we have a 10-tonne 4×4 truck to bring in materials and supplies for the most remote properties around New South Wales. Having this capability means we can bring in labour and materials where & when it’s needed the most, which is a huge help in controlling logistics costs.
The Power of Staged Construction
Let’s be realistic—very few people have the cash on hand to build their entire dream homestead in one go. Staging the project over several phases is a smart, practical strategy that lets you build at a pace that your finances can handle.
A logical staging plan often looks something like this:
- Infrastructure First: Nail down the fundamentals. Get your access road built and your essential services either connected or installed.
- Sheds and Workshops: Next up, get your primary sheds built. This gives you secure, weatherproof storage for tools and materials when the main house build starts, protecting your assets and saving hassle.
- The Main Residence: With all the core infrastructure in place, you can finally focus the bulk of your budget on building your home.
This phased approach turns a massive, overwhelming project into a series of manageable, achievable steps. For a deeper dive into the numbers, have a look at our guide on budgeting secrets for successful construction farm projects.
Securing Your Budget and Planning for the Unexpected
When it’s time to sign with a builder, a fixed-price contract is your best friend. It locks in the cost for the agreed scope of work, giving you certainty and protecting you from surprise price hikes on materials or labour down the track.
Of course, even the most meticulous plans can hit a snag. This is where a contingency fund is non-negotiable. I always recommend setting aside 10-15% of the total project cost. This buffer is there for the unknowns, like hitting a seam of rock during excavation or discovering you need an upgraded septic system.
It’s interesting to see how much rural home design has changed. We’ve moved from basic farmhouses to incredibly sophisticated country homes. Since the 2000s, over 60% of new rural builds have incorporated open-plan layouts and sustainable design. The average homestead has also grown from around 150 square metres in the 1950s to over 250 square metres today, a clear reflection of our modern desire for more spacious country living. You can see more on how contemporary country homes are made to understand this evolution.
By planning meticulously, staging your build intelligently, and preparing for the unknown, you can ensure your homestead project is a financial success story, not a cautionary tale.
Common Questions About Building a Rural Homestead
When you’re thinking about building a life on a rural block, a million questions pop into your head. It’s a huge undertaking, after all. Below, I’ve answered some of the most common queries we get from clients across NSW, tackling everything from where to start to the real-world costs and challenges of building remotely.
What Is the First Step in Designing a Rural Homestead?
Before you sketch a single line on a floor plan, you need to get out on the land and understand it intimately. This is the absolute first step: a comprehensive site assessment.
We’re talking about walking the ground to understand its topography, figuring out the soil type, and observing the sun’s path across your property. You also need to know which way the prevailing winds blow and identify any potential hazards, like bushfire attack levels (BAL ratings) or flood-prone areas.
This practical information, laid over your local council’s planning rules (the Local Environmental Plan or LEP), gives you the non-negotiable foundation for a design that actually works. Get this right, and everything else flows from there.
How Much Does It Cost to Build a Homestead in Rural NSW?
This is the million-dollar question, and the honest answer is: it varies wildly. The final cost depends on your location, how tricky the site access is, the materials you choose, and the complexity of your design.
As a rough guide, a quality custom home in rural NSW can start anywhere from $2,500 to over $4,000 per square metre.
But here’s the crucial part: that figure is just for the house itself. You absolutely must budget for the significant site costs that come with rural blocks. Think about expenses like building long driveways, connecting to the grid (or setting up an off-grid system), installing septic and water tanks, and the earthworks needed to create a stable building pad. Always push for a detailed quote that spells out these site-specific costs.
How Can I Make My Homestead Design More Sustainable?
True sustainability is about building a resilient home that works with the environment, not against it. It’s about more than just a few solar panels.
A smart design starts with passive solar principles—orienting the house to capture the winter sun for warmth and shield it from the harsh summer heat. This alone can slash your heating and cooling bills.
From there, you can integrate large rainwater tanks to secure your water supply, and specify high-performance insulation and double-glazed windows to keep the indoor temperature stable. Choosing durable, low-maintenance materials like Colorbond steel and planning for future solar power generation will lower your home’s environmental impact for decades to come.
How Do You Manage Construction on a Remote Property?
This is where so many rural builds fall apart. Logistics are everything. It’s one thing to have a great design, but if you can’t get materials and trades to the site reliably, your project will be plagued by delays and budget blowouts.
This is precisely why we invested in specialised equipment. We have a 10-tonne 4×4 truck to bring in materials and supplies for the most remote properties around New South Wales, allowing us to bring in labour and materials where and when it’s needed the most.
This truck is our solution to one of the biggest headaches in rural construction. It means we’re not at the mercy of a muddy track or a steep incline. We can keep your project moving forward, no matter how far off the beaten path you are, ensuring the build stays on track and on budget.
Ready to turn your rural homestead vision into a reality? The team at Awesim Building Contractors has the experience and specialised equipment to manage your project from concept to completion, no matter how remote your NSW property is. Visit us online to discuss your project today.


2 Comments